RTMIS Self-Host Installation Guide
Installation Guide
Below step is for self-host or on-prem installation process. Please follow Developer-Guide to setup the development environement.
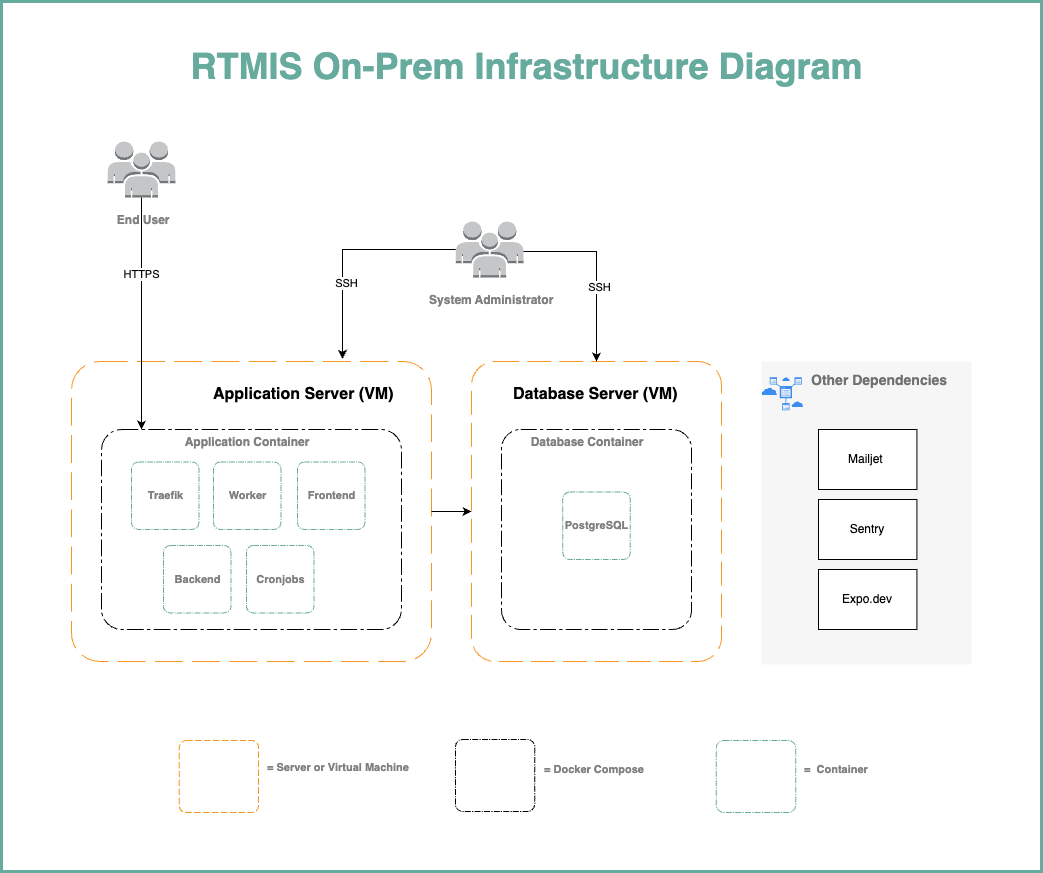
Infrastructure Diagram

System Requirements
Application Server
- CPU: 2 GHz Dual Core Processor
- Memory: 4 GiB
- Storage: 25 GiB or more Disk Space
- Operating System: Ubuntu Server 22.04 - x86_64 (AMD/Intel)
- IP: 1 public IP (plus 1 private IP if the database server in private IP)
Database Server
- CPU: 2 GHz Dual Core Processor
- Memory: 4 GiB
- Storage: 25 GiB or more Disk Space
- Operating System: Ubuntu Server 22.04 - x86_64 (AMD/Intel)
- IP: 1 private or public IP
Prerequisite
- Servers: Application and database servers provisioned as specified above
- Domain: Domain or Subdomain which pointed to the server's public IP
- Docker Engine: 20.10 or above
- Git: 2.39 or above
-
3rd Party Service Providers:
- Mailjet: Mail delivery service
- Sentry: Error tracking
- Github Account: Code repository and CI/CD tool platform
- Expo: Mobile application build service
Preparation
Note: The following guide is an example installation on Ubuntu and Debian based systems. You need the below depedencies installed both on Application Server and Database Server.
Install Docker Engine
-
Install Docker engine:
sudo curl -L https://get.docker.com | sudo sh -
Manage Docker for a non-root user.
sudo usermod -aG docker $USER exit -
The above
exitcommand will close your terminal session. Please log back in to the previous user before continuing to the next steps.
Install Git Version Control
The RTMIS uses git as version control. Therefore it is better to install git to make it easier to retrieve updates instead download the repository zip.
sudo apt install git
Install Database Server
Execute the commands below on the server allocated for the database server.
Clone the Repository
cd ~
mkdir src
cd src
git clone https://github.com/unicefkenya/rtmis.git .
Environment Variable Setup
Install text editor to be able to edit .env file
sudo apt install nano
or
sudo apt install vim
Go to the repository directory, then edit the environment
cd deploy
cp db.env.template db.env
vim db.env
Example Environment:
POSTGRES_PASSWORD=<<your postgres user's password>>

# Ensure the values below match those in the app.env file in the application.
DB_USER=<<your rtmis db user>>
DB_PASSWORD=<<your postgresql password>>
DB_SCHEMA=<<your rtmis schema name>>
Run the Database Server
docker compose -f docker-compose.db.yml up -d
Install Application Server
Execute the commands below on the server allocated for the application server.
Clone the Repository
cd ~
mkdir src
cd src
git clone https://github.com/unicefkenya/rtmis.git .
Environment Variable Setup
Install text editor to be able to edit .env file
sudo apt install nano
or
sudo apt install vim
Go to the repository directory, then edit the environment
cd deploy
cp app.env.template app.env
vim app.env
Example environment variables:
DB_HOST=<<your postgresql ip>>
DB_PASSWORD=<<your postgresql password>>
DB_SCHEMA=<<your rtmis schema name>>
DB_USER=<<your rtmis db user>>
POSTGRES_PASSWORD=<<your postgres user's password>>
DEBUG="False"
DJANGO_SECRET=<<your Django secret key>>
MAILJET_APIKEY=<<your mailjet api key from mailjet portal>>
MAILJET_SECRET=<<your mailjet api secret from mailjet portal>>
WEBDOMAIN=<<your exposed domain url, example : https://rtmis.akvo.org>>
APK_UPLOAD_SECRET=<<your apk upload secret>>
STORAGE_PATH="./storage"
SENTRY_DSN="<<your sentry DSN for BACKEND>>"
TRAEFIK_CERTIFICATESRESOLVERS_MYRESOLVER_ACME_EMAIL=<<administrator email for Letsencrypt registration>>
Build the Documentation
CI_COMMIT=initial docker compose -f docker-compose.documentation-build.yml up
Build the Frontend
CI_COMMIT=initial docker compose -f docker-compose.frontend-build.yml up
Run the Application
docker compose -f docker-compose.app.yml up -d --build
Data Seeding for Initial Data
Once the app is started, we need to populate the database with the initial data set. The required initial dataset are:
- Seed administration
- Seed super admin
- Seed form
- Seed organization
docker compose -f docker-compose.app.yml exec backend ./seeder.prod.sh
Cheatsheets
Manual Update the Application
Execute the command below on the application server to update the application with the latest codes and re-deploy to the application server:
$ cd deploy/
$ ./manual_update.sh
Restart the Application
Execute the command below on the application server to restart the application container:
$ cd deploy/
$ ./restart_app.sh
Clear Nginx Cache
Execute the command below on the application server:
$ docker compose -f docker-compose.app.yml exec -u root frontend sh -c "rm -rf /var/tmp/cache/*"
Remove Form
Execute the command below on the application server.
Login to container:
$ docker compose -f docker-compose.app.yml exec backend sh
After logged in, execute belo commands:
$ python manage.py shell
> from api.v1.v1_forms.models import Forms
> f = Forms.objects.filter(name="Short HH").first()
> f.delete()
Exit from the container and execute below command: Execute the command below on the application server
$ docker compose -f docker-compose.app.yml exec -u root frontend sh -c "rm -rf /var/tmp/cache/*"
Execute the Cronjob Manually
Execute the command below on the application server to triggering the cronjob manually.
$ docker compose -f docker-compose.app.yml exec backend-cron ./job.sh
Generate Django Secret
$ python3 -c 'import secrets; print(secrets.token_hex(60))'

No comments to display
No comments to display