# RTMIS Self-Host Installation Guide

## Installation Guide

Below step is for self-host or on-prem installation process. Please follow [Developer-Guide](https://github.com/akvo/rtmis/blob/main/README.md) to setup the development environement.

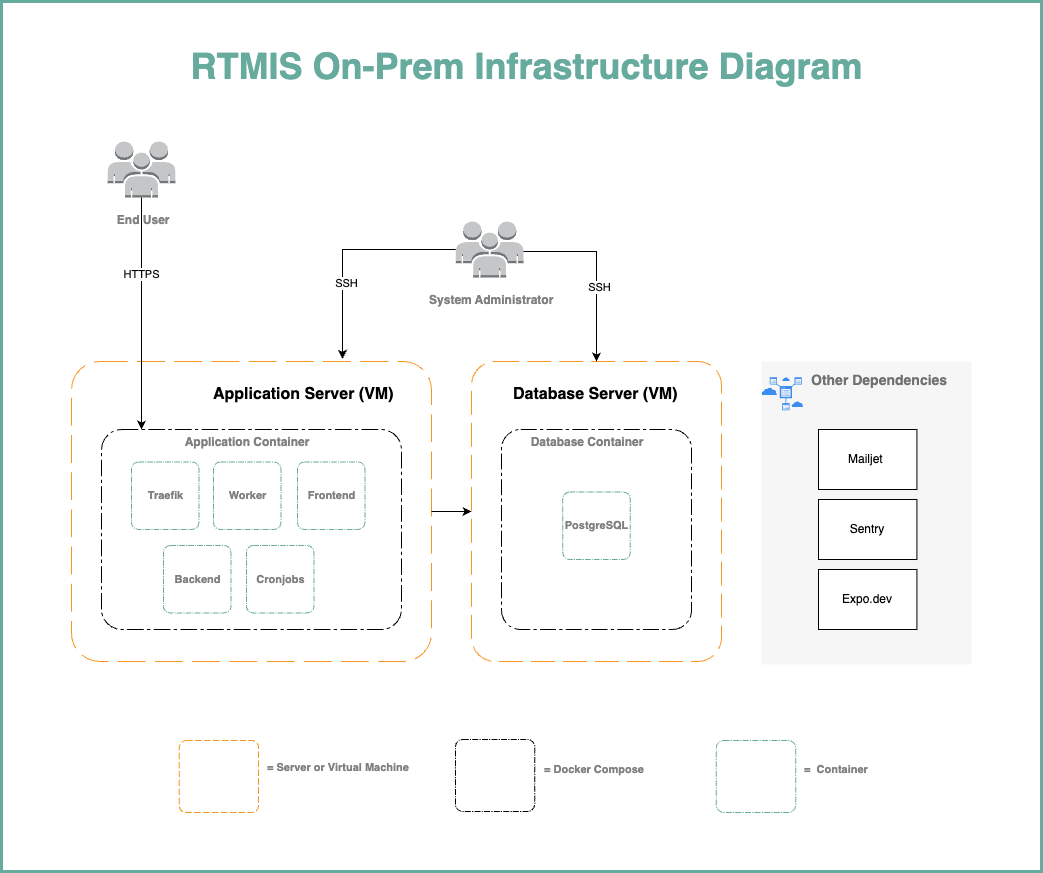
### Infrastructure Diagram
<div drawio-diagram="209"><img src="https://wiki.cloud.akvo.org/uploads/images/drawio/2024-07/ZXzUt1ZsLNtKs76h-drawing-12-1721196280.png"></div>

## System Requirements
#### Application Server
- **CPU:** 2 GHz Dual Core Processor
- **Memory:** 4 GiB
- **Storage:** 25 GiB or more Disk Space
- **Operating System:** Ubuntu Server 22.04 - x86\_64 (AMD/Intel)
- **IP:** 1 public IP (plus 1 private IP if the database server in private IP)

#### Database Server
- **CPU:** 2 GHz Dual Core Processor
- **Memory:** 4 GiB
- **Storage:** 25 GiB or more Disk Space
- **Operating System:** Ubuntu Server 22.04 - x86\_64 (AMD/Intel)
- **IP:** 1 private or public IP


## Prerequisite

- **Servers:** Application and database servers provisioned as specified above
- **Domain:** Domain or Subdomain which pointed to the server's public IP
- **Docker Engine:** 20.10 or above
- **Git:** 2.39 or above
- **3rd Party Service Providers:**
    - Mailjet: Mail delivery service
    - Sentry: Error tracking
    - Github Account: Code repository and CI/CD tool platform
    - Expo: Mobile application build service

## Preparation

**Note:** The following guide is an example installation on **Ubuntu and Debian based systems**.
You need the below depedencies installed both on **Application Server** and **Database Server**.

#### Install Docker Engine

1. Install Docker engine:

    ```
    sudo curl -L https://get.docker.com | sudo sh
    ```
2. Manage Docker for a non-root user.
    ```
    sudo usermod -aG docker $USER
    exit
    ```
2. The above `exit` command will close your terminal session. Please log back in to the previous user before continuing to the next steps.

#### Install Git Version Control

The RTMIS uses git as version control. Therefore it is better to install git to make it easier to retrieve updates instead download the repository zip.

```
sudo apt install git
```
## Install Database Server
Execute the commands below on the server allocated for the **database** server.

#### Clone the Repository

```
cd ~
mkdir src
cd src
git clone https://github.com/unicefkenya/rtmis.git .
```

#### Environment Variable Setup

Install text editor to be able to edit `.env` file

```
sudo apt install nano
```

or

```
sudo apt install vim
```

Go to the repository directory, then edit the environment

```
cd deploy
cp db.env.template db.env
vim db.env
```

Example Environment:

```
POSTGRES_PASSWORD=<<your postgres user's password>>

# Ensure the values below match those in the app.env file in the application.
DB_USER=<<your rtmis db user>>
DB_PASSWORD=<<your postgresql password>>
DB_SCHEMA=<<your rtmis schema name>>
```

#### Run the Database Server

```
docker compose -f docker-compose.db.yml up -d 
```


## Install Application Server
Execute the commands below on the server allocated for the **application** server.

#### Clone the Repository

```
cd ~
mkdir src
cd src
git clone https://github.com/unicefkenya/rtmis.git .
```

#### Environment Variable Setup

Install text editor to be able to edit `.env` file

```
sudo apt install nano
```

or

```
sudo apt install vim
```

Go to the repository directory, then edit the environment

```
cd deploy
cp app.env.template app.env
vim app.env
```

Example environment variables:

```
DB_HOST=<<your postgresql ip>>
DB_PASSWORD=<<your postgresql password>>
DB_SCHEMA=<<your rtmis schema name>>
DB_USER=<<your rtmis db user>>
POSTGRES_PASSWORD=<<your postgres user's password>>
DEBUG="False"
DJANGO_SECRET=<<your Django secret key>>
MAILJET_APIKEY=<<your mailjet api key from mailjet portal>>
MAILJET_SECRET=<<your mailjet api secret from mailjet portal>>
WEBDOMAIN=<<your exposed domain url, example : https://rtmis.akvo.org>>
APK_UPLOAD_SECRET=<<your apk upload secret>>
STORAGE_PATH="./storage"
SENTRY_DSN="<<your sentry DSN for BACKEND>>"
TRAEFIK_CERTIFICATESRESOLVERS_MYRESOLVER_ACME_EMAIL=<<administrator email for Letsencrypt registration>>
```

#### Build the Documentation

```
CI_COMMIT=initial docker compose -f docker-compose.documentation-build.yml up
```

#### Build the Frontend

```
CI_COMMIT=initial docker compose -f docker-compose.frontend-build.yml up
```

#### Run the Application

```
docker compose -f docker-compose.app.yml up -d --build
```

#### Data Seeding for Initial Data

Once the app is started, we need to populate the database with the initial data set. The required initial dataset are:

1. Seed administration
2. Seed super admin
3. Seed form
4. Seed organization

```
docker compose -f docker-compose.app.yml exec backend ./seeder.prod.sh
```

## Cheatsheets

#### Manual Update the Application
Execute the command below on the application server to update the application with the latest codes and re-deploy to the application server:
```
$ cd deploy/
$ ./manual_update.sh
```

#### Restart the Application
Execute the command below on the application server to restart the application container:
```
$ cd deploy/
$ ./restart_app.sh
```

#### Clear Nginx Cache
Execute the command below on the application server:
```
$ docker compose -f docker-compose.app.yml exec -u root frontend sh -c "rm -rf /var/tmp/cache/*"
```

#### Remove Form
Execute the command below on the application server. 

Login to container:
```
$ docker compose -f docker-compose.app.yml exec backend sh
```
After logged in, execute belo commands:
```
$ python manage.py shell
> from api.v1.v1_forms.models import Forms
> f = Forms.objects.filter(name="Short HH").first()
> f.delete()
```
Exit from the container and execute below command:
Execute the command below on the application server
```
$ docker compose -f docker-compose.app.yml exec -u root frontend sh -c "rm -rf /var/tmp/cache/*"
```

#### Execute the Cronjob Manually
Execute the command below on the application server to triggering the cronjob manually.
```
$ docker compose -f docker-compose.app.yml exec backend-cron ./job.sh
```

#### Generate Django Secret
```
$ python3 -c 'import secrets; print(secrets.token_hex(60))'
```

&nbsp;
&nbsp;
&nbsp;