Developer Guidelines
Version Manager
Akvo is using GitHub as main version control system. By using GitHub, we can ensure that our code-base is well-managed and that changes are thoroughly reviewed and approved before they are added to the code-base, ultimately improving the quality and stability of our software. Here are the most important rules of that have to be consider:
Branch Protection Rules
-
Require pull request reviews before merging: This rule requires that all changes to a branch be submitted as a pull request, and that at least one other team member approves the changes before they can be merged into the main branch.
-
Require status checks to pass before merging: This rule requires that certain conditions be met before a pull request can be merged. For example, we require that all tests pass in the CI and certain code quality coverage metrics are met.
- Require a minimum number of reviewers (at least one reviewers): This helps to ensure that changes are thoroughly reviewed before merging.
- Restrict who can push to the branch: This rule limits who can make changes to a branch, helping to prevent accidental or unauthorized changes.
Branch Naming
It's important to have a clear and consistent naming convention for your branches. A good naming convention for Feature Branches is to use the following format: feature/<issue_number>-<issue_description>. For example, feature/13-backend-test-setup.
Make sure that you have the issue number is available on GitHub
Here's what each part of the naming convention means:
-
feature/: This is a prefix that identifies the branch as a feature branch. -
<issue_number>: This is the number of the issue or task that the branch is related to. -
<issue_description>: This is a brief description of the issue or task. It should be short but descriptive enough to give an idea of what the branch is about.
Using this naming convention makes it easy to identify which branches are related to which issues or tasks. It also helps to keep our branches organized and easy to manage.
Pre-Commit Config
Pre-commit config is a configuration file used by the pre-commit framework to define a set of code checks, also known as "hooks," that are run before code is committed to a version control system. The pre-commit framework is a tool that allows developers to define and manage these hooks locally, providing a way to catch errors early and enforce coding standards.
Example: [#363] Pre-commit initial config
It is true that Continuous Integration/Continuous Delivery (CI/CD) pipelines can also catch errors and enforce coding standards. However, pre-commit hooks have some distinct benefits that make them complementary to CI/CD pipelines.
Pull Request
In our projects, each team is relatively small, and developers often work independently. This makes PR (Pull Request) reviews critical, as they allow other developers to understand the project better, which is essential for cross-team knowledge and backup in case of absence. Although Deden (Lead Developer) is the primary person responsible for reviewing code, it is not mandatory that he handles every review.
Benefits of Code Reviews
- They help ensure code quality, maintainability, and alignment with the project’s goals.
- They allow the team to share knowledge about features and code structures, reducing bottlenecks when someone is unavailable.
- They encourage best practices, such as adhering to DRY, KISS, and YAGNI principles.
- They provide a learning opportunity for both the code author and the reviewer.
As a Requester
-
Move the Task to the PR Review Section
Move the task related to the feature you're asking to be reviewed into the PR Review section on the Asana's current Sprint board (e.g. Sprint #2). -
Provide the PR Link
Ensure that the GitHub PR link is added to the "GitHub" field in the Asana task.
-
Assign a Reviewer
Assign the reviewer for your code in Asana. Talk to the Lead Developer on your project to confirm who to assign the PR too. Usually one person is appointed for a project, but we remain flexible based on the workload of said person and the timeliness needed for the review. Escalate to the Delivery Manager or CTO if you are blocked. -
Assign the Reviewer in GitHub
Don’t forget to also assign the same reviewer in the GitHub PR. -
Follow Up on Delayed Reviews
If the assigned reviewer hasn’t been able to review your code after 2 days, report it in the relevant Slack channel, mentioning the reviewer. You can use #team-tech-general or the specific project’s channel #proj-<project-name>-tech. Escalate to the Delivery Manager or CTO if you remain blocked. -
Ensure CI Passing and Test Coverage
Make sure your code passes all CI checks. Additionally, unit tests are mandatory, or at the very least, integration tests (e.g., testing API endpoints) should be included if it’s a back-end feature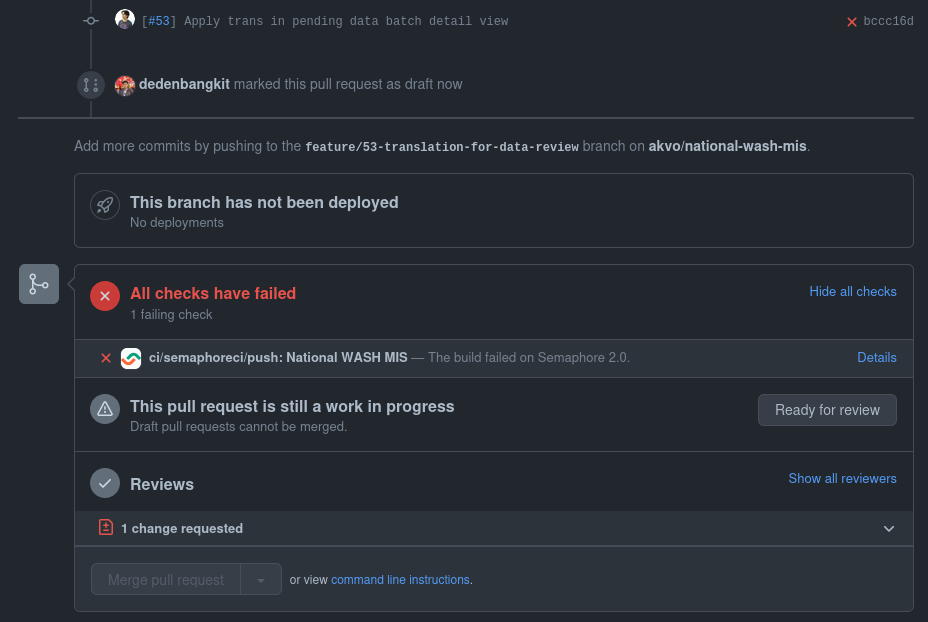
As a Reviewer
-
Check PR Readiness
Confirm that the code is marked as "Ready to Review" in both GitHub and Asana. If the PR is still in draft or missing the GitHub PR link in Asana, notify the requester to update it. -
Ensure CI Status
If the PR hasn’t passed the CI checks, reassign the task back to the requester and move the task to the In Progress section. -
Understand the Feature’s Context
Carefully read the task description in Asana, paying special attention to the goals and purpose outlined in the Tech AC (Acceptance Criteria) section or Low-Level Design. Check if there’s a QA plan—if so, you might want to manually test the feature as well. -
Run and Inspect the Code (if necessary)
For larger or more complex PRs, run the code locally. Also, review code quality by running linters or quality checks if required. Evaluate the code’s adherence to best practices like. -
Log Your Review Time
Track the time you spend reviewing the code. The review ideally should not takes longer than an hour, log your time in the Asana task itself and Clockwise (or General, with notes) to accurately reflect the effort. -
Check the Target Branch
Ensure that the PR is targeting the correct branch (usuallymain) since the QA team will test the code manually after it’s deployed to the main branch.
When the Review is Completed
-
Reassign to the Developer
Once the review is done, reassign the task back to the developer. Keep the task in the PR Review section on Asana. -
Move to QA if Necessary
If you know who the QA person is, move the task to the QA section in Asana and assign it to the appropriate person. The QA is typically the Project Manager, who may not be highly technical. If there’s nothing for them to test, you can simply mark the task as "Done." -
Limit Feedback Cycles
It is desirable to keep the number of iterations to a minimum as each iteration can add delays to the development process. The author of the PR should ensure that they have done thorough testing and review before submitting the PR for review, and try to incorporate feedback as much as possible in a single iteration.
As a general rule of thumb, most teams aim to keep the number of iterations between 1 and 3
Code Format
A consistent code format is important for several reasons:
-
Readability: A consistent code format makes it easier for team members to read and understand the code, even if they didn't write it themselves.
-
Maintainability: Consistent formatting makes it easier to maintain the code over time. When code is formatted consistently, it's easier to spot errors and to make changes to the code without introducing new errors.
-
Collaboration: Consistent formatting makes it easier for team members to collaborate on code. If everyone is following the same format, it's easier to understand each other's code and to work together to solve problems.
Prettier - JavaScript
Some common best practices for JavaScript code formatting include:
- Using consistent indentation, such as two or four spaces per level
- Using camelCase for variable and function names
- Placing opening braces on the same line as the associated statement or declaration
- Using semicolons to terminate statements
- Using single quotes for strings, unless the string contains a single quote
- Using === and !== instead of == and != for comparisons
- Limiting line lengths to 80-120 characters to improve readability.
Example: .prettier.json
{
  "trailingComma": "es5",
  "tabWidth": 2,
  "useTabs": false,
  "semi": true,
  "singleQuote": true,
  "printWidth": 80,
  "singleAttributePerLine": true
}
Python - Black
-
Indentation: Use four spaces per indentation level. Avoid using tabs or a mix of tabs and spaces for indentation.
-
Line length: Keep lines of code to a maximum of 79 characters. If a line needs to be longer, break it into multiple lines.
-
Naming conventions: Use lowercase letters for variable names, and separate words with underscores. Use Capitalized for class names, and lowercase_with_underscores for module names.
-
Imports: Import one module per line, and place imports at the top of the file. Use relative imports for intra-package imports.
-
Function and class definitions: Use two blank lines to separate function and class definitions from other code.
-
Blank lines: Use blank lines to separate logical sections of code. For example, use a single blank line to separate method definitions in a class.
Example: setup.cfg
[flake8]
max-line-length = 79
inline-quotes = single
accept-encodings = utf-8
isort-show-traceback = True
# Excluding some directories:
exclude = .git,__pycache__

[tool.black]
line-length = 79
Text Editor Setup
Visual Studio Code
To use the Flake8 in VS Code, you can install the "Python" extension from the VS Code marketplace. This extension provides a built-in linter that can use the Flake8 configuration in your setup.cfg file. Once you have the extension installed, open a Python file in VS Code and the linter should automatically start providing feedback on your code.
To use the Black in VS Code, you can install the "Python" extension and the "Black" extension from the VS Code marketplace. Once you have both extensions installed, you can enable Black as the default formatter by adding the following line to your VS Code settings:
"python.formatting.provider": "black"With this setting enabled, VS Code will automatically format your code using Black whenever you save a Python file. You can also customize how VS Code reads your setup.cfg file by adding the following line to your VS Code settings:
"python.linting.flake8Path": "/path/to/flake8"To auto-format your JavaScript code using Prettier in Visual Studio Code (VS Code), you can install the Prettier extension from the VS Code marketplace. This extension provides automatic code formatting using the Prettier code formatter.
Open your VS Code settings by pressing Ctrl+, (Windows and Linux) or Command+, (macOS). In the search bar at the top of the settings window, search for "Prettier". Under "Prettier: Config Path", enter the path to your .prettier.json configuration file. With these settings in place, whenever you save a JavaScript file in VS Code, the Prettier extension will automatically format your code according to the options specified in your .prettier.json configuration file.
Vim / Neo-Vim
You can also use the Prettier and Black in Vim by adding the following lines to your Vim configuration file:
" Format code using Black and Prettier when saving
augroup autoformat
    autocmd!
    autocmd BufWritePre *.py :%!black -
    autocmd BufWritePre *.js :silent! %!prettier --stdin --semi --single-quote --no-bracket-spacing --tab-width 2
augroup END
GNU Emacs
For Emacs, you can use the before-save-hook feature to run a command before saving the file. Add following lines to your ~/.emacs.d/init.el:
;; Format Python code using Black when saving
(defun format-python-code-with-black ()
  (when (eq major-mode 'python-mode)
    (progn
      (call-process-region
       (point-min) (point-max) "black" t t nil "-")
      (save-buffer))))

;; Format JavaScript code using Prettier when saving
(defun format-javascript-code-with-prettier ()
  (when (eq major-mode 'js-mode)
    (progn
      (call-process-region
       (point-min) (point-max) "prettier" t t nil "--stdin" "--single-quote" "--no-bracket-spacing" "--tab-width=2")
      (save-buffer))))

(add-hook 'before-save-hook #'format-python-code-with-black)
(add-hook 'before-save-hook #'format-javascript-code-with-prettier)
Please ask questions or raise concerns if you're not sure how to follow the code format
Quality Control
These standards is defined by Project maintainer / Team Lead, it should follow best practices and established coding conventions. There are many aspects to code quality, but some common factors include:
- Readability: The code should be easy to understand and follow, with clear and consistent formatting and naming conventions.
- Maintainability: The code should be modular and easy to modify, with clear separation of concerns and a well-defined structure.
- Efficiency: The code should be optimized for performance and resource usage, with efficient algorithms and data structures.
- Robustness: The code should handle errors and unexpected inputs gracefully, with appropriate error handling and testing.
- Security: The code should be designed with security in mind, with appropriate measures to protect against potential vulnerabilities and attacks.
Example python code that following code quality standards:
def calculate_average(numbers):
    if not isinstance(numbers, list):
        raise TypeError("Input must be a list of numbers.")

    if len(numbers) == 0:
        return 0

    total = sum(numbers)
    return total / len(numbers)
This code is a function that calculates the average of a list of numbers. It follows some good coding practices, such as:
- Checking the input parameter to make sure it's a list before proceeding
- Handling the case where the input list is empty
- Using descriptive variable names that make the code easier to understand
- Using Python's built-in functions like
isinstanceandsumto write concise and readable code - Raising a meaningful exception when the input is not of the expected type
On the other hand, here's an example of bad code that doesn't follow code quality standards:
def avg(num1, num2, num3):
    if not isinstance(num1, (int, float)):
        return "num1 must be a number"
    if not isinstance(num2, (int, float)):
        return "num2 must be a number"
    if not isinstance(num3, (int, float)):
        return "num3 must be a number"

    sum = num1 + num2 + num3
    average = sum / 3
    return average
This code also calculates the average of three numbers, but it's written in a way that violates good coding practices, such as:
- Hard-coding the number of input parameters, which would require changing the code if we wanted to calculate the average of more or fewer numbers
- Returning a string message instead of raising an exception when the input is not of the expected type
- Using a variable name
sumthat's the same as a built-in Python function, which can cause confusion and errors - Not handling cases where the input values might be invalid or lead to errors
There are also several principles that are widely recognized as important for writing high-quality code. Here are some of the most important ones:
SOLID
SOLID is an acronym for a set of principles that were developed to guide object-oriented design. The principles are:
- Single Responsibility Principle: Each class should have a single responsibility.
- Open-Closed Principle: Classes should be open for extension but closed for modification.
- Liskov Substitution Principle: Sub-types should be substitutable for their base types.
- Interface Segregation Principle: Clients should not be forced to depend on interfaces they don't use.
- Dependency Inversion Principle: High-level modules should not depend on low-level modules; both should depend on abstractions.
Code example:
class Circle:
    def __init__(self, radius):
        self.radius = radius

    def area(self):
        return 3.14 * (self.radius ** 2)

class Square:
    def __init__(self, side):
        self.side = side

    def area(self):
        return self.side * self.side

shapes = [Circle(5), Square(10)]
total_area = sum(shape.area() for shape in shapes)
This code defines two classes, Circle and Square, each with a single responsibility of calculating its own area. This adheres to the Single Responsibility Principle of SOLID. Both classes use a common interface (the area() method) that makes them interchangeable, which adheres to the Liskov Substitution Principle. The code is also open to extension (adding new shapes) but closed to modification, which adheres to the Open-Closed Principle.
Example of code that does not follow SOLID:
class User:
    def __init__(self, name, email):
        self.name = name
        self.email = email

    def save(self):
        # Code to save user to database
        pass

class UserManager:
    def __init__(self):
        self.users = []

    def add_user(self, name, email):
        user = User(name, email)
        self.users.append(user)
        user.save()
This code defines two classes, User and UserManager. The User class has the responsibility of storing information about a single user, and the UserManager class has the responsibility of managing a list of users and saving them to a database. However, the UserManager class violates the Single Responsibility Principle by having both responsibilities of creating users and saving them to the database. This makes the code harder to maintain and test.
References:
- https://towardsdatascience.com/solid-coding-in-python-1281392a6a94
- https://realpython.com/solid-principles-python
DRY - Don't Repeat Yourself
This principle states that we should avoid duplicating code and instead aim to write code that is reusable and modular.
Code Example:
# DRY approach
def calculate_sum(numbers):
    return sum(numbers)

def calculate_average(numbers):
    if not numbers:
        return 0
    return calculate_sum(numbers) / len(numbers)
This code calculates the sum and average of a list of numbers. Instead of duplicating the code to sum and average the list of numbers, the calculate_sum function is defined and reused in the calculate_average function. This makes the code more concise, easier to maintain and less error-prone.
Example of code that does not follow DRY:
# Not DRY approach
def calculate_sum(numbers):
    total = 0
    for num in numbers:
        total += num
    return total

def calculate_average(numbers):
    total = 0
    for num in numbers:
        total += num
    if len(numbers) == 0:
        return 0
    return total / len(numbers)
This code also calculates the sum and average of a list of numbers, but it repeats the code to calculate the sum in both functions. This makes the code longer, harder to maintain and more error-prone. If a bug is found in the sum calculation, it would have to be fixed in both functions.
By refactoring the code to follow the DRY principle, we could improve the code quality and avoid duplicating code. This would lead to more maintainable and efficient code in the long run.
References:
- https://realpython.com/lessons/zen-of-python/
- https://medium.com/technology-hits/dry-dont-repeat-yourself
KISS - Keep It Simple, Stupid
This principle suggests that we should aim for simplicity in our code and avoid unnecessary complexity.
Code Example:
def is_palindrome(word):
    return word == word[::-1]
Above code defines a function that checks whether a given word is a palindrome (i.e. reads the same backward as forward). The function is concise and easy to understand, adhering to the KISS principle.
Example of code that does not follow KISS:
def calculate_fibonacci(n):
    if n == 0:
        return 0
    elif n == 1:
        return 1
    else:
        return calculate_fibonacci(n-1) + calculate_fibonacci(n-2)
This code defines a function that calculates the nth number in the Fibonacci sequence recursively. While this code is functional, it can be hard to read and understand, especially for those who are not familiar with the Fibonacci sequence or recursive functions. This violates the KISS principle by introducing unnecessary complexity.
References:
- https://code-specialist.com/code-principles/kiss
- https://softwareengineering.stackexchange.com/questions/178294/kiss-principle-applied-to-programming-language-design
YAGNI - You Aren't Gonna Need It
This principle suggests that we should avoid adding functionality to our code until we actually need it.
Code Example:
def multiply_numbers(num1, num2):
    return num1 * num2
This code defines a function that multiplies two numbers together. It does only what is needed for the immediate task and does not add any unnecessary functionality.
Example of code that does not follow YAGNI:
class Question:
    def __init__(self, name: str, options: list, type: TypeEnum):
        self.name = name
        self.options = options
        self.type = type

    def set_options(self, options):
        self.options = options
This code defines a Question class with several attributes and methods, including attributes for options, and methods for adding options for the options attribute. However, it's unclear whether all of these attributes and methods will be used in the immediate project, and whether they will be needed in the future. By Adding unnecessary functionality and complexity to the code violates the YAGNI principle.
References:
- https://dev.to/richardwynn/yagni-principle-in-100-seconds-1i6j
- https://solidstudio.io/blog/deep-dive-into-kiss-and-yagni
Clean Code
The idea of clean code is to write code that is easy to read, understand, and maintain. This involves using clear and descriptive variable and function names, following good coding conventions, and breaking code up into small, modular functions. Example:
def find_missing_number(numbers):
    """Find the missing number in a list of consecutive numbers."""
    n = len(numbers)
    expected_sum = (n + 1) * (n + 2) // 2
    actual_sum = sum(numbers)
    return expected_sum - actual_sum
This code defines a function that finds the missing number in a list of consecutive numbers. The function is well-organized, has a clear and descriptive function name and documentation, and uses clear and concise variable names. This adheres to the Clean Code principle of writing code that is easy to read, understand, and maintain.
Example of code that does not follow Clean Code:
def fmnm(nmbrs):
    n = len(nmbrs)
    es = (n + 1) * (n + 2) // 2
    ac = sum(nmbrs)
    return es - ac
This code defines the same function as the previous example, but with poorly named variables and an unclear function name. It's harder to understand what the code does and what the variables represent.
References:
Test-Driven Development
Test-Driven Development (TDD) is considered a best practice in software development for several reasons:
-
Improved Code Quality: TDD promotes writing high-quality code by focusing on small units of functionality at a time. Developers write tests before writing the code, which helps clarify the expected behavior and ensure that the code meets those requirements. By continually running tests during development, developers can catch bugs early, leading to cleaner and more robust code.
-
Faster Debugging and Bug Fixing: With TDD, bugs are often caught early in the development process since tests are executed frequently. When a test fails, it indicates the presence of a bug. Developers can then pinpoint the issue quickly and fix it before moving forward. This iterative approach saves time in the long run by reducing the debugging phase.
-
Facilitates Refactoring: Refactoring is the process of improving code without changing its behavior. TDD provides a safety net for refactoring by ensuring that tests act as a safety harness. Developers can confidently make changes to the code-base, knowing that if they accidentally introduce a bug, the tests will catch it. This ability to refactor code without fear encourages cleaner and more maintainable code-bases.
-
Regression Detection: TDD's incremental and iterative nature ensures that changes to the code-base are made in small, manageable steps. After each step, developers run the tests to verify that the existing functionality is still intact. If a test fails, it immediately highlights a regression, indicating that the refactoring has unintentionally broken existing behavior. This immediate feedback helps pinpoint the cause of the regression, allowing developers to quickly identify and rectify the issue.
-
Documentation and Examples: Test cases serve as a form of documentation for the code-base. They provide concrete examples of how the code should behave and can act as living documentation for other developers. Newcomers to the code-base can understand the intended functionality by reading the tests, facilitating faster on-boarding and reducing reliance on outdated or missing documentation.
-
Confidence and Peace of Mind: TDD gives developers confidence in their code-base. Passing tests indicate that the code behaves as expected, reducing uncertainty and providing peace of mind. Developers can make changes to the code-base with confidence, knowing that if they accidentally break something, the tests will quickly alert them.
While TDD has many advantages, it may not be suitable for every situation or team. It requires discipline and initial investment in writing tests, which can slow down the development process in the short term.
Example of TDD
Let's say we want to create a simple function that adds two numbers together. Using TDD, we would follow these steps:
- Write a test case that defines the behavior of the function:
import unittest class TestAddition(unittest.TestCase): def test_add_numbers(self): result = add_numbers(2, 3) self.assertEqual(result, 5) - Run the test case and observe that it fails since the add_numbers function does not exist yet.
- Implement the
add_numbersfunction to pass the test:
def add_numbers(a, b): return a + b - Run the test case again and verify that it passes.
ensure that your code is testable and you are only writing code that is necessary pass the test.
References:
- https://www.linkedin.com/pulse/what-advantages-test-driven-development-fortegroup
- https://www.codica.com/blog/test-driven-development-benefits/
- https://www.geeksforgeeks.org/advantages-and-disadvantages-of-test-driven-development-tdd/
Documentation
Documentation serves as a valuable resource for current developers, and future maintainers, and maintaining the software. Here are a minimum requirements for Documentation:
-
API Documentation: This type of documentation focuses on explaining the usage, inputs, outputs, and behavior of application programming interfaces (APIs). It helps developers integrate and interact with the code-base effectively.
-
Installation and Configuration Guides: These guides explain the installation process, system requirements, and configuration options for deploying and setting up the software environment.
-
Release Notes: Release notes provide information about new features, bug fixes, known issues, and compatibility changes in each software release. They help users and stakeholders understand the changes and potential impacts of an upgrade.
- User Manuals: User manuals or guides are created to assist end-users in understanding how to use the software. They typically provide step-by-step instructions, explanations of features, and troubleshooting tips.
Important points about documentation:
-
Keep it Up to Date: Regularly review and update documentation to ensure its accuracy and relevance. Outdated or incorrect documentation can be misleading and counterproductive.
-
Balance Detail and Conciseness: Document important details without overwhelming the reader. Use clear and concise language, provide examples, and consider different audiences' needs.
-
Use Consistent Formatting: Establish a consistent formatting style throughout the documentation to enhance readability. Use headings, bullet points, and formatting conventions to structure the content effectively.
-
Include Examples and Visuals: Examples, diagrams, and screenshots can significantly enhance understanding, especially for complex concepts or workflows. Visual aids help illustrate relationships, dependencies, and system flows.
-
Make it Searchable: Use proper organization and indexing techniques to make documentation easily searchable. This enables users to quickly find the information they need.
-
Collect Feedback: Encourage users and developers to provide feedback on the documentation. Feedback can help identify areas for improvement, clarify ambiguities, and address common pain points.
References:
- https://blog.jetbrains.com/writerside/2022/01/the-holy-grail-of-always-up-to-date-documentation/
- https://medium.com/@lanceharvieruntime/code-documentation-waste-of-time-or-vital-for-success-in-c-and-c-development-c1618c0c2f7a
Tests
It's essential to include testing in your development process to catch bugs early and ensure that your application meets the required quality standards. There are several types tests that you should consider writing to ensure the quality and reliability of your code.
Unit tests
These tests are written to test the smallest units of code in isolation, such as individual functions or methods. They are usually automated and should be written for every new piece of code you add to your application.
Example: test_category_data_frame.py
Integration tests
These tests check how different parts of the application work together. They test how components interact and ensure that the application functions as expected when all the pieces are put together.
Example: tests_form_approval.py
Functional tests
These tests focus on testing the application's features and functionalities. They ensure that the user's requirements are met and that the application works as intended.
Example: geo.test.js
Performance tests
These tests are designed to check the application's ability to handle a large number of users and data without slowing down or crashing.
Example: test_10_stress_and_timeout.py
Security tests
These tests ensure that the application is secure and that sensitive data is protected from unauthorized access.
Example: test_01_auth.py
End-to-end tests
In an end-to-end test, the system is tested as a whole, without any isolation of its components. This means that the tests encompass the entire stack of the software system, including the user interface, application logic, and database. The objective of these tests is to verify that the software system is functioning as expected and that the user's needs are met.
Example: 00_login_with_verified_super_admin.side
Code Coverage
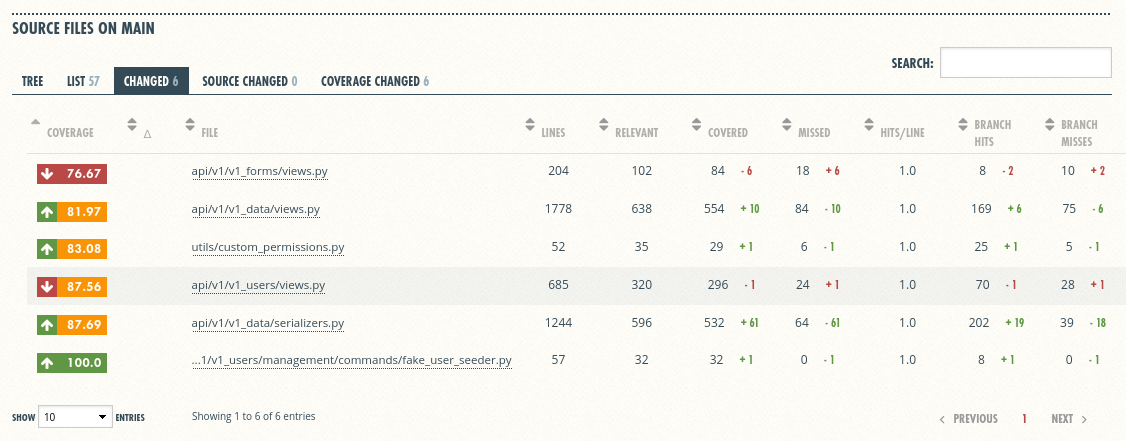
Code coverage is a measure of how much of a software application's source code is executed during the testing process. It is used to determine the effectiveness of software testing and the quality of the testing suite. Code coverage is expressed as a percentage, representing the percentage of code that was executed during testing. For example, if a test suite runs through 80% of the lines of code in a software application, then the code coverage is said to be 80%.
Coveralls
Tech consultancy team uses Coveralls because it provides a simple and efficient way to measure code coverage in our development process. Coveralls can be integrated with GitHub repositories to provide code coverage reports for each pull request, allowing developers to quickly and easily identify code changes that have impacted test coverage. With this integration, we can ensure that all changes to the code-base are properly tested, and we can catch any regressions before they make it into the main code-base.
Example code coverage summary by Coveralls:
Example coveralls notifications on Pull Requests:
Minimum Coverage Requirements
Based on the Tech Consultancy KPI, we must established a minimum code coverage requirement of 80%
This means that at least 80% of the source code in our projects must be executed during testing. We have set this requirement to ensure that our software is thoroughly tested and that we are delivering high-quality products to our customers. By striving for a minimum code coverage of 80%, we can identify areas of the code that are not being adequately tested, and we can ensure that we are catching potential issues before they make it into production. We encourage the TC team to aim for a code coverage percentage higher than the minimum requirement, as this will help us to build more reliable and robust software.
Continuous Integration / Continuous Delivery
By implementing Continuous Integration/Continuous Delivery (CI/CD) with Semaphore or GitHub Workflows, we continuously build, test, and deploy code changes in a repeatable, automated way. This means that our development and operations teams can collaborate more effectively and identify issues early on in the development process, leading to faster resolution and a more stable application.
Semaphore CI
Semaphore (Semaphore CI) is the most frequently used for Tech Consultancy Projects. Particularly dealing with Kubernetes deployment, Semaphore provides more customization options for workflow execution environments and integrates with Kubernetes for seamless deployment.
Semaphore also provides more advanced customization options for workflow execution environments, such as custom Docker images and caching, which can help speed up your builds and deployments.
Example config:
---
version: v1.0
name: RTMIS
agent:
  machine:
    type: e1-standard-2
    os_image: ubuntu1804
global_job_config:
  secrets:
    - name: GCP
    - name: docker-hub-credentials
    - name: coveralls
    - name: rtmis
  prologue:
    commands:
      - echo "${DOCKER_PASSWORD}" | docker login --username
        "${DOCKER_USERNAME}" --password-stdin
      - export CI_COMMIT="${SEMAPHORE_GIT_SHA:0:7}"
      - export CI_BRANCH="${SEMAPHORE_GIT_BRANCH}"
      - export CI_TAG="${SEMAPHORE_GIT_TAG_NAME}"
      - export CI_PULL_REQUEST="${SEMAPHORE_GIT_REF_TYPE/pull-request/true}"
      - export CI_COMMIT_RANGE="${SEMAPHORE_GIT_COMMIT_RANGE}"
      - export CLOUDSDK_CORE_DISABLE_PROMPTS=1
      - export COMPOSE_INTERACTIVE_NO_CLI=1
      - export COVERALLS_REPO_TOKEN="${COVERALLS_RTMIS_TOKEN}"
      - export SERVICE_ACCOUNT=/home/semaphore/credentials
blocks:
  - name: 'Build, Test & Push'
    skip:
      when: "tag =~ '.*'"
    task:
      prologue:
        commands:
          - checkout
          - cache restore "npm-$(checksum frontend/package.json)"
          - cache restore "node-modules-$(checksum frontend/package.json)"
          - cache restore "pip-$(checksum backend/requirements.txt)"
          - cache restore "images-${SEMAPHORE_PROJECT_ID}"
          - cache restore "$SEMAPHORE_PROJECT_ID-$SEMAPHORE_GIT_BRANCH"
      epilogue:
        commands:
          - cache store "npm-$(checksum frontend/package.json)" "$HOME/.npm"
          - cache store "node-modules-$(checksum frontend/package.json)"
            "frontend/node_modules"
          - cache store "pip-$(checksum backend/requirements.txt)"
            "backend/.pip"
          - cache store "images-${SEMAPHORE_PROJECT_ID}" "ci/images"
          - cache store "$SEMAPHORE_PROJECT_ID-$SEMAPHORE_GIT_BRANCH"
            "$HOME/.cache"
      jobs:
        - name: Build & Test
          commands:
            - ./ci/build.sh
            - ./ci/deploy.sh
  - name: "Promote to production"
    run:
      when: "tag =~ '.*'"
    task:
      jobs:
        - name: Promote to production
          commands:
            - checkout
            - ./ci/deploy.sh
Source: https://github.com/akvo/rtmis
GitHub Workflows
In some other cases, when we only need to run tests or code quality checks (e.g. develop a package library), Semaphore may not be needed. That's why we take advantage of the GitHub Workflow, because it's simple, integrated, and easy to use.
Example config:
name: Build & Test
on:
  push:
    branches:
      - main
      - feature*
  pull_request:
    branches:
      - main
jobs:
  build:
    runs-on: ubuntu-latest
    strategy:
      matrix:
        python: [3.8, 3.9]
    steps:
      - uses: actions/checkout@v2
      - name: Setup Python
        uses: actions/setup-python@v2
        with:
          python-version: ${{ matrix.python }}
      - name: Install Tox and any other packages
        run: pip install tox
      - name: Run Tox
        # Run tox using the version of Python in `PATH`
        run: tox -e py
  test:
    runs-on: ubuntu-latest
    steps:
      - name: Checkout
        uses: actions/checkout@v2
      - name: Run Container
        env:
          COVERALLS_REPO_TOKEN: ${{ secrets.COVERALLS_REPO_TOKEN}}
        run: docker compose -f "docker-compose.ci.yml" up --exit-code-from backend
Source: https://github.com/akvo/Akvo-ResponseGrouper
Slack Notifications
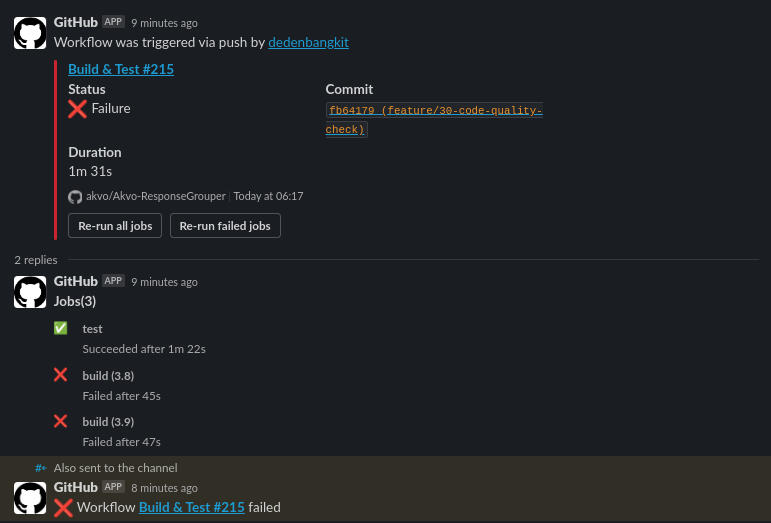
When a build fails in your CI/CD pipeline, it's important for developers to take prompt action to resolve the issue. Here are some steps that developers can take when a build fails:
- Review the build logs: The first step is to review the build logs to identify the cause of the failure. The logs should provide detailed information about what went wrong, such as error messages or stack traces.
- Reproduce the issue: Once the cause of the failure has been identified, the next step is to reproduce the issue locally.
- Fix the issue: Once the issue has been reproduced, developers should work to fix the problem.
- Test the fix: After making the necessary changes, developers should test the fix locally to ensure that it resolves the issue.
- Communicate with the team: Finally, it's important for developers to communicate with their team about the issue and the steps taken to resolve it.
Example GitHub Workflows Notification on Slack:
Example Semaphore Notification on Slack:
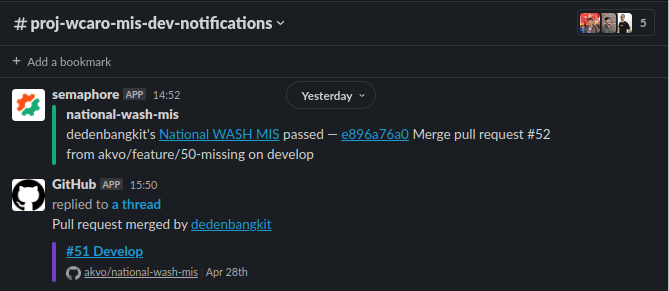
Typically you will get notification of the CI status in different channels on Slack (e.g #proj-wcaro-mis-dev-notifications)
Release / Deployment
Draft for @Anjar
Summary
Developer Sprint should only started after we have a design document that outlines the system architecture, data models, algorithms, and other technical details. During the developer sprint, the development team works on developing new features or fixing bugs that have been identified. Sprints are typically short, time-boxed periods of development that focus on a specific set of tasks that already estimated in Asana tasks.
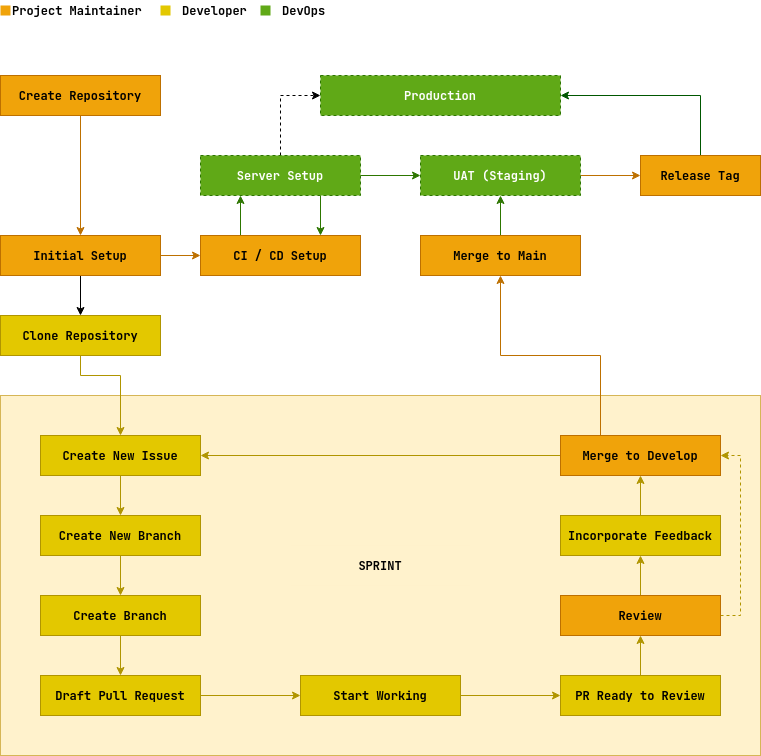
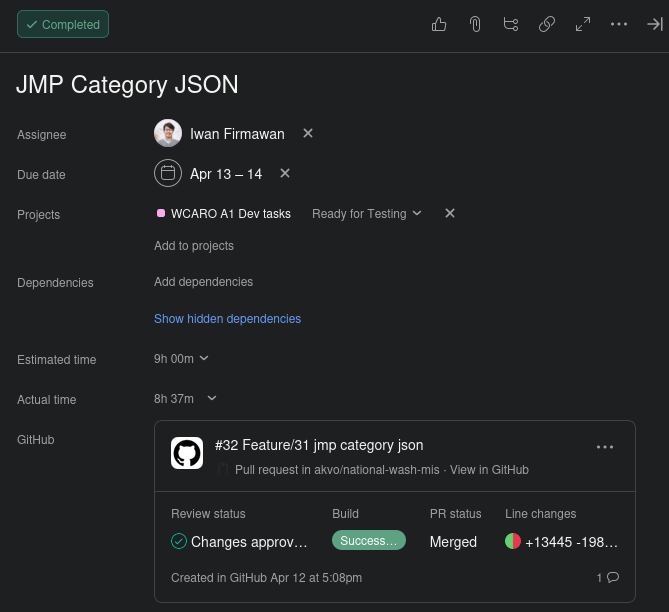
At the end of each sprint, the team should mark the Asana tasks as completed with it's Actual time.
Example of a competed task in Asana:
FAQ
I did git commit and found that my local branch is not updated, how to justify it?
If you merge your local branch into the origin branch, there will be only a single commit reported on the origin branch you've merged even if your local branch has multiple commits, regardless of whether you use a plain git pull or with --squash merge. You should always do git pull --rebase instead of git merge.
I've run the test locally and everything is fine, but why did the build fails?
Become friends with your broken builds. So, your build fails… what exactly does that mean? You can always check the pipeline build from https://akvo.semaphoreci.com/projects/<repo_name>. Checking the job output should point you to a failing test. There are several reasons:
- Build or Deploy code has an error, DevOps to blame.
- Network test (eg. basic.sh) is error. Meaning that there are missing URLs or the network/proxy is misconfigured.
- Code Quality (Flake, ES-Lint, or Prettier) warning


No comments to display
No comments to display