Support & Quality
- Product Support Workflow
- How To Tag Tickets
- Product Support Dashboard
- Support for multiple products
- QA Process
- QA Process For PMs
Product Support Workflow
No support without a ticket 😘
The help desk provides technical support to end users, troubleshoots customer and user issues, and/or guides them through specific tasks and actions. The fundamental aim of our help desk is to provide swift and effective resolutions for user queries and act as a one-stop shop to manage all customer queries, complaints, needs, requests and support. It is essentially a single point of communication between Akvo and end users and helps resolve any product issues swiftly and effectively.
What Is The Support Process?
- The user can solve an issue through the self-help tools, namely the online support portal for each of our tools. We are constantly adding new articles as features are released, and updating older materials. The support documentation can be found here
- If the user can’t find what they need in the self help documentation, they can request specific 1st line support. The first line support evaluates the request, categorizes it as a bug, question or feature request. L1 also prioritizes the issue based on severity/impact/urgency and queues it. If the issue can be resolved quickly the solution is communicated back to the partner by L1. Additional tagging of tickets by hub, partner and category for further reporting.
- If the request happens to require 2nd line support (meaning this needs more technical support, involving server adjustments or fixes in the code) and an issue is added to GitHub. Any updates, workarounds etc., are communicated back to the partner by L1 support.

How to Categorize Issues?
|
Severity |
Definition |
|
Critical Impact |
Production application down or major malfunction resulting in in-operative condition. |
|
Significant Impact |
Critical loss of application resulting in high number of users unable to perform their normal functions. Major failure; inconvenient workaround or no workaround exists. |
|
Minor impact |
Moderate loss of application functionality or performance resulting in multiple users impacted in their normal functions. Minor feature/product failure, convenient workaround exists/minor performance degradation. |
|
Low impact |
Minor loss of application functionality, cosmetic issues. |
How To Tag Incoming Tickets?
See this page.
Response Time
The support team commits to responding to issues within 1 working day.
How To Reach Out To Support?
The strong preference is for users to submit requests via the Contact Us form in the support portal.
To create a support request, follow the below steps:
- Locate the Contact Us form - Look for a link or button labelled "Contact Us" on the product support pages.
- Enter your information - On the contact form page, enter your name, email address, the hub you work with, the product you need help with, and any other information required by the form. Also select whether you are reporting a bug, requesting a feature or have a question.
- Write your message - Use the message box provided to write your inquiry or message. Be clear and concise, and include any necessary details to help us understand your request. See guidelines below on how to write appropriate messages.
- Review and submit - Before submitting the form, review all of the information you've entered to make sure it's accurate and complete.
Please reach out on Slack to make sure we attend to the ticket if it is urgent.
If a client reaches out to you directly:
- Inform clients that a ticket will be created for them
- Make sure the client knows that the support team will end up reaching out to them over email (support ticket)
How To Properly Document A Support Issue?
Sharing as much information as possible helps us in researching and replicating the issue. “It doesn’t work” makes it very hard to research a problem.
A general guideline on what to provide:
- What were you doing - the action the user was performing
- What did you expect to happen - expected result
- What actually happened
- Steps to reproduce the problem - Any steps that will help reproduce the problem
- Flow specific - Dashboards, folders, surveys, assignments, device IDs, IMEI, etc.
- RSR specific - User roles / account, specific project, organization, RSR page, etc.
- Lumen specific - Instance, user, dataset, visualization, dashboard, etc.
- Device specific - Type of computer/browser, type of phone or tablet, app version (and connected dashboard)
Rationale
The process of submitting all produced related inquiries, issues, and complaints through the help desk ticketing system will ensure that your requests are logged and tracked, and our support team can address your needs in a timely and organized manner. Additionally, by following this process, we can document and analyze the data collected from your requests; This data will allow us to measure our performance and identify areas for improvement.
How To Tag Tickets
|
Tag |
Description |
|
Hub |
The hub from which the client/partner is managed from. Can be one off East-Africa, Europe, West-Africa, Asia, Americas.
The following tags are available on Re:amaze for the regions partners are managed from:
|
|
Partner |
The partner/client name. The partner tag beings with a “#instance-” followed by the partner name e.g. for Nuffic the partner tag is "#instance-nuffic" for Wemos "#instance-wemos" etc. |
|
Category |
Groups tickets by whether it is a question, bug or feature request. When triaging a ticket the support office the following tags are available for this:
|
|
Escalation Status |
Flags whether the ticket required additional input from L2. This is for tickets that are not resolved by L1 usually bugs or feature requests. The available tag options for this are:
|
|
Impact |
Categorizes tickets by the severity of the impact. The description of each of this can be found here. |
|
Issue |
A brief tag that describes the issue being reported by the user e.g. data import or export, user management etc. No standard classification. But be mindful of reusing existing tags as much as possible. |
Product Support Dashboard
See the dashboard here.
What Is the Product Support Dashboard?
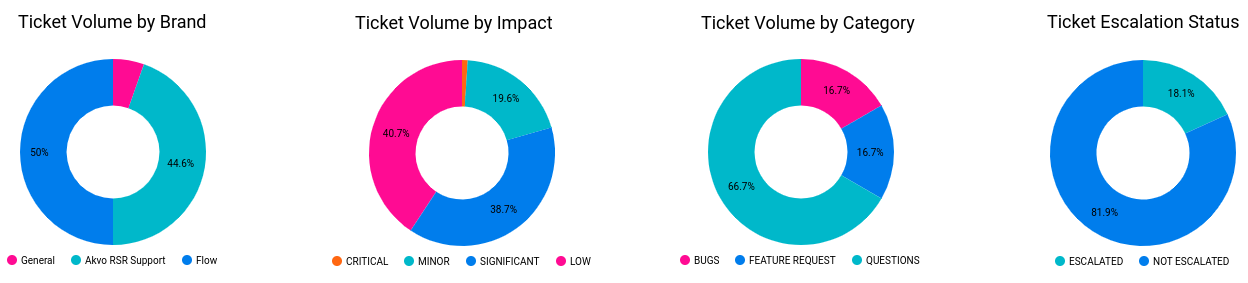
A ticket dashboard collects all client tickets and provides a centralized place for support teams to view and manage the issues and requests. The dashboard provides a quick, visual overview of ticket status, ticket volume and overall team performance.
What does each chart mean?
Volume Reports
The Volume report shows you a summary and detailed breakdown of customer support requests. It gives you an idea of how "busy" things are in the world of support.
There are 3 volume reports grouped by:
- The product/brand
- The impact/severity of the issue
- The category of the ticket
- Escalation Status
There is an additional volume report that shows which partners have raised the most number of tickets and a summary of the same by date.
Average Response Time
The Average Response Time report tells how fast your team is getting back to customers. It's a metric on quality of support and the reports show you when you're doing well and when there are deficiencies in speed.

Filtering The Dashboard
Support for multiple products
To set up Freshdesk to allow customers to raise tickets for different products, start by configuring multiple support email addresses—one for each product e.g isco@akvo.org, idc@akvo.org etc. This ensures that tickets are categorised based on the product they relate to. Once done, on the contact us form there is a Product dropdown, allowing customers to specify the product when submitting a ticket.
Additionally, we set up Automation Rules (Admin > Automations) to automatically assign tickets to the relevant support agents or collaborators based on the product selection.
This setup allows us to also have different SLAs for each product where needed.
QA Process
How QA fits Into the Global Delivery Framework
In Akvo’s Global Delivery Framework (GDF), Quality Assurance (QA) plays a structured and strategic role, particularly within the project implementation and software development phases. QA is not a separate or standalone step, but an integrated part of the project lifecycle, aimed at ensuring high-quality delivery and partner satisfaction.
Integration With GDF Tools and Processes
QA work supports the Project Dashboard and PRO (Project Report Out) submissions:
-
QA status updates feed into the project traffic light system (Green, Yellow, Red).
-
QA outcomes affect decisions related to scope, timeline, and budget adjustments.
QA in the GDF ensures that Akvo’s project delivery is:
-
Structured - Embedded early in the project life cycle through test planning and documentation.
-
Collaborative - Works closely with TPMs, Project Managers, and Dev teams.
-
Measured - QA outcomes directly inform PRO submissions and project status.
-
Quality-driven - Ensures deliverables meet defined standards before reaching the client
This systematic QA integration helps Akvo achieve its core GDF objectives:
-
Increased project quality and partner satisfaction
-
Improved internal operational efficiency
Scope of the QA Role
The QA will focus on functional testing to ensure that features work as intended. At the initial stage, the focus will be on manual testing using TestLodge to support testing.
The goal of this will be to:
-
Standardize testing practices to maintain consistency across projects.
-
Improving functional test coverage across various projects and use cases.
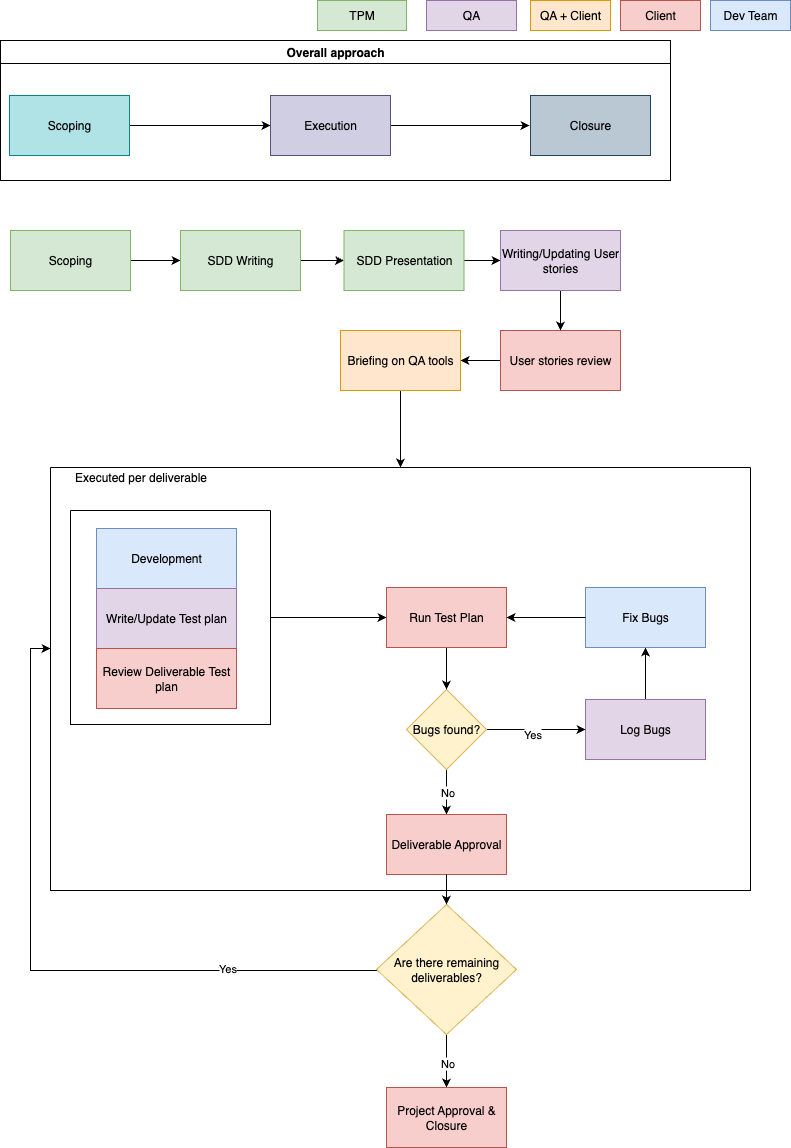
Scoping
Defines the boundaries, objectives, and priorities of the project. The output from this step (scoping notes or high-level technical outline) clarify what will be developed.
SDD Writing
The TPM creates a System Design Document (SDD) that outlines what needs to be built, detailing technical aspects, feature requirements, and dependencies. For QA, it acts as a foundational reference that clarifies how different user stories relate to the overall system, helping ensure consistency and coverage during testing.
SDD Presentation
The team reviews the SDD together. This is a chance to ask questions, flag missing info, and ensure there's a shared understanding of the approach. The QA uses this to begin designing test cases.
Writing/Updating User Stories
QA uses the SDD to shape or refine user stories, making sure they reflect the latest understanding of the feature. If some stories already exist, they’re updated to align with any new details or decisions.
User Stories Review
The QA team, TPM and the client go through each user story to ensure it's clear, complete, and meets the requirements. This is also where edge cases and test scenarios begin to emerge.
Briefing on QA Tools
QA gives the client a quick walkthrough of the tools (Testlodge in this case) like where to find test cases, how bugs will be logged, and how everyone will stay in sync during testing.
Per Deliverable Execution
Development
The development team begins building the feature or component. This includes writing code, reviewing it internally, and getting everything ready for testing.
Write or Update Test Plan
As the feature takes shape, QA prepares a test plan tailored to that specific deliverable. It spells out what will be tested, how it will be tested, and what outcomes are expected. This ensures nothing important is missed.
Review Deliverable Test Plan
Before testing begins, the test plan is reviewed by the TPM, client and QA team. This step helps confirm that all relevant scenarios are covered and that the test plan matches the deliverable's scope.
Run Test Plan
QA runs through each test case to confirm everything works as expected and to catch any issues early. The client also reviews the deliverable either on their own or together with QA using the test cases as a guide. This collaborative approach helps ensure the feature meets expectations from both technical and user perspectives. Any bugs or feedback are documented and sent to the development team. If everything passes, the deliverable moves on to approval.
Log Bugs
When issues come up during testing, QA logs them in Asana complete with clear steps to reproduce, screenshots (if needed), and an assessment of how serious each bug is.
Fix Bugs
Developers then work on fixing the reported issues. Once fixes are in place, they let QA know so retesting can begin. This back-and-forth may happen a few times until everything checks out.
Deliverable Approval
Once testing is complete and all issues are resolved, the deliverable goes through a final review and is formally approved by the TPM and the client. If there are more deliverables in the pipeline, the process starts again with the next one.
Project Approval & Closure
When all deliverables have been completed and approved, the project moves into its final stage. A final sign-off is done, and all stakeholders are informed that the project is officially closed.
Responsibilities
|
Task |
TPM |
PM |
QA Team |
Dev Team |
|
Drive scoping |
R |
A |
I |
I |
|
Write and present SDD |
A |
R |
I |
I |
|
Review and finalise SDD |
R |
A |
I |
I |
|
Write, execute, and update test cases |
I |
I |
A/R |
C |
|
Provide final QA sign-off |
I |
I |
A/R |
C |
|
Develop features |
A |
C |
C |
R |
|
Fix defects based on QA feedback |
A |
I |
C |
R |
A - Accountable R - Responsible C - Consulted I - Informed
QA Onboarding process
For a QA specialist to integrate effectively into a project, the following steps should be taken:
-
Review Design Documentation - Gain an understanding of the project scope, objectives, and user requirements by reading design documents.
-
Examine UI/UX Designs - Study wireframes and prototypes to understand the user flows and interface expectations.
-
Engage with Developers - Ask clarifying questions about functionality, edge cases, and system constraints.
-
Receive QA Task Assignments - Developers/TPM/PM will delegate specific QA tasks that require manual verification and testing.
Tooling
TestLodge is a user-friendly, cloud-based test management tool used to support manual quality assurance (QA) processes. It allows teams to create, manage, and execute test cases.
TestLodge is primarily used for the following:
-
Writing and organizing test cases based on project requirements and features.
-
Executing test runs during development sprints and UAT (User Acceptance Testing) phases.
-
Collaborating with clients, who can be granted access to view or contribute to test progress and outcomes.
-
Logging and tracking issues by integrating with Asana.
Using TestLodge ensures transparency, traceability, and structured QA practices, while making it easy for both internal teams and clients to stay aligned on testing progress and feedback.
(Record a 3 minute video walk-through for PMs)
Collaboration Between QA, PM, and Dev Teams
Effective QA reporting at Akvo depends on close collaboration between the QA, Project Management (PM), and Development teams. QA specialists share regular updates on test progress, bugs, and blockers through test reports generated in TestLodge. These reports are linked directly to related Asana tasks, making it easy for the team to track what needs attention. Each issue includes clear steps to reproduce, relevant screenshots, and any context that helps speed up resolution. PMs use this information to adjust timelines and communicate with clients, while developers rely on QA input to prioritize bug fixes and enhance feature stability. The use of shared tools like Asana, TestLodge, and Slack ensures real-time visibility, efficient task tracking, and quicker resolution of issues. This helps maintain product quality while ensuring alignment on delivery goals.
Best practices and lessons learnt
Key best practices include:
-
Writing clear, reusable, and traceable test cases.
-
Starting QA planning early in the project lifecycle.
-
Testing incrementally, in parallel with development.
-
Documenting bugs with precise reproduction steps and screenshots.
-
Involving PMs and clients in UAT preparation and execution.
Project Retrospectives
Akvo encourages a culture of continuous improvement by integrating feedback at every stage of the QA cycle. After each project, retrospectives are held to reflect on what went well, what didn't, and how testing processes can be improved. Client feedback gathered during UAT or post-deployment is also reviewed to identify missed edge cases or usability concerns. This information can then be used to refine and improve QA workflows.
Additional materials
QA Process For PMs
📥 Click here to download or play the video
What is QA?
Quality Assurance (QA) is a collaborative effort that ensures we deliver a product that meets partner expectations, works reliably, and is ready for real-world use. It is not just about testing, but building confidence in the product together with the partner.
This document outlines your role in the QA process. While our QA team leads the testing efforts, your input and feedback at key stages is required for the successful delivery of projects
Purpose & Benefits
Quality
We identify and fix bugs early, and validate our work against requirements with the partner, often.
Shared Accountability
We tie partner validations to our deliverables and payments.
Timeline & Budget Control
We do not move backwards, i.e. what is done is done.
Shared Confidence
The process is transparent and collaborative.
Our Software Delivery Process, In A Nutshell
To ensure clarity, transparency, and quality throughout our collaboration, we follow a simple but structured three-stage approach:
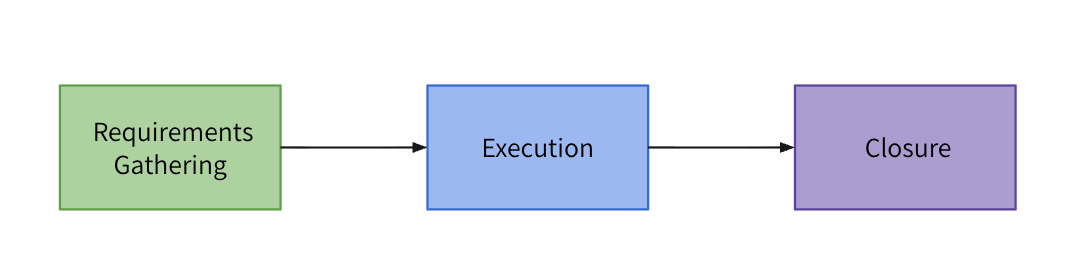
Requirements Gathering
The Requirements Gathering phase lays the foundation for the project. Together with you, we define the problem we’re solving, agree on objectives, and align on what success looks like.
This includes:
-
-
Understanding your needs and expectations of the partner
-
Defining project goals, timelines, and deliverables
-
Defining key features, functionalities, and priorities
-
Agreeing on a plan for development, testing, and validation
-
This phase ensures everyone is aligned before work begins, reducing the risk of misunderstandings or scope creep later on.
Execution
This is the main development phase. Based on the scope we’ve defined, we design, build, and test the solution in iterative cycles (referred to as sprints).
During this phase:
-
-
You’ll see working software regularly and have the chance to provide feedback
-
Our internal QA team tests each feature before it’s shared with you
-
You’ll be invited to validate deliverables through a client-facing QA process (via TestLodge)
-
This collaborative approach ensures continuous alignment and allows us to address issues early.
Closure
The Closure phase wraps up the project. This is where we:
-
-
Conduct final validations and User Acceptance Testing (UAT)
-
Finalise documentation, provide training (if needed), and prepare for handover
-
Close out any remaining tasks and reflect on lessons learned
-
Once everything is confirmed, the project is formally closed. Any remaining contractual obligations are also completed.
This structured approach gives you full visibility and control, while ensuring we deliver high-quality results that meet your expectations.
Here’s how it plays out in practice: from scoping and writing user stories, through test plans and test runs, to bug reporting, approvals, and final closure
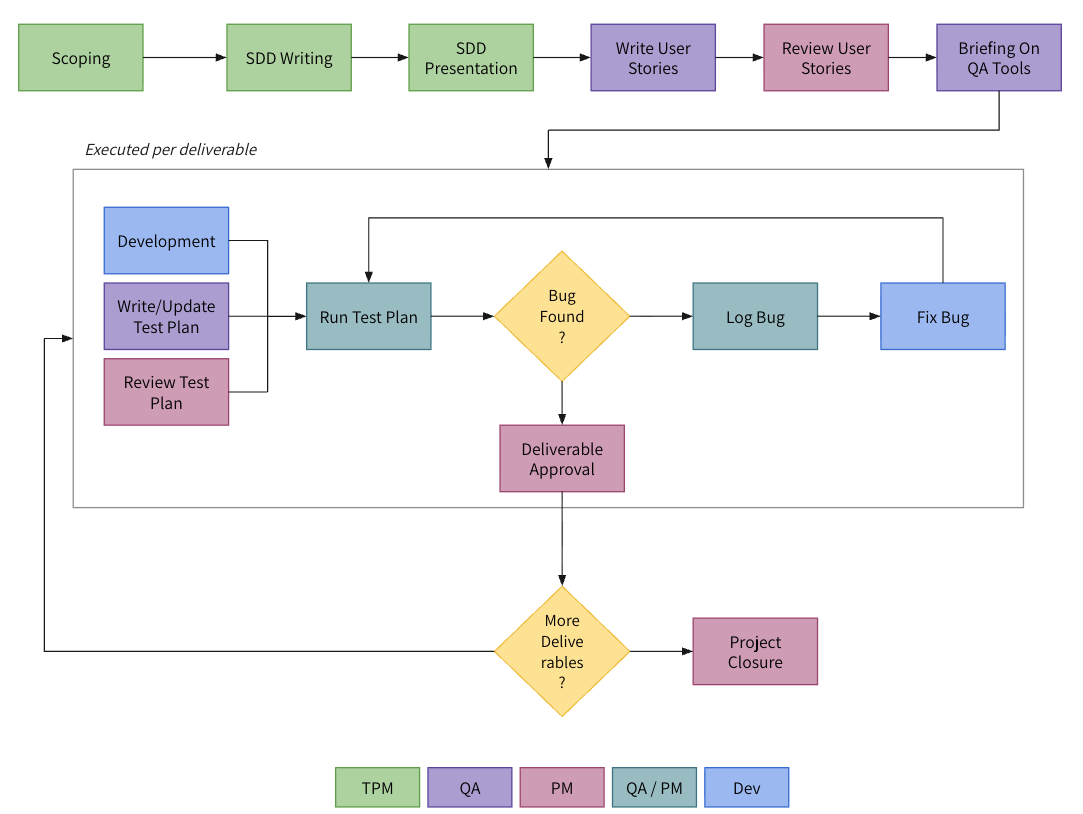
NB: TPM, QA, PM, and Dev all work together, with the PM often representing the partner’s perspective.
PMs Interactions
-
Scoping: Collaborate with the TPM to define project goals, features, and priorities your input shapes the entire build.
-
SDD Presentation: We’ll walk you through the System Design Document to align on functionality and clarify anything that may affect testing.
-
Write User Stories: Answer questions from the QA team to support them in writing relevant user stories.
-
Review User Stories: Review and confirm that user stories align with partner expectations, planned features, and flag anything unclear or missing for final adjustment
-
Briefing On QA Tools: We’ll guide you through TestLodge so you can easily access test cases and report issues—no technical skills needed.
-
Review Test Plan: We share a test plan for each deliverable so you can see what we're testing, how, and why — and suggest additions if needed.
-
Run Test Plan: Once the feature is ready, we’ll invite you to test it, either with us or on your own. We’ll guide you to ensure everything meets your expectations.
-
Log Bug: Found an issue? Let us know via TestLodge or together with us. Clear steps and screenshots help us resolve it faster.
-
Deliverable Approval: After testing and fixes, you’ll review and confirm the deliverable is working as expected and ready to proceed.
-
Project Closure: Once everything is approved, we’ll do a final review with you and formally close the project.
Partner Interactions
From an internal perspective, the PM represents the partner. Consequently, whenever the PM is involved for an internal step, that same step can be executed by the partner, representing the external perspective.
Testlodge
Tool used to support manual Quality Assurance (QA) processes. It allows teams to create, manage, and execute test cases.
We use TestLodge for:
-
-
Write and organise test cases based on project requirements and features
-
Run tests during development sprints and UAT phases
-
Collaborate with clients, who can view or contribute to test progress
-
Log and track issues through integration with Asana
-
TestLodge ensures transparency, traceability, and structured QA practices for internal teams and clients.
See a TestLodge demo in the video above (starting at 05:17).
Summary
-
This document walked you through the QA process and your essential role in it.
-
We have explored how QA ensures the quality, reliability, and readiness of what we build while also offering structure and confidence at every stage.
-
From defining requirements together, to validating deliverables using TestLodge, your involvement helps us stay aligned and catch issues early.
-
The process is designed to be collaborative, transparent, and supportive so you can be confident in every step of the journey, right up to final project approval and closure.