# 2023 New Features

## UI Branding

### Migrating Panels to Sidebar Menu

#### **[![canvas.png](https://wiki.cloud.akvo.org/uploads/images/gallery/2023-12/scaled-1680-/WnO1xV6fjWpYONG8-canvas.png)](https://wiki.cloud.akvo.org/uploads/images/gallery/2023-12/WnO1xV6fjWpYONG8-canvas.png)**

**Figure 1: New Control Center with Sidebar**

#### Previous Implementation Overview

The previous implementation of the user interface in the application primarily revolved around a panel-based design complemented by a tabbed navigation system. This approach was characterized by distinct sections within the main panel, where each section or page had its own set of tabs for detailed navigation. Here's a closer look at the key features of this previous implementation:

1. **Panel-Based Layout:**
    
    
    - The interface was structured around main panels, each representing a major functional area of the application.
    - These panels served as the primary means of navigation and content organization, providing users with a clear view of the available options and functionalities.
2. **Tabbed Navigation:**
    
    
    - Within each panel, a tabbed interface was used to further categorize and compartmentalize information and features.
    - The **[UserTab](https://github.com/akvo/rtmis/blob/main/frontend/src/components/tabs/UserTab.js)** component, for instance, was a pivotal element in this design, allowing for the segregation of different user-related functionalities like Manage Data, User Management or Approval Panel.
3. **Role-Based Access:** The navigation elements, both panels and tabs, were dynamically rendered based on **[the user’s role and permissions](https://github.com/akvo/rtmis/blob/00d842e32488d0d6bacfe4c2bfe6e24ce63d4588/frontend/src/lib/config.js#L39-L132)**. This ensured that users accessed only the features and information pertinent to their roles.
4. **Content Organization:** The content within each panel was organized logically, with tabs providing a secondary level of content segregation. This allowed users to navigate large amounts of information more efficiently.
5. **User Interaction:** Interaction with the interface was primarily through clicking on various panels and tabs. The UI elements were designed to be responsive to user actions, providing immediate access to the content.
6. **Aesthetic and Functional Consistency:** The previous design maintained a consistent aesthetic and functional approach across different panels and tabs, ensuring a cohesive user experience.
7. **Responsive Design:** While the design was primarily desktop-focused, it included responsive elements to ensure usability across various screen sizes.
8. **State Management and URL Routing:** The application managed the state of active panels and tabs, with URL routing reflecting the current navigation path. This was crucial for bookmarking and sharing links.

[![canvas.png](https://wiki.cloud.akvo.org/uploads/images/gallery/2023-12/scaled-1680-/WFId8cvRsfRgpy0g-canvas.png)](https://wiki.cloud.akvo.org/uploads/images/gallery/2023-12/WFId8cvRsfRgpy0g-canvas.png)

**Figure 2: Previous Control Center**

#### Key Considerations

The redesign of an application's user interface to incorporate a sidebar-based layout with expandable content requires a strategic and thoughtful approach. This transition aims to enhance the desktop user experience by offering a more intuitive and organized navigation system. These considerations will guide the development process, ensuring that the final product efficiently and effectively meets user needs. Below is a list of these key considerations:

1\. **Navigation Hierarchy and Structure:**

- **Clear Hierarchy:** Design a straightforward and logical hierarchy within the sidebar. Ensure users can easily understand the relationship between main categories and their expandable sub-categories.
- **Expandable Sections:** Implement expandable sections for main categories to reveal sub-categories, using visual cues for differentiation.

2\. **User Role and Access Control:**

- **Dynamic Sidebar Content:** Adjust the sidebar content dynamically based on the user's role and permissions, ensuring appropriate access control.
- **Relevant Access:** Ensure users only see and access sidebar items pertinent to their roles.

3\. **State Management and URL Routing:**

- **State Synchronization:** Manage the state of the expanded/collapsed sections and the active selection in sync with the application's routing.
- **URL Structure:** Design URLs to reflect the nested nature of the sidebar, facilitating intuitive navigation and bookmarking.

4\. **User Experience and Interaction:**

- **Active Section Indicators:** Employ visual indicators to denote which section is active or expandable.
- **Simplicity:** Avoid making the sidebar too complex or crowded, even on desktop.

5\. **Content Organization and Layout:**

- **Logical Grouping:** Group related items in the sidebar in a way that makes sense to the user, facilitating easier navigation.
- **Responsive Main Content Area:** Ensure the main content area adapts well to changes in the sidebar, especially when sections are expanded or collapsed.

6\. **Performance Considerations:**

- **Optimized Performance:** Even without lazy loading, ensure that the performance is optimized, particularly if the sidebar includes dynamic or data-intensive elements.
- **Efficient Pagination:** Since the pages use pagination, ensure it's implemented efficiently to handle data loading without performance lags.

7\. **Testing and Validation:**

- **Browser Testing:** Test the sidebar across different browsers to ensure consistency and functionality.
- **User Feedback:** Collect user feedback focused on the desktop experience to refine the navigation model.

<p class="callout info">Example **Ant-design** implementation of sidebar component: [https://ant.design/~demos/components-layout-demo-side](https://ant.design/~demos/components-layout-demo-side)</p>

#### User Access Overview

```javascript
const config = {
...
roles: [
  {
    id: 1,
    name: "Super Admin",
    filter_form: false,
    page_access: [
      ...
      "visualisation",
      "questionnaires",
      "approvals",
      "approvers",
      "form",
      "reports",
      "settings",
      ...
    ],
    administration_level: [1],
    description:
      "Overall national administrator of the RUSH. Assigns roles to all county admins",
    control_center_order: [
      "manage-user",
      "manage-data",
      "manage-master-data",
      "manage-mobile",
      "approvals",
    ],
  },
  ...
],
checkAccess: (roles, page) => {
  return roles?.page_access?.includes(page);
},
...
}

```

Source: [https://github.com/akvo/rtmis/blob/main/frontend/src/lib/config.js](https://github.com/akvo/rtmis/blob/main/frontend/src/lib/config.js)

1. **Roles Array:**
    
    
    - The `roles` array within `config` defines different user roles in the system. Each role is an object with specific properties.
    - Example Role Object: 
        - `id`: A unique identifier for the role (e.g., `1` for Super Admin).
        - `name`: The name of the role (e.g., "Super Admin").
        - `filter_form`: A boolean indicating whether the role has specific form filters (e.g., `false` for Super Admin).
        - `page_access`: An array listing the pages or features the role has access to (e.g., "visualisation", "questionnaires", etc. for Super Admin).
        - `administration_level`: An array indicating the level(s) of administration the role pertains to (e.g., `[1]` for national level administration for Super Admin).
        - `description`: A brief description of the role (e.g., "Overall national administrator of the RUSH. Assigns roles to all county admins" for Super Admin).
        - `control_center_order`: An array defining the order of items or features in the control center specific to the role.
2. **Check Access Function:**
    
    
    - `checkAccess` is a function defined within `config` to determine if a given role has access to a specific page or feature.
    - It takes two parameters: `roles` (the role object) and `page` (the page or feature to check access for).
    - The function returns `true` if the `page_access` array of the role includes the specified `page`, indicating that the role has access to that page.
    - Example Usage of checkAccess: 
        - ```bash
            λ ag config.checkAccess
            pages/profile/components/ProfileTour.jsx
            19:    ...(config.checkAccess(authUser?.role_detail, "form")
            28:    ...(config.checkAccess(authUser?.role_detail, "approvals")
            
            pages/settings/Settings.jsx
            29:    config.checkAccess(authUser?.role_detail, p.access)
            
            pages/control-center/components/ControlCenterTour.jsx
            14:    ...(config.checkAccess(authUser?.role_detail, "data")
            29:    config.checkAccess(authUser?.role_detail, "form")
            38:    ...(config.checkAccess(authUser?.role_detail, "user")
            48:    config.checkAccess(authUser?.role_detail, "form")
            57:    ...(config.checkAccess(authUser?.role_detail, "approvals")
            
            components/layout/Header.jsx
            74:      {config.checkAccess(user?.role_detail, "control-center") && (
            
            ```

##### Usage and Implications

- **Role-Based Access Control (RBAC):** This configuration is a clear example of RBAC, where access to different parts of the application is controlled based on the user's role.
- **Dynamic Access:** The system can dynamically render UI elements and allow actions based on the user's role, enhancing security and user experience.
- **Scalability and Maintenance:** By defining roles and access rights in a centralized configuration, the system becomes easier to manage and scale. Adding a new role or modifying access rights becomes a matter of updating the `config` object.
- **Functionality:** The `checkAccess` function simplifies the process of verifying access rights, making the code more readable and maintainable.

## Master Data Management

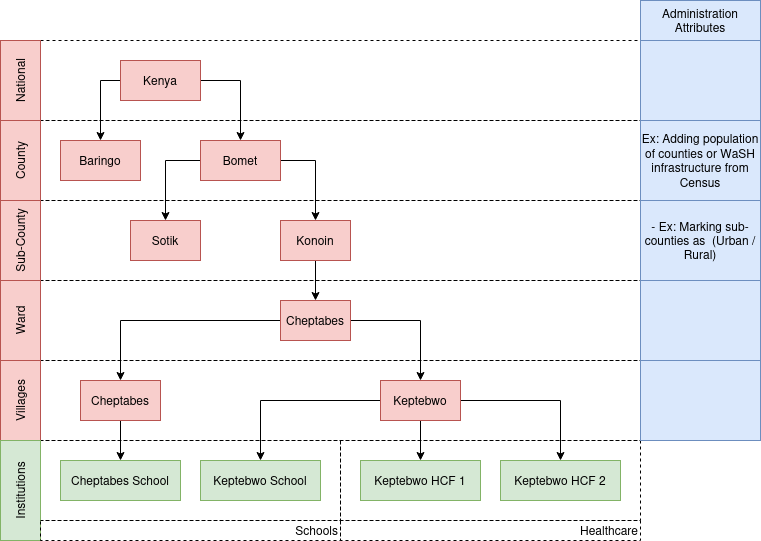
<div drawio-diagram="135"><img src="https://wiki.cloud.akvo.org/uploads/images/drawio/2023-11/5SpaNifqzf6Zndtw-drawing-7-1700574203.png" alt=""/></div>

**Figure 3: Administration and Entities Hierarchy**

### User Interactions  


#### Add / Edit Administration Attribute

- **Step 1:** Click the "Add Attribute" button.
- **Step 2:** Fill in the attribute name and select the type (e.g., "Value","Option", "Multiple Option", "Aggregate").
- **Step 3:** If the attribute type is "Option,Multiple Option or Aggregate" click the "+" button to add more options.
- **Step 4:** Click "Submit" to save.
- **Step 5:** Success alert message appears and return to Administration Attribute list

API: [administration-endpoints](https://wiki.cloud.akvo.org/books/rtmis/page/2023-new-features#bkmrk-administration-endpo "RTMIS")

#### Add / Edit Administration  


- **Step 1:** Click "Add New Administration" or select an administrative area to edit.
- **Step 2:** Select Level Name. The options will be in between National to Lowest Level, so National and Lowest Level will be hidden.
- **Step 3:** Select the parent administration using a cascading drop-down.
- **Step 4:** Fill in administration details (name, parent, and code).
- **Step 5:** Fill in attributes and their values.  
    
    - For Value type: Input Number
    - For Option and Multiple Option type: Drop-down option
    - For Aggregate: It will shows table with 2 columns, the columns are: **name, value**
        - **Name:** the dissagregation name
        - **Value:** Input Number
- **Step 6:** Click "Submit" to save.
- **Step 7:** A success message appears confirming the administration has been added or updated.
- **Step 8:** Return to administration list.

[API: ](https://wiki.cloud.akvo.org/books/rtmis/page/2023-new-features#bkmrk-administration-crud)[administration-endpoints](https://wiki.cloud.akvo.org/books/rtmis/page/2023-new-features#bkmrk-administration-endpo "RTMIS")

<p class="callout warning">The option names for the Level are situated between the National and Lowest levels. The inclusion of the National Level is not feasible, as it would result in the appearance of more than two countries, rendering the selection of a parent level logically null. While the addition of the Lowest Level is achievable, it is necessary to inhibit the display of the last cascade option to ensure that any newly added administration does not have an undefined level.</p>

#### Add / Edit Entity

- **Step 1:** Click on the "Add Entity" or "Edit Entity" button from the Entity List Page to start the process.
- **Step 2:** Fill in the entity details such as the name of the entity (e.g., "Health Facility", "School").
- **Step 3:** Click the "Submit" button to save the new or updated entity information.
- **Step 4:** A success message appears confirming the entity has been added or updated.
- **Step 5:** Return to Entity List

API: [entity-endpoints](https://wiki.cloud.akvo.org/books/rtmis/page/2023-new-features#bkmrk-entity-endpoints)

#### Add / Edit Entity Data

- **Step 1:** Click on the "Add Entity Data" or "Edit Entity Data" button to begin from the Entity Data List.
- **Step 2:** Choose the entity from a drop-down list for which you want to add or edit data.
- **Step 3:** Fill in the specific data for the selected entity, such as services offered, number of staff, etc.
- **Step 4:** Select the Administration ID from the cascade drop down. This ID links the entity data to a specific administrative unit.
- **Step 5:** Click the "Submit" button to save the new or updated entity data.
- **Step 6:** A success message appears confirming the entity data has been added or updated.
- **Step 7:** Return to Entity Data List

API: [entity-data-endpoints](https://wiki.cloud.akvo.org/books/rtmis/page/2023-new-features#bkmrk-entity-endpoints)

### Administration / Entity Attribute Types

#### Option &amp; Multiple Option Values

**Use Case**

We have a dataset that contains categorical information about the types of land use for various regions. This data will be utilized to classify and analyze land use patterns at the county level.

**Feature**

To achieve this, we will need to define option values for an attribute. In this scenario, the workflow is as follows:

**Define Attribute**

<div class="flex flex-grow flex-col max-w-full gap-3 gizmo:gap-0" id="bkmrk-attribute-name%3A-land"><div class="min-h-[20px] text-message flex flex-col items-start gap-3 whitespace-pre-wrap break-words [.text-message+&]:mt-5 overflow-x-auto" data-message-author-role="assistant" data-message-id="7a8bc2d7-a50e-49ec-a3a5-c865c76b241b"><div class="markdown prose w-full break-words dark:prose-invert dark">- Attribute Name: Land Use Type
- Attribute Code: `<Unique Identifier>Land_Use_Type`
- Type: Categorical (Option Values)
- Administration Level: County

</div></div></div>**Define Option Values**

<div class="flex flex-grow flex-col max-w-full gap-3 gizmo:gap-0" id="bkmrk-option-name%3A-residen"><div class="min-h-[20px] text-message flex flex-col items-start gap-3 whitespace-pre-wrap break-words [.text-message+&]:mt-5 overflow-x-auto" data-message-author-role="assistant" data-message-id="7a8bc2d7-a50e-49ec-a3a5-c865c76b241b"><div class="markdown prose w-full break-words dark:prose-invert dark">- Option Name: Residential 
    - Option Code: Residential
- Option Name: Commercial 
    - Option Code: Commercial
- Option Name: Agricultural 
    - Option Code: Agricultural

</div></div></div>**Upload Data for Counties**

<div class="flex flex-grow flex-col max-w-full gap-3 gizmo:gap-0" id="bkmrk-county-attribute-cod"><div class="min-h-[20px] text-message flex flex-col items-start gap-3 whitespace-pre-wrap break-words [.text-message+&]:mt-5 overflow-x-auto" data-message-author-role="assistant" data-message-id="7a8bc2d7-a50e-49ec-a3a5-c865c76b241b"><div class="markdown prose w-full break-words dark:prose-invert dark"><table border="1" style="border-collapse: collapse; width: 100%;"><thead><tr><th>County</th><th>Attribute Code</th><th>Value</th></tr></thead><tbody><tr><td>County A</td><td>Land\_Use\_Type</td><td>Residential</td></tr><tr><td>County B</td><td>Land\_Use\_Type</td><td>Commercial</td></tr><tr><td>County C</td><td>Land\_Use\_Type</td><td>Agricultural</td></tr></tbody></table>

</div></div></div>In this case, we define the "Option Values" for the "Land Use Type" attribute, allowing us to categorize land use patterns at the county level. The actual data for individual counties is then uploaded using the defined options.

#### Single Numeric Values

**Use Case**

We possess household counts from the 2019 census that correspond to the RTMIS administrative list at the sub-county level. This data can be employed to compute the household coverage per county, which is calculated as (# of households in that sub-county in RTMIS / # from the census).

**Feature**

To achieve this, we need to store the population value for individual sub-counties as part of their attributes. In this scenario, the workflow is as follows:

**Define Attribute**

- Attribute Name: Census HH Count
- Attribute Code: `<Unique Identifier>Census_HH_Count`
- Type: Single Numeric Value
- Administration Level: Sub-County

**Upload Data for Individual Sub-Counties**

<table border="1" id="bkmrk-sub-county-attribute" style="border-collapse: collapse; width: 100%;"><thead><tr><th>Sub-County</th><th>Attribute Code</th><th>Value</th></tr></thead><tbody><tr><td>CHANGAMWE</td><td>Census\_HH\_Count</td><td>46,614</td></tr><tr><td>JOMVU</td><td>Census\_HH\_Count</td><td>53,472</td></tr></tbody></table>

In this case, the values for the county level will be automatically aggregated.

#### Disaggregated Numeric Values

**Use Case**

We aim to import data from the CLTS platform or the census regarding the count of different types of toilets, and we have a match at the sub-county level. This data will serve as baseline values for visualization.

**Feature**

For this use case, we need to store disaggregated values for an attribute. To do so, we will:

**Define the Attribute**

- Attribute Name: Census HH Toilet Count
- Attribute Code: `<Unique Identifier>Census_HH_Toilet_Count`
- Type: Disaggregated Numeric Values
- Disaggregation: “Improved”, “Unimproved”
- Administration Level: Sub-County

**Upload Data for Individual Sub-Counties**

<table border="1" id="bkmrk-sub-county-attribute-1" style="border-collapse: collapse; width: 100%;"><thead><tr><th>Sub-County</th><th>Attribute Code</th><th>Disaggregation</th><th>Value</th></tr></thead><tbody><tr><td>CHANGAMWE</td><td>Census\_HH\_Toilet\_Count</td><td>Improved</td><td>305,927</td></tr><tr><td>CHANGAMWE</td><td>Census\_HH\_Toilet\_Count</td><td>Unimproved</td><td>70,367</td></tr></tbody></table>

### Database Overview

#### Entities Table

<table border="1" id="bkmrk-pos-table-column-nul" style="border-collapse: collapse; width: 100%;"><thead><tr><th class="align-center" style="width: 6.30408%;">pos</th><th style="width: 22.2497%;">table</th><th style="width: 17.4288%;">column</th><th style="width: 11.2486%;">null</th><th style="width: 14.3387%;">dtype</th><th style="width: 14.3387%;">len</th><th style="width: 14.3387%;">default</th></tr></thead><tbody><tr><td class="align-center" style="width: 6.30408%;">1</td><td style="width: 22.2497%;">Entities</td><td style="width: 17.4288%;">id</td><td style="width: 11.2486%;"> </td><td style="width: 14.3387%;">Integer</td><td style="width: 14.3387%;"> </td><td style="width: 14.3387%;"> </td></tr><tr><td class="align-center" style="width: 6.30408%;">2</td><td style="width: 22.2497%;">Entities</td><td style="width: 17.4288%;">name</td><td style="width: 11.2486%;"> </td><td style="width: 14.3387%;">Text</td><td style="width: 14.3387%;"> </td><td style="width: 14.3387%;"> </td></tr></tbody></table>

#### Entity Data Table  


<table border="1" id="bkmrk-pos-table-column-nul-1" style="border-collapse: collapse; width: 100%; height: 178.8px;"><thead><tr style="height: 29.8px;"><th class="align-center" style="width: 6.42769%; height: 29.8px;">pos</th><th style="width: 22.1261%; height: 29.8px;">table</th><th style="width: 17.6736%; height: 29.8px;">column</th><th style="width: 11.0038%; height: 29.8px;">null</th><th style="width: 14.3387%; height: 29.8px;">dtype</th><th style="width: 14.3387%; height: 29.8px;">len</th><th style="width: 14.3387%; height: 29.8px;">default</th></tr></thead><tbody><tr style="height: 29.8px;"><td class="align-center" style="width: 6.42769%; height: 29.8px;">1</td><td style="width: 22.1261%; height: 29.8px;">Entity Data</td><td style="width: 17.6736%; height: 29.8px;">id</td><td style="width: 11.0038%; height: 29.8px;"> </td><td style="width: 14.3387%; height: 29.8px;">Integer</td><td style="width: 14.3387%; height: 29.8px;"> </td><td style="width: 14.3387%; height: 29.8px;"> </td></tr><tr style="height: 29.8px;"><td class="align-center" style="width: 6.42769%; height: 29.8px;">2</td><td style="width: 22.1261%; height: 29.8px;">Entity Data</td><td style="width: 17.6736%; height: 29.8px;">entity\_id</td><td style="width: 11.0038%; height: 29.8px;"> </td><td style="width: 14.3387%; height: 29.8px;">Integer</td><td style="width: 14.3387%; height: 29.8px;"> </td><td style="width: 14.3387%; height: 29.8px;"> </td></tr><tr style="height: 29.8px;"><td class="align-center" style="width: 6.42769%; height: 29.8px;">3  
</td><td class="align-left" style="width: 22.1261%; height: 29.8px;">Entity Data  
</td><td class="align-left" style="width: 17.6736%; height: 29.8px;">code  
</td><td class="align-center" style="width: 11.0038%; height: 29.8px;">Yes  
</td><td class="align-left" style="width: 14.3387%; height: 29.8px;">Text  
</td><td class="align-center" style="width: 14.3387%; height: 29.8px;">  
</td></tr><tr style="height: 29.8px;"><td class="align-center" style="width: 6.42769%; height: 29.8px;">4</td><td style="width: 22.1261%; height: 29.8px;">Entity Data</td><td style="width: 17.6736%; height: 29.8px;">name</td><td style="width: 11.0038%; height: 29.8px;"> </td><td style="width: 14.3387%; height: 29.8px;">Text</td><td style="width: 14.3387%; height: 29.8px;"> </td><td style="width: 14.3387%; height: 29.8px;"> </td></tr><tr style="height: 29.8px;"><td class="align-center" style="width: 6.42769%; height: 29.8px;">5</td><td style="width: 22.1261%; height: 29.8px;">Entity Data</td><td style="width: 17.6736%; height: 29.8px;">administration\_id</td><td style="width: 11.0038%; height: 29.8px;"> </td><td style="width: 14.3387%; height: 29.8px;">Integer</td><td style="width: 14.3387%; height: 29.8px;"> </td><td style="width: 14.3387%; height: 29.8px;"> </td></tr></tbody></table>

#### Entity Attributes

<table border="1" id="bkmrk-pos-table-column-nul-2" style="border-collapse: collapse; width: 100%; height: 119.2px;"><thead><tr style="height: 29.8px;"><th class="align-center" style="width: 7.04574%; height: 29.8px;">pos</th><th style="width: 21.508%; height: 29.8px;">table</th><th style="width: 17.7955%; height: 29.8px;">column</th><th style="width: 10.8819%; height: 29.8px;">null</th><th style="width: 14.3387%; height: 29.8px;">dtype</th><th style="width: 14.3387%; height: 29.8px;">len</th><th style="width: 14.3387%; height: 29.8px;">default</th></tr></thead><tbody><tr style="height: 29.8px;"><td class="align-center" style="width: 7.04574%; height: 29.8px;">1</td><td style="width: 21.508%; height: 29.8px;">Entity Attributes</td><td style="width: 17.7955%; height: 29.8px;">id</td><td style="width: 10.8819%; height: 29.8px;"> </td><td style="width: 14.3387%; height: 29.8px;">Integer</td><td style="width: 14.3387%; height: 29.8px;"> </td><td style="width: 14.3387%; height: 29.8px;"> </td></tr><tr style="height: 29.8px;"><td class="align-center" style="width: 7.04574%; height: 29.8px;">2</td><td style="width: 21.508%; height: 29.8px;">Entity Attributes</td><td style="width: 17.7955%; height: 29.8px;">entity\_id</td><td style="width: 10.8819%; height: 29.8px;"> </td><td style="width: 14.3387%; height: 29.8px;">Integer</td><td style="width: 14.3387%; height: 29.8px;"> </td><td style="width: 14.3387%; height: 29.8px;"> </td></tr><tr style="height: 29.8px;"><td class="align-center" style="width: 7.04574%; height: 29.8px;">3</td><td style="width: 21.508%; height: 29.8px;">Entity Attributes</td><td style="width: 17.7955%; height: 29.8px;">name</td><td style="width: 10.8819%; height: 29.8px;"> </td><td style="width: 14.3387%; height: 29.8px;">Text</td><td style="width: 14.3387%; height: 29.8px;"> </td><td style="width: 14.3387%; height: 29.8px;"> </td></tr></tbody></table>

#### Entity Attributes Options

<table border="1" id="bkmrk-pos-table-column-nul-3" style="border-collapse: collapse; width: 100%;"><thead><tr><th class="align-center" style="width: 7.29295%;">pos</th><th style="width: 21.2608%;">table</th><th style="width: 18.5362%;">column</th><th style="width: 10.1412%;">null</th><th style="width: 14.3387%;">dtype</th><th style="width: 14.3387%;">len</th><th style="width: 14.3387%;">default</th></tr></thead><tbody><tr><td class="align-center" style="width: 7.29295%;">1</td><td style="width: 21.2608%;">Entity Attributes Options</td><td style="width: 18.5362%;">id</td><td style="width: 10.1412%;"> </td><td style="width: 14.3387%;">Integer</td><td style="width: 14.3387%;"> </td><td style="width: 14.3387%;"> </td></tr><tr><td class="align-center" style="width: 7.29295%;">2</td><td style="width: 21.2608%;">Entity Attributes Options</td><td style="width: 18.5362%;">entity\_attribute\_id</td><td style="width: 10.1412%;"> </td><td style="width: 14.3387%;">Integer</td><td style="width: 14.3387%;"> </td><td style="width: 14.3387%;"> </td></tr><tr><td class="align-center" style="width: 7.29295%;">3</td><td style="width: 21.2608%;">Entity Attributes Options</td><td style="width: 18.5362%;">name</td><td style="width: 10.1412%;"> </td><td style="width: 14.3387%;">Text</td><td style="width: 14.3387%;"> </td><td style="width: 14.3387%;"> </td></tr></tbody></table>

#### Entity Values

<table border="1" id="bkmrk-pos-table-column-nul-4" style="border-collapse: collapse; width: 100%;"><thead><tr><th class="align-center" style="width: 7.04574%;">pos</th><th style="width: 21.508%;">table</th><th style="width: 17.672%;">column</th><th style="width: 11.0054%;">null</th><th style="width: 14.3387%;">dtype</th><th style="width: 14.3387%;">len</th><th style="width: 14.3387%;">default</th></tr></thead><tbody><tr><td class="align-center" style="width: 7.04574%;">1</td><td style="width: 21.508%;">Entity Values</td><td style="width: 17.672%;">id</td><td style="width: 11.0054%;"> </td><td style="width: 14.3387%;">Integer</td><td style="width: 14.3387%;"> </td><td style="width: 14.3387%;"> </td></tr><tr><td class="align-center" style="width: 7.04574%;">2</td><td style="width: 21.508%;">Entity Values</td><td style="width: 17.672%;">entity\_data\_id</td><td style="width: 11.0054%;"> </td><td style="width: 14.3387%;">Integer</td><td style="width: 14.3387%;"> </td><td style="width: 14.3387%;"> </td></tr><tr><td class="align-center" style="width: 7.04574%;">3</td><td style="width: 21.508%;">Entity Values</td><td style="width: 17.672%;">entity\_attribute\_id</td><td style="width: 11.0054%;"> </td><td style="width: 14.3387%;">Integer</td><td style="width: 14.3387%;"> </td><td style="width: 14.3387%;"> </td></tr><tr><td class="align-center" style="width: 7.04574%;">4</td><td style="width: 21.508%;">Entity Values</td><td style="width: 17.672%;">value</td><td style="width: 11.0054%;"> </td><td style="width: 14.3387%;">Text</td><td style="width: 14.3387%;"> </td><td style="width: 14.3387%;"> </td></tr></tbody></table>

#### Administration Table

<table border="1" id="bkmrk-pos-table-column-nul-5" style="border-collapse: collapse; width: 100%; border-style: solid;" width="100%"><thead><tr><th style="width: 6.30408%;">pos</th><th style="width: 22.7385%;">table</th><th style="width: 13.6027%;">column</th><th style="width: 6.30408%;">null</th><th style="width: 25.3399%;">dtype</th><th style="width: 7.54017%;">len</th><th style="width: 18.1706%;">default</th></tr></thead><tbody><tr><td style="width: 6.30408%;">1</td><td style="width: 22.7385%;">administrator</td><td style="width: 13.6027%;">id</td><td style="width: 6.30408%;">NO</td><td style="width: 25.3399%;">bigint</td><td style="width: 7.54017%;"> </td><td style="width: 18.1706%;">administrator\_id\_seq</td></tr><tr><td style="width: 6.30408%;">2</td><td style="width: 22.7385%;">administrator</td><td style="width: 13.6027%;">code</td><td style="width: 6.30408%;">YES</td><td style="width: 25.3399%;">character varying</td><td style="width: 7.54017%;">255</td><td style="width: 18.1706%;"> </td></tr><tr><td style="width: 6.30408%;">3</td><td style="width: 22.7385%;">administrator</td><td style="width: 13.6027%;">name</td><td style="width: 6.30408%;">NO</td><td style="width: 25.3399%;">text</td><td style="width: 7.54017%;"> </td><td style="width: 18.1706%;"> </td></tr><tr><td style="width: 6.30408%;">4</td><td style="width: 22.7385%;">administrator</td><td style="width: 13.6027%;">level\_id</td><td style="width: 6.30408%;">NO</td><td style="width: 25.3399%;">bigint</td><td style="width: 7.54017%;"> </td><td style="width: 18.1706%;"> </td></tr><tr><td style="width: 6.30408%;">5</td><td style="width: 22.7385%;">administrator</td><td style="width: 13.6027%;">parent\_id</td><td style="width: 6.30408%;">YES</td><td style="width: 25.3399%;">bigint</td><td style="width: 7.54017%;"> </td><td style="width: 18.1706%;"> </td></tr><tr><td style="width: 6.30408%;">6</td><td style="width: 22.7385%;">administrator</td><td style="width: 13.6027%;">path</td><td style="width: 6.30408%;">YES</td><td style="width: 25.3399%;">text</td><td style="width: 7.54017%;"> </td><td style="width: 18.1706%;"> </td></tr></tbody></table>

#### Administration Attributes

<table border="1" id="bkmrk-pos-table-column-nul-6" style="border-collapse: collapse; border-style: solid; width: 108.395%;"><thead><tr><th style="width: 6.5513%;">pos</th><th style="width: 24.5983%;">table</th><th style="width: 11.8665%;">column</th><th style="width: 6.18047%;">null</th><th style="width: 31.644%;">dtype</th><th style="width: 7.04726%;">len</th><th style="width: 12.2358%;">default</th></tr></thead><tbody><tr><td style="width: 6.5513%;">1</td><td style="width: 24.5983%;">Administration Attributes</td><td style="width: 11.8665%;">id</td><td style="width: 6.18047%;"> </td><td style="width: 31.644%;">Integer</td><td style="width: 7.04726%;"> </td><td style="width: 12.2358%;"> </td></tr><tr><td style="width: 6.5513%;">2</td><td style="width: 24.5983%;">Administration Attributes</td><td style="width: 11.8665%;">level\_id</td><td style="width: 6.18047%;"> </td><td style="width: 31.644%;">Integer</td><td style="width: 7.04726%;"> </td><td style="width: 12.2358%;"> </td></tr><tr><td style="width: 6.5513%;">3  
</td><td style="width: 24.5983%;">Administration Attribute  
</td><td style="width: 11.8665%;">code  
</td><td style="width: 6.18047%;">  
</td><td style="width: 31.644%;">Text  
</td><td style="width: 7.04726%;">  
</td><td style="width: 12.2358%;">Unique (Auto-Generated)  
</td></tr><tr><td style="width: 6.5513%;">4</td><td style="width: 24.5983%;">Administration Attributes</td><td style="width: 11.8665%;">Type</td><td style="width: 6.18047%;"> </td><td style="width: 31.644%;">Enum (Number, Option, Aggregate)  
</td><td style="width: 7.04726%;"> </td><td style="width: 12.2358%;"> </td></tr><tr><td style="width: 6.5513%;">5</td><td style="width: 24.5983%;">Administration Attributes</td><td style="width: 11.8665%;">name</td><td style="width: 6.18047%;"> </td><td style="width: 31.644%;">Text</td><td style="width: 7.04726%;"> </td><td style="width: 12.2358%;"> </td></tr></tbody></table>

#### Administration Attributes Options

<table border="1" id="bkmrk-pos-table-column-nul-7" style="border-collapse: collapse; width: 100%;"><thead><tr><th class="align-center" style="width: 6.67491%;">pos</th><th style="width: 26.0816%;">table</th><th style="width: 25.5844%;">column</th><th style="width: 7.91375%;">null</th><th style="width: 12.1137%;">dtype</th><th style="width: 7.41656%;">len</th><th style="width: 14.3387%;">default</th></tr></thead><tbody><tr><td class="align-center" style="width: 6.67491%;">1</td><td style="width: 26.0816%;">Administration Attributes Options</td><td style="width: 25.5844%;">id</td><td style="width: 7.91375%;"> </td><td style="width: 12.1137%;">Integer</td><td style="width: 7.41656%;"> </td><td style="width: 14.3387%;"> </td></tr><tr><td class="align-center" style="width: 6.67491%;">2</td><td style="width: 26.0816%;">Administration Attributes Options</td><td style="width: 25.5844%;">administration\_attributes\_id</td><td style="width: 7.91375%;"> </td><td style="width: 12.1137%;">Integer</td><td style="width: 7.41656%;"> </td><td style="width: 14.3387%;"> </td></tr><tr><td class="align-center" style="width: 6.67491%;">3</td><td style="width: 26.0816%;">Administration Attributes Options</td><td style="width: 25.5844%;">name</td><td style="width: 7.91375%;"> </td><td style="width: 12.1137%;">Text</td><td style="width: 7.41656%;"> </td><td style="width: 14.3387%;"> </td></tr></tbody></table>

#### Administration Values

<table border="1" id="bkmrk-pos-table-column-nul-8" style="border-collapse: collapse; width: 100%;"><thead><tr><th class="align-center" style="width: 7.16935%;">pos</th><th style="width: 21.3844%;">table</th><th style="width: 18.6597%;">column</th><th style="width: 10.0177%;">null</th><th style="width: 14.3387%;">dtype</th><th style="width: 14.3387%;">len</th><th style="width: 14.3387%;">default</th></tr></thead><tbody><tr><td style="width: 7.16935%;">1</td><td style="width: 21.3844%;">Administration Values</td><td style="width: 18.6597%;">id</td><td style="width: 10.0177%;"> </td><td style="width: 14.3387%;">Integer</td><td style="width: 14.3387%;"> </td><td style="width: 14.3387%;"> </td></tr><tr><td style="width: 7.16935%;">2</td><td style="width: 21.3844%;">Administration Values</td><td style="width: 18.6597%;">administration\_id</td><td style="width: 10.0177%;"> </td><td style="width: 14.3387%;">Integer</td><td style="width: 14.3387%;"> </td><td style="width: 14.3387%;"> </td></tr><tr><td style="width: 7.16935%;">3</td><td style="width: 21.3844%;">Administration Values</td><td style="width: 18.6597%;">administration\_attributes\_id</td><td style="width: 10.0177%;">Integer</td><td style="width: 14.3387%;"> </td><td style="width: 14.3387%;"> </td><td style="width: 14.3387%;"> </td></tr><tr><td style="width: 7.16935%;">4</td><td style="width: 21.3844%;">Administration Values</td><td style="width: 18.6597%;">value</td><td style="width: 10.0177%;"> </td><td style="width: 14.3387%;">Integer</td><td style="width: 14.3387%;"> </td><td style="width: 14.3387%;"> </td></tr><tr><td style="width: 7.16935%;">5  
</td><td style="width: 21.3844%;">Administrative Values  
</td><td style="width: 18.6597%;">option  
</td><td style="width: 10.0177%;">  
</td><td style="width: 14.3387%;">Text  
</td><td style="width: 14.3387%;">  
</td></tr></tbody></table>

Rules:

- Attribute Type: **Numeric**
    - value: NOT NULL
    - option: NULL
- Attribute Type: **Option**
    - value: NULL
    - option: NOT NULL
- Attribute Type: **Aggregate**
    - value: NOT NULL
    - option: NOT NULL


Validation for Option Type

- If parent has a value for a particular administration\_attributes\_id, then invalidate the children input.
- If children have a value for a particular administration\_attributes\_id, then override the children value.

### Materialized View for Aggregation

#### Visualization Query

<table border="1" id="bkmrk-id-type-name-attribu" style="border-collapse: collapse; width: 100%;"><tbody><tr><th class="align-center" style="width: 5.80964%;">id</th><th style="width: 23.2393%;">type</th><th style="width: 21.0128%;">name</th><th style="width: 16.6873%;">attribute</th><th style="width: 16.6873%;">option</th><th style="width: 16.6873%;">value</th></tr><tr><td class="align-center" style="width: 5.80964%;">1</td><td style="width: 23.2393%;">administration</td><td style="width: 21.0128%;">Bantul</td><td style="width: 16.6873%;">Water Points Type</td><td style="width: 16.6873%;">Dugwell</td><td style="width: 16.6873%;">1</td></tr><tr><td class="align-center" style="width: 5.80964%;">2</td><td style="width: 23.2393%;">entity</td><td style="width: 21.0128%;">Bantul School</td><td style="width: 16.6873%;">Type of school</td><td style="width: 16.6873%;">Highschool</td><td style="width: 16.6873%;">1</td></tr></tbody></table>

### API Endpoints

#### Administration Endpoints

##### Administration Create / Update (POST &amp; PUT)  


```json
{
  "parent_id": 1,
  "name": "Village A",
  "code": "VA",
  "attributes": [{
      "attribute":1,
      "value": 200,
    },{
      "attribute":2,
      "value": "Rural",
    },{
      "attribute":3,
      "value": ["School","Health Facilities"],
    },{
      "attribute":4,
      "value": {"Improved": 100,"Unimproved": 200},
    }
  ]
}
```

##### Administration Detail (GET)

```json
{
  "id": 2,
  "name": "Tiati",
  "code": "BT",
  "parent": {
    "id": 1,
    "name": "Baringo",
    "code": "B"
  },
  "level": {
    "id": 1,
    "name": "Sub-county"
  },
  "childrens": [{
    "id": 2,
    "name": "Tiati",
    "code": "BT"
  }],
  "attributes": [{
      "attribute":1,
      "type": "value",
      "value": 200,
    },{
      "attribute":2,
      "type": "option",
      "value": "Rural",
    },{
      "attribute":3,
      "type": "multiple_option",
      "value": ["School","Health Facilities"],
    },{
      "attribute":4,
      "type": "aggregate",
      "value": {"Improved": 100,"Unimproved": 200},
    }
  ]
}
```

##### Administration List (GET)

Query Parameters (for filtering data):

- parent (only show data that has same parent id, so the parent itself should not be included)
- search (search keyword: by name or code)
- level
- Rules: 
    - Always filter parent\_id = null (Kenya) by default

```json
{
  "current": "self.page.number",
  "total": "self.page.paginator.count",
  "total_page": "self.page.paginator.num_pages",
  "data":[
    {
      "id": 2,
      "name": "Tiati",
      "code": "BT",
      "parent": {
        "id": 1,
        "name": "Baringo",
      },
      "level": {
        "id": 1,
        "name": "Sub-county"
      }
    }
]}
```

##### Administration Attributes CRUD (POST &amp; PUT)  


```json
{
  "name": "Population",
  "type": "value",
  "options": []
}
```

##### Administration Attributes (GET)

```json
[{
  "id": 1,
  "name": "Population",
  "type": "value",
  "options": []
},{
  "id": 2,
  "name": "Wheter Urban or Rural",
  "type": "option",
  "options": ["Rural","Urban"]
},{
  "id": 3,
  "name": "HCF and School Availability",
  "type": "multiple_option",
  "options": ["School","Health Care Facilities"]
},{
  "id": 4,
  "name": "JMP Status",
  "type": "aggregate",
  "options": ["Improved","Unimproved"]
}]
```

#### Entity Endpoints

##### Entity Create / Update (POST / PUT)

```json
{
  "name": "Schools",
}
```

##### Entity List (GET)

```json
{
  "current": "self.page.number",
  "total": "self.page.paginator.count",
  "total_page": "self.page.paginator.num_pages",
  "data":[
    {
      "id": 1,
      "name": "Health Facilities",
    },
    {
      "id": 2,
      "name": "Schools",
    }
]}
```

#### Entity Data Endpoints

##### Entity Data Create / Update (POST / PUT)

```json
{
  "name": "Mutarakwa School",
  "code": "101",
  "administration": 1,
  "entity": 1
}
```

##### Entity Data List (GET)

```json
{
  "current": "self.page.number",
  "total": "self.page.paginator.count",
  "total_page": "self.page.paginator.num_pages",
  "data":[
    {
      "id": 1,
      "name": "Lamu Huran Clinic",
      "code": "101",
      "administration": {
          "id": 111,
          "name": "Bura",
          "full_name": "Kenya - Tana River - Bura - Bura - Bura",
          "code": null
      },
      "entity": {
          "id": 1,
          "name": "Health Care Facilities"
      }
    },
]}
```

### Bulk Upload

As an administrator of the system, the ability to efficiently manage and update administrative data is crucial. To facilitate this, a feature is needed that allows for the bulk uploading of administrative data through a CSV file. This CSV file format is generated based on administration level table and administrative attribute table. When downloading a template, system administrators are given the ability to choose what attributes they want to include in the template.

The CSV template, will contain columns representing all administrative levels (such as National, County, Sub-County, Ward, and Village) along with their respective IDs. Additionally, it will include columns for selected attributes associated with each administrative unit, as defined in the administration attribute table.

#### Acceptance Criteria

##### CSV File Format and Structure

- The system should accept CSV files for bulk upload.
- The CSV file must include columns for different administrative levels (e.g., National, County, Sub-County, Ward, Village).
- The CSV tile must include only selected attributes.
- Each administrative level column in the CSV file must be filled to ensure proper hierarchical placement.
- Columns for administrative codes and attributes are included but are optional to fill.

##### Optional Codes and Attributes

- While the administrative codes and attribute columns are provided in the CSV template, filling them is optional.
- The system should be able to process the CSV file and update the administration data correctly, even if some or all of the code and attribute columns are left blank.

##### Data Validation and Integrity

- The system should validate the CSV file to ensure that all required administrative level columns are filled.
- The system should handle empty optional fields (codes and attributes) gracefully without causing errors.
- Any discrepancies or format errors in the CSV file should be reported back to the user for correction via email.
- The system should process the CSV file efficiently, updating existing records and adding new ones as necessary.
- The process should be optimized to handle large datasets without significant performance issues.

##### User Feedback and Error Handling

- The user should receive clear feedback on the progress of the upload, including confirmation via email once the upload is complete.
- The system should provide detailed error messages or guidance in case of upload failures or data inconsistencies.

#### Example CSV Template for Administration Data

<table border="1" id="bkmrk-county-sub-county-wa" style="border-collapse: collapse; width: 100%; height: 236.766px;"><thead><tr style="height: 63.3906px;"><th style="height: 63.3906px;">County</th><th style="height: 63.3906px;">Sub-County</th><th style="height: 63.3906px;">Ward</th><th style="height: 63.3906px;">Village</th><th style="height: 63.3906px;">Population</th><th style="height: 63.3906px;">Whether\_Urban\_or\_Rural</th><th style="height: 63.3906px;">HCF\_and\_School\_Availability</th><th style="height: 63.3906px;">JMP\_Status\_Improved</th><th style="height: 63.3906px;">JMP\_Status\_Unimproved</th></tr></thead><tbody><tr style="height: 63.3906px;"><td style="height: 63.3906px;">Kitui</td><td style="height: 63.3906px;">Mwingi North</td><td style="height: 63.3906px;">Kyuso</td><td style="height: 63.3906px;">Ikinda</td><td style="height: 63.3906px;">200</td><td style="height: 63.3906px;">Rural</td><td style="height: 63.3906px;">School;Health Care Facilities</td><td style="height: 63.3906px;">100</td><td style="height: 63.3906px;">200</td></tr><tr style="height: 63.3906px;"><td style="height: 63.3906px;">Kitui</td><td style="height: 63.3906px;">Mwingi North</td><td style="height: 63.3906px;">Kyuso</td><td style="height: 63.3906px;">Gai Central</td><td style="height: 63.3906px;">150</td><td style="height: 63.3906px;">Urban</td><td style="height: 63.3906px;">Health Care Facilities</td><td style="height: 63.3906px;">120</td><td style="height: 63.3906px;">180

</td></tr></tbody></table>

- **County, Sub-County, Ward, Village**: Names of the administrative units at each level.
- **Population**: Corresponds to the "Population" attribute.
- **Whether\_Urban\_or\_Rural**: Corresponds to the "Whether Urban or Rural" attribute.
- **HCF\_and\_School\_Availability**: Corresponds to the "HCF and School Availability" attribute. Multiple options are separated by semicolons.
- **JMP\_Status\_Improved, JMP\_Status\_Unimproved**: Correspond to the "JMP Status" aggregate attribute, split into separate columns for each option.

**Notes:**

- The template is designed to reflect the structure of the administrative hierarchy from County to Village.
- The columns for administrative levels are included, and each level is represented in its own column.
- Attributes are represented according to their types and names as provided.
- The CSV format allows for flexibility in filling out the data, with some attribute fields being optional.

#### Bulk Upload Process

Example process:

```python
from api.v1.v1_jobs.constants import JobTypes, JobStatus
from api.v1.v1_jobs.models import Jobs
from api.v1.v1_users.models import SystemUser

job = Jobs.objects.create(type=JobTypes.validate_administration,
                          status=JobStatus.on_progress,
                          user=request.user,
                          info={
                              'file': filename,
                          })
task_id = async_task('api.v1.v1_jobs.jobs.validate_administration',
                     job.id,
                     hook='api.v1.v1_jobs.job.seed_administration')
```

1. **Initiating the Bulk Upload Task**:
    
    
    - When a bulk upload is initiated, the `async_task` function is called.
    - The function is provided with the task name `'api.v1.v1_jobs.job.validate_administration_data'`, which likely refers to a function responsible for validating the uploaded administration data.
2. **Passing Job ID to the Task**:
    
    
    - Along with the task name, the job ID (`job.id`) is passed to the `async_task` function.
    - This job ID is used to associate the asynchronous task with the specific job record in the `Jobs` table.
3. **Task Execution and Hook**:
    
    
    - The `async_task` function also receives a `hook` parameter, in this case, `'api.v1.v1_jobs.job.seed_administration_data'`.
    - This hook is likely another function that is called after the validation task completes. It's responsible for seeding the validated administration data into the database.
4. **Task ID Generation**:
    
    
    - The `async_task` function generates a unique task ID for the job. This task ID is used to track the progress and status of the task.
    - The task ID is likely stored in the `Jobs` table, associated with the corresponding job record.
5. **Monitoring and Tracking**:
    
    
    - With the task ID, administrators can monitor and track the status of the bulk upload process.
    - The `Jobs` table provides a comprehensive view of each job, including its current status, result, and any relevant information.
6. **Error Handling and Notifications**:
    
    
    - If the validation or seeding task encounters any errors, these are captured and recorded in the `Jobs` table.
    - The system can be configured to notify administrators of any issues, allowing for prompt response and resolution.
7. **Completion and Feedback**:
    
    
    - Once the bulk upload task is completed (both validation and seeding), its final status is updated in the `Jobs` table.
    - Administrators can then review the outcome of the job and take any necessary actions based on the results.

### Database Seeder

#### Administration Seeder  


In the updated approach for seeding initial administration data, the shift from using **TopoJSON** to **Excel** file format is being implemented. While TopoJSON has been the format of choice, particularly for its geospatial data capabilities which are essential for visualization purposes, the move to Excel is driven by the need for a more flexible and user-friendly data input method.

However, this transition introduces potential challenges in maintaining consistency between the Excel-based administration data and the TopoJSON used for visualization. The inherent differences in data structure and handling between these two formats could lead to discrepancies, impacting the overall data integrity and coherence in the system. This change necessitates a careful consideration of strategies to ensure that the data remains consistent and reliable across both formats.

##### Key Considerations

- **Data Format and Consistency**: The shift to Excel might introduce inconsistencies with the TopoJSON format, especially in terms of data structure and geospatial properties.
- **Data Validation**: Robust validation is essential to mitigate errors common in Excel files.
- **Import Complexity**: Managing complex Excel structures requires additional parsing mechanisms.
- **Scalability and Performance**: Excel's performance with large datasets and memory usage should be monitored.
- **Security and Integrity**: Increased risk of data tampering in Excel files, and challenges in version control.
- **Automation and Workflow Integration**: Adapting automation processes to accommodate Excel's format variations.
- **User-Provided Data**: Dependence on external data updates necessitates clear handling policies.

##### Excel File Structure for Seeder

**File Naming Convention**

- Each Excel file represents a county.
- File names follow the format: `<county_id>-<county_name>.xlsx`
- Example: `101-Nairobi.xlsx`, `102-Mombasa.xlsx`

**File Content Structure**

Each file contains details of sub-counties and wards within the respective county.

<table border="1" id="bkmrk-sub-county_id-sub-co" style="border-collapse: collapse; width: 100%;"><thead><tr><th>Sub-County\_ID</th><th>Sub-County</th><th>Ward\_ID</th><th>Ward</th></tr></thead><tbody><tr><td>201</td><td>Westlands</td><td>301</td><td>XYZ</td></tr><tr><td>201</td><td>Westlands</td><td>302</td><td>ABC</td></tr><tr><td>...</td><td>...</td><td>...</td><td>...</td></tr></tbody></table>

##### Seeder Adaptation

- **Hard-coded National Level**: The national level, Kenya, should be hard-coded in the seeder.
- **Dynamic County Processing**: The seeder dynamically processes each county file, creating or updating records for sub-counties and wards.
- **File Processing Logic**: The seeder reads the file name to determine the county and iterates through each row to seed data for sub-counties and wards.

#### Administration Attribute Seeder

##### Assumptions

- Administration IDs are available and consistent.
- The attributes are stored in an Excel file, with a structure that includes administration IDs and their corresponding attributes.

##### Example Excel File Structure

<table border="1" id="bkmrk-admin_id-attribute1-" style="border-collapse: collapse; width: 100%;"><thead><tr><th>Admin\_ID</th><th>Attribute1</th><th>Attribute2</th><th>...</th></tr></thead><tbody><tr><td>1</td><td>Value1</td><td>Value2</td><td>...</td></tr><tr><td>2</td><td>Value1</td><td>Value2</td><td>...</td></tr><tr><td>...</td><td>...</td><td>...</td><td>...</td></tr></tbody></table>

##### Seeder Script

```python
import pandas as pd
from your_app.models import Administration, AdministrationAttribute

class AdministrationAttributeSeeder:
    def __init__(self, file_path):
        self.file_path = file_path

    def run(self):
        # Load data from Excel file
        df = pd.read_excel(self.file_path)

        # Iterate through each row in the DataFrame
        for index, row in df.iterrows():
            admin_id = row['Admin_ID']
            # Retrieve the corresponding Administration object
            administration = Administration.objects.get(id=admin_id)

            # Create or update AdministrationAttribute
            for attr in row.index[1:]:  # Skipping the first column (Admin_ID)
                attribute_value = row[attr]
                AdministrationAttribute.objects.update_or_create(
                    administration=administration,
                    attribute_name=attr,
                    defaults={'attribute_value': attribute_value}
                )

        print("Administration attributes seeding completed.")

# Usage
seeder = AdministrationAttributeSeeder('path_to_your_excel_file.xlsx')
seeder.run()
```

**Note:**

1. **File Path**: Replace `'path_to_your_excel_file.xlsx'` with the actual path to the Excel file containing the administration attributes, the excel files will be safely stored in backend/source.
2. **Model Structure**: This script assumes the existence of `Administration` and `AdministrationAttribute` models. Adjust the script according to your actual model names and structures.
3. `update_or_create`: This method is used to either update an existing attribute or create a new one if it doesn't exist.
4. **Error Handling**: Add appropriate error handling to manage cases where the administration ID is not found or the file cannot be read.

### Task Scheduler

The system needs to perform scheduled tasks periodically such as backups, report generation, and so on. Cron expression is a familiar format used to configure scheduled tasks to run periodically. Using the Cron expression in the Task Scheduler is the prefered approach.

Django Q has a feature to [run scheduled tasks](https://django-q.readthedocs.io/en/latest/schedules.html) and can be used to implement the Task Scheduler. With [Croniter](https://github.com/kiorky/croniter) package it can support cron expression.

#### Configuration

Use django settings to configure the Task Scheduler. Example:

```python
SCHEDULED_TASKS = {
    "task name" : {
        "func": "function_to_run",
        "cron": "* * * * *",
        "kwargs": {
            "hook": "post_function_to_run"
        }
    },
}
```

The task attributes (`func`, `cron`. ...) is a dictionary object representation of the [Django Q schedule parameters.](https://django-q.readthedocs.io/en/latest/schedules.html#reference)

#### Configuration update synchronization

The Task Scheduler configuration must support adding new tasks, deleting tasks, and changing task parameters. The command to synchronize configuration updates needs to be implemented. This command will be run on Django startup to apply configuration changes.

```python
from django_q.models import Schedule


def sync_scheduled_tasks():
  schedules = get_setting_schedules()
  existing_schedules = list(Schedule.objects.all())
  actions = calculate_schedule_changes(schedules, existing_schedules)
  apply_sync_actions(actions)


class SyncActions:
  to_add: List[Schedule]
  to_modify: List[Schedule]
  to_delete: List[Schedule]


def get_setting_schedules() -> List[Schedule]:
  """
  Converts the schedules configuration in the app settings to django-q
  schedule objects
  """
  ...


def calculate_schedule_changes(
  schedules: List[Schedule], existing_schedules: List[Schedule]
) -> SyncActions:
  """
  Calculates the operations that have to be taken in order to sync the schedules
  in the settings with the existing schedules in the db
  """
  ...


def apply_sync_actions(actions: SyncActions):
  """
  Applies the operations required to sync the schedules in the settings with the
  schedules in the DB
  """
  ...
```

#### List of scheduled tasks

- SQLite file generator

### Entity Type of Question

#### How to Achieve Entity Type of Question

To achieve an entity type of question, we need to ensure that the question type is supported in both web forms and mobile applications. We should consider the question format, ensuring alignment with [akvo-react-form](https://github.com/akvo/akvo-react-form#supported-field-type), and verify that the attributes can be stored in the database. For this case, we will use a type cascade with an additional attribute for further classification.

#### Handling Existing Cascade Type of Question

As mentioned earlier, we will use an extra attribute to manage existing cascade-type questions, if the cascade type does not have extra attributes and not providing an API endpoint, then the entity cascade will not work.

##### Provide API attribute for Entity Cascade

Implementing an API attribute for Entity Cascade is a significant enhancement aimed at improving the functionality of web forms. This feature involves adding an API attribute at the question level within a questionnaire and defining it as an object. The primary purpose of this object is to store the API URL, which is crucial for enabling the Entity Cascade functionality. This should be done as follows:

```json
{
  "api": {
    "endpoint": "<API URL here>"
  }
}

```

The format for the response can be found at the following URL:

[https://raw.githubusercontent.com/akvo/akvo-react-form/main/example/public/api/entities/1/13](https://raw.githubusercontent.com/akvo/akvo-react-form/main/example/public/api/entities/1/13)

##### Extra attribute for Entity Cascade

<table border="1" id="bkmrk-attribute-value-extr" style="border-collapse: collapse; width: 100%;"><colgroup><col style="width: 45.4167%;"></col><col style="width: 54.7025%;"></col></colgroup><tbody><tr><td>**Attribute**  
</td><td>**Value**  
</td></tr><tr><td>type  
</td><td>"entity"

This aims to identify on the backend that we will use entity table to filter entity data and send SQLite files to the mobile app

</td></tr><tr><td>name</td><td>Use existing entity names and fill them **exactly as they are in the database** to prevent data from not being found

https://wiki.cloud.akvo.org/link/65#bkmrk-entities-table

</td></tr><tr><td>parentId  
</td><td>Set the **question source ID** to trigger a list of entities to appear based on the answer to the question. If the questionnaire is filled out via a Webform, the entities will appear from the API response. The entities will appear from the SQL query results if the questionnaire is filled out via a Mobile app.

</td></tr></tbody></table>

##### Example

```json
{
  "id": 67,
  "label": "School cascade",
  "name": "school_cascade",
  "type": "cascade",
  "required": false,
  "order": 7,
  "api": {
    "endpoint": "https://akvo.github.io/akvo-react-form/api/entities/1/"
  },
  "extra": {
    "type": "entity",
    "name": "School",
    "parentId": 5
  }
},
```

##### BACKEND changes  


We need to modify the form details response by changing this file to retrieve the SQLite file based on the extra type attribute

[https://github.com/akvo/rtmis/blob/main/backend/api/v1/v1\_forms/serializers.py#L322-L331](https://github.com/akvo/rtmis/blob/main/backend/api/v1/v1_forms/serializers.py#L322-L331)

```python
for cascade_question in cascade_questions:
  if cascade_question.type == QuestionTypes.administration:
    source.append("/sqlite/administrator.sqlite")
  if (
    cascade_question.extra and
    cascade_question.extra.get('type') == 'entity'
  ):
    source.append("/sqlite/entity_data.sqlite")
  else:
    source.append("/sqlite/organisation.sqlite")
return source
```

[https://github.com/akvo/rtmis/blob/main/backend/api/v1/v1\_forms/serializers.py#L198-L216](https://github.com/akvo/rtmis/blob/main/backend/api/v1/v1_forms/serializers.py#L198-L216)

```python
def get_source(self, instance: Questions):
    user = self.context.get('user')
    assignment = self.context.get('mobile_assignment')
    if instance.type == QuestionTypes.cascade:
        if instance.extra:
            cascade_type = instance.extra.get("type")
            cascade_name = instance.extra.get("name")
            if cascade_type == "entity":
                # Get entity type by name
                entity_type = Entity.objects.filter(name=cascade_name).first()
                entity_id = entity_type.id if entity_type else None
                return {
                    "file": "entity_data.sqlite",
                    "cascade_type": entity_id,
                    "cascade_parent": "administrator.sqlite"
                }
    # ... the rest of the code
```

The backend response will be

```json
{
   ...
    "source": {
      "file": "entity_data.sqlite",
      "cascade_type": 1,
      "cascade_parent": "administrator.sqlite"
    }
}
```

#### Mobile Handler for Entity Type of Question

Once the mobile application can read the entity SQLite file, we can execute a filtering query based on the selected administration.

##### Test cases

- It should be able to load `entity\_data.sqlite`.
- It should be able to be filtered by cascade\_type and the selected administration ID.
- It should display the answer from the currentValues.
- It should not be shown when the administration has not been selected.

##### Store selected administration  


We need to store the selected administration to quickly retrieve the parent of the entity cascade. Once the administration is selected, the related entity list should be made available.

To achieve this, we can add a new global state called ``administration`` and set its value using the onChange event in the TypeCascade component.

- Add administration in global state forms 
    - [https://github.com/akvo/rtmis/blob/main/app/src/store/forms.js#L13](https://github.com/akvo/rtmis/blob/main/app/src/store/forms.js#L13)
    - ```javascript
        ...
          prefilled: false,
          administration: null,
        }
        ```
- Set value `administration` in onChange event 
    - [https://github.com/akvo/rtmis/blob/main/app/src/form/fields/TypeCascade.js#L66-L67](https://github.com/akvo/rtmis/blob/main/app/src/form/fields/TypeCascade.js#L66-L67)
    - ```
        FormState.update((s) => {
          ...
          s.administration = source?.file === 'administrator.sqlite'
            ? finalValues
            : s.administration;
        });
        ```

##### Modify initial cascade

Change how the dropdown data is initialized by checking the`cascadeParent` from the source value. If '`cascadeParent`' exists, use it as a parameter to retrieve the selected administration as the parent ID. Otherwise, obtain the parent from the 'parent\_id' value.

To filter entity types, we can utilize the '`cascadeType`' property to display a list of relevant entities with previously defined extra attributes. The implementation will look as follows:

[https://github.com/akvo/rtmis/blob/main/app/src/form/fields/TypeCascade.js#L115-L134](https://github.com/akvo/rtmis/blob/main/app/src/form/fields/TypeCascade.js#L115-L134)

```javascript
const parentIDs = cascadeParent === 'administrator.sqlite' ? prevAdmAnswer || [] : parentId || [0];
const filterDs = dataSource
  ?.filter((ds) => {
    if (cascadeParent) {
      return parentIDs.includes(ds?.parent);
    }
    return (
      parentIDs.includes(ds?.parent) ||
      parentIDs.includes(ds?.id) ||
      value?.includes(ds?.id) ||
      value?.includes(ds?.parent)
    );
  })
  ?.filter((ds) => {
    if (cascadeType && ds?.entity) {
      return ds.entity === cascadeType;
    }
    return ds;
  });
```

## <span id="bkmrk-grade-determination--1" style="font-size: 26pt; font-family: Arial,sans-serif; color: #000000; background-color: transparent; font-weight: 400; font-style: normal; font-variant: normal; text-decoration: none; vertical-align: baseline; white-space: pre-wrap;">Grade Determination Process</span>

### Grade Claim

The Sub-County or Ward PHO opens a Grade Determination process by claiming that a community has reached a G level. A team is assembled to collect data in all households and at the community level. The collected data is associated with the Grade Determination process, i.e. it is not stored alongside the routine data. Specific questions could be added to the Community form to reinforce the accountability of PHOs in claiming a grade. Ex:

- Confirm that the grade claim criteria are achieved.
- Confirm that all households have been visited.

The collected data does not need to go through the data approval workflow the routine data is subject to. Based on the collected data, the Sub-County or Ward the PHO can decide to submit the claim for approval to the Sub-County PHO or to cancel it.

The platform computes and displays the % completion of the data collection activity associated with the Grade Determination process (the number of households of a community - denominator - is collected in the community form). A % completion below 100% does not prevent the Sub-County or Ward the PHO from submitting the claim for approval.

**Features**

- User is able to create a Grade Determination Process
- User is able to collect data that goes to a different bucket
- User is able to see browse data associated with the Grade Determination Process

### Claim Certification

Claim certification is done by doing another round of data collection on a sampled number of households per candidate communities. The collected data does not need to go through the data approval workflow the routine data is subject to. The collected data goes to a different bucket than the routine data. The data collection is performed by staff of a different Sub-County a community belongs to. The data collection is done in batches: a team will plan and perform the data collection for multiple communities. The County PHO is in charge of creating the batches and to assign them to the Sub-County PHO that will later put together a team of data collectors. Candidate Communities are expected to be assigned to a batch within two months of being approved for the certification process.

Specific sampling rules apply:

- 50%-100% of at-risk households should be sampled, with a minimum sample of 20 new/at-risk households (or 100% of at-risk households where fewer than 20)
- 30%-100% of other households should be sampled, with a minimum sample of 30 other households (or 100% of other households where fewer than 30)

Based on the data collected, the County PHO can decide to:

- Certify a community - The community is then flagged for the requested grad. This ends the Grade Determination Process.
- Fail the certification - The Grade Determination Process ends.

The users are able to see the outcomes for which the targeted level was not reached in order to provide feedback to the community.

**Features**

- The user is able to confirm the certification
- The user is able to to create batches of Candidate Communities and assign them to a Sub-County user
- The Sub-County user is able to assign the Candidate Communities to specific enumerators.
- User is able to collect data that goes to a different bucket

#####  