# RTMIS The Kenya Rural Urban Sanitation and Hygiene (RUSH) platform is a real-time monitoring and information system owned by the Ministry of Health. The platform aggregates quantitative and qualitative data from county and national levels and facilitates data analysis, report generation and visualizations. # Project Sheet [![Build Status](https://camo.githubusercontent.com/2943ff5e7ae00c176b12521f7f10899d71d3ee8657553503547c59650353cfb4/68747470733a2f2f616b766f2e73656d6170686f726563692e636f6d2f6261646765732f72746d69732f6272616e636865732f6d61696e2e7376673f7374796c653d736869656c6473)](https://akvo.semaphoreci.com/projects/rtmis) [![Repo Size](https://camo.githubusercontent.com/9853310262a74a424c120246da65c07b0ab0162035d1ff0749d56621aca70186/68747470733a2f2f696d672e736869656c64732e696f2f6769746875622f7265706f2d73697a652f616b766f2f72746d6973)](https://img.shields.io/github/repo-size/akvo/rtmis) [![Languages](https://camo.githubusercontent.com/81edd661dab43e22e99c51ebb677230772a6679496eed66ebf05c630d71f1f3e/68747470733a2f2f696d672e736869656c64732e696f2f6769746875622f6c616e6775616765732f636f756e742f616b766f2f72746d6973)](https://img.shields.io/github/languages/count/akvo/rtmis) [![Issues](https://camo.githubusercontent.com/63c3aabd6460832b1dc4f87dbc4df2e55b2c8d9db42c91587fbc3bfcc702cca3/68747470733a2f2f696d672e736869656c64732e696f2f6769746875622f6973737565732f616b766f2f72746d6973)](https://img.shields.io/github/issues/akvo/rtmis) [![Last Commit](https://camo.githubusercontent.com/2d75610561a882c750d494fe87b2a6805854de72facdce9b8684635c04d1b0b0/68747470733a2f2f696d672e736869656c64732e696f2f6769746875622f6c6173742d636f6d6d69742f616b766f2f72746d69732f6d61696e)](https://img.shields.io/github/last-commit/akvo/rtmis/main) [![Coverage Status](https://camo.githubusercontent.com/6efb5972e72381f580d6f50892eb0e4e7a7ce0b0627b9fbeee1b88f7403145b7/68747470733a2f2f636f766572616c6c732e696f2f7265706f732f6769746875622f616b766f2f72746d69732f62616467652e737667)](https://coveralls.io/github/akvo/rtmis) [![Coverage Status](https://camo.githubusercontent.com/f8aaf470cd7ef98d79775ca9b1e3d38af16589308fe0b3b317441deee47ce5ad/68747470733a2f2f696d672e736869656c64732e696f2f72656164746865646f63732f72746d69733f6c6162656c3d72656164253230746865253230646f6373)](https://rtmis.readthedocs.io/en/latest)
**Name** RTMIS (Real Time Monitoring Information Systems)
**Project Scope** The government of Kenya needs a way to effectively monitor sanitation and hygiene facilities nationwide. Akvo is developing an integrated Real Time Management Information System (RTMIS) to collect, analyse and visualise all sanitation and hygiene data in both rural and urban Kenya, allowing the Ministry of Health to improve sanitation and hygiene for citizens nationwide.
**Contract Link**
**Project Dashboard Link**
**Start Date**
**End Date**
**Repository Link** [https://github.com/akvo/rtmis](https://github.com/akvo/rtmis)
**Tech Stack**List of technologies used to execute the technical scope of the project: - Front-end: JavaScript with React Framework - Back-end: Python with Django Framework - Testing: Django Test Framework, Jest - Coverage: [Coveralls](https://coveralls.io/github/akvo/rtmis) - Documentation: [RTD](https://rtmis.readthedocs.io/en/latest/), [dbdocs](https://dbdocs.io/deden/rtmis-main) - CI & CD: [Semaphore](https://akvo.semaphoreci.com/projects/rtmis) - Hosting: GKE - Database: PostgreSQL, Cloud-SQL - Storage: Cloud Storage Buckets
**Asana Link** [https://app.asana.com/0/1204439932895582/overview](https://app.asana.com/0/1204439932895582/overview)
**Slack Channel Link**[https://akvo.slack.com/archives/C04RMBFUR6F](https://akvo.slack.com/archives/C04RMBFUR6F)
# Low Level Design ## Introduction ### About RUSH The Kenya Rural Urban Sanitation and Hygiene (RUSH) platform is an advanced and comprehensive real-time monitoring and information system owned by the Ministry of Health in Kenya. This platform is designed to streamline and enhance the management of sanitation and hygiene data at both county and national levels. One of the notable capabilities of the RUSH platform is its ability to handle large amounts of data efficiently. It supports Excel bulk upload, allowing users to upload data in bulk from Excel spreadsheets, which can significantly expedite the data entry process. Additionally, the platform features a web-form batch submission functionality, enabling users to submit multiple data entries through a user-friendly web-based interface. To ensure data accuracy and reliability, the RUSH platform incorporates a data review and approval hierarchy between administrative levels. This means that data entered into the system undergoes a rigorous review process, where it is checked and approved by designated personnel at various administrative levels. This hierarchical approach ensures that data is thoroughly reviewed and validated before being utilised for analysis and decision-making. Another significant aspect of the RUSH platform is its visualization capabilities. The platform follows the [Joint Monitoring Program (JMP)](https://washdata.org/how-we-work/about-jmp) standard and the RUSH (Rural Urban Sanitation) standard when presenting data visually. By adhering to these standards, the platform ensures consistency and comparability in data visualization across different geographical areas and time periods. The visualizations generated by the platform help in understanding trends, patterns, and gaps in sanitation and hygiene metrics, providing valuable insights for policymakers, stakeholders, and researchers. ### The purpose of RUSH Platform The purpose of the Kenya Rural Urban Sanitation and Hygiene (RUSH) platform is to support effective monitoring, management, and improvement of sanitation and hygiene practices in Kenya. It serves as a comprehensive information system owned by the Ministry of Health, aiming to address the challenges and gaps in sanitation and hygiene by providing reliable data, analysis, and visualization tools. 1. **Data Collection and Aggregation**: The RUSH platform serves as a centralised repository for collecting and aggregating both quantitative and qualitative data related to sanitation and hygiene practices. It allows for data collection at the county and national levels, ensuring comprehensive coverage and representation of diverse geographical areas. 2. **Real-Time Monitoring**: The platform operates in real-time, enabling timely monitoring of sanitation and hygiene indicators. This real-time monitoring helps identify emerging trends, gaps, and challenges, allowing for prompt intervention and decision-making. 3. **Data Analysis and Insights**: The RUSH platform facilitates data analysis, allowing policymakers and stakeholders to gain valuable insights into the state of sanitation and hygiene practices across different regions and demographics. By analising the collected data, trends, patterns, and areas of improvement can be identified, contributing to evidence-based decision-making and targeted interventions. 4. **Reporting and Visualization**: The platform enables the generation of reports and visualizations based on the collected data. The reports provide a comprehensive overview of the sanitation and hygiene situation, highlighting key indicators, challenges, and progress. The visualizations, following the JMP and RUSH standards, make complex data easily understandable, aiding in communication and knowledge dissemination. 5. **Decision Support**: The RUSH platform acts as a decision support system, providing policymakers, health officials, and other stakeholders with the necessary information to formulate policies, design interventions, and allocate resources effectively. The data-driven insights and visualizations empower decision-makers to prioritize areas for improvement, target resources where they are most needed, and track progress over time. 6. **Collaboration and Accountability**: The platform enhances collaboration between different administrative levels and stakeholders involved in sanitation and hygiene management. It establishes a data review and approval hierarchy, ensuring the accuracy and reliability of data. By promoting transparency and accountability, the platform facilitates coordinated efforts towards achieving national and international targets related to sanitation and hygiene. 7. **Continuous Improvement**: The RUSH platform can be continually updated and enhanced to align with evolving needs and priorities. As new data sources, indicators, or best practices emerge, the platform can be adapted to incorporate these changes, ensuring that it remains a relevant and effective tool for monitoring and managing sanitation and hygiene in Kenya. By leveraging technology and real-time data, the platform aims to contribute to better health outcomes, improved living conditions, and sustainable development in both rural and urban areas of the country. ## Functional Overview The Kenya Rural Urban Sanitation and Hygiene (RUSH) platform is a comprehensive real-time monitoring and information system owned by the Ministry of Health. It serves as a centralized platform for capturing, analising, and visualizing sanitation and hygiene data at the national, county, sub-county, and ward levels. The platform provides various functionalities to facilitate data collection, analysis, reporting, and visualization, empowering decision-makers with timely and accurate information. The RUSH platform promotes collaboration and accountability by fostering engagement between different administrative levels and stakeholders involved in sanitation and hygiene management. It acts as a decision support system, providing policymakers and health officials with the necessary information to formulate policies, design interventions, and allocate resources effectively. Additionally, the platform encourages continuous improvement by being adaptable to changing needs and priorities, accommodating new data sources, indicators, and best practices. To ensure data accuracy and reliability, the RUSH platform incorporates a robust data review and approval hierarchy between administrative levels. This hierarchical approach guarantees that data is thoroughly reviewed, validated, and approved by designated personnel, enhancing the credibility and quality of the information within the system.

the RUSH platform's functional overview highlights its role as a comprehensive system for data collection, analysis, reporting, and visualization.

#### Data Collection and Management - The RUSH platform enables users to input data through user-friendly forms, allowing for efficient data collection. - Users can make use of features like Excel bulk upload to upload a large amount of data in a structured manner, facilitating data entry and saving time. - The platform supports data validation, ensuring the accuracy and integrity of the collected data. - Data entries are associated with the respective administrative levels, allowing for easy filtering and analysis based on administrative geographical hierarchy. #### Approval Hierarchy - The RUSH platform incorporates an approval hierarchy system to ensure data accuracy and control. - Administrators at each level have the authority to approve or reject data entries based on their jurisdiction. - Approvers can review and make necessary edits or corrections to the data before approving or rejecting it. - The approval hierarchy helps maintain data quality and integrity by involving multiple levels of review and verification. #### User Roles and Access Control - The RUSH platform implements a role-based access control system to manage user permissions and access levels. - Users are assigned roles based on their responsibilities and administrative levels. - Each role has specific page access permissions, allowing users to perform relevant tasks within their assigned administrative level. - The platform ensures secure access and proper segregation of duties by granting appropriate permissions to users based on their roles. #### Visualisations and Reports - The platform provides visualisations following the Joint Monitoring Programme (JMP) and RUSH standards. - Visualisations include charts, aggregates, tables, and advanced filters. - These visualisations allow users to gain insights into the collected data, track trends, and generate reports. - Reports can be generated based on selected criteria, such as administrative level, time period, and specific indicators. - The platform offers export functionalities, allowing users to download reports or visualisations for further analysis or sharing. ## Design Considerations The design of the RUSH platform incorporates several key considerations to ensure its effectiveness in addressing the challenges and requirements of managing sanitation and hygiene practices in Kenya. Some of the design considerations of the RUSH platform include: 1. **Data Aggregation and Integration:** The RUSH platform is designed to aggregate both quantitative and qualitative data from various sources and administrative levels. It integrates data from county and national levels, allowing for comprehensive and unified data management. This design consideration enables a holistic view of sanitation and hygiene practices across different geographical areas. 2. **Real-time Monitoring and Reporting:** The platform emphasise real-time monitoring of sanitation and hygiene indicators. It provides timely updates on data collection, analysis, and reporting, enabling prompt interventions and decision-making. This design consideration ensures that stakeholders have access to the most up-to-date information to address emerging challenges effectively. 3. **User-Friendly Interface:** The RUSH platform features a user-friendly interface that enhances usability and accessibility. It is designed with intuitive navigation, clear visual cues, and streamlined workflows. This consideration enables users of varying technical backgrounds to easily navigate the platform and perform tasks efficiently. 4. **Role-Based Access and Permissions:** The platform employs role-based access control, assigning different levels of access and permissions based on user roles and administrative levels. This design consideration ensures data security, privacy, and appropriate data management by allowing users to access only the functionalities and data relevant to their roles and responsibilities. 5. **Data Validation and Approval Hierarchy:** The RUSH platform incorporates a data validation process and approval hierarchy to ensure data accuracy and reliability. Appropriate users at different administrative levels review, validate, and approve the data, maintaining data integrity throughout the platform. 6. **Standardized Visualizations:** The platform follows standardized visualization practices, including the Joint Monitoring Programme (JMP) standard and the RUSH standard. This design consideration ensures consistency and comparability in data visualizations, allowing for meaningful insights and effective communication of information across different regions and time periods. 7. **Scalability and Adaptability:** The design of the RUSH platform takes into account its scalability and adaptability. It is built to accommodate a growing volume of data and changing requirements over time. This consideration ensures that the platform can evolve and meet the changing needs of sanitation and hygiene management in Kenya. 8. **Integration of Existing Systems:** The design of the RUSH platform takes into consideration the integration of existing systems and data sources. It aims to leverage and integrate with other relevant platforms, databases, and information systems to facilitate data exchange, interoperability, and collaboration. These design considerations are aimed at creating a robust, user-friendly, and scalable platform that effectively supports data management, analysis, reporting, and decision-making for improved sanitation and hygiene practices in Kenya. ## Architecture ### Class Diagrams ### Class Functions #### User Roles The RUSH platform offers a range of user roles, each with its own set of capabilities and responsibilities. The Super Admin holds the highest level of administrative authority at the national level and oversees the overall operation of the platform. County Admins have the responsibility of managing the platform within their respective counties, while Data Approvers review and approve data at the sub-county level. Data Entry Staff are responsible for collecting data at the ward level, ensuring that information is captured accurately at the grassroots level. Additionally, Institutional Users have access to view and download data from all counties, facilitating research and analysis. These user roles, aligned with administrative levels, contribute to the effective management of sanitation and hygiene data. By assigning specific roles and access privileges, the RUSH platform ensures that data is collected, validated, and utilised appropriately. This promotes accountability, collaboration, and evidence-based decision-making, leading to improved sanitation and hygiene practices throughout Kenya. In the following sections is the detailed descriptions of each user role, outlining their specific capabilities, page access, administration levels, and responsibilities. Understanding the functions and responsibilities of these user roles is vital to effectively utilising the RUSH platform and harnessing its full potential for transforming sanitation and hygiene practices in Kenya. 1. **Super Admin:** The Super Admin holds the highest level of administrative authority in the RUSH platform at the national level. They have access to all functionalities and pages, including user management, data control, visualisation, questionnaires, approvals, and reports. As the overall national administrator, their responsibilities encompass assigning roles to County Admins, managing the organisation's settings, and overseeing the platform's operations. The Super Admin plays a crucial role in ensuring the smooth functioning and effective utilisation of the RUSH platform nationwide. 2. **County Admin:** County Admins are responsible for overseeing the RUSH platform at the county level. They possess extensive access to functionalities and pages, including user management, data control, visualisation, questionnaires, approvals, and reports. Their primary role involves managing and coordinating the platform's operations within their respective counties. This includes assigning roles to Sub County RUSH Admins (Approvers) operating at the sub-county level, who play a crucial role in data management and approval. County Admins act as key facilitators in ensuring efficient and accurate data collection and analysis within their counties. 3. **Data Approver:** Data Approvers hold the responsibility of giving final approval to the data submitted from their respective sub-counties. Operating at the sub-county administrative level, they possess access to functionalities and pages such as data control, visualisation, approvals, questionnaires, and reports. Data Approvers play a critical role in reviewing and validating data submitted by Data Entry Staff from their areas of jurisdiction. They have the authority to edit or return data for correction, ensuring data accuracy and reliability within their assigned sub-counties. 4. **Data Entry Staff:** Data Entry Staff operate at the ward administrative level and are responsible for collecting data from the communities or villages assigned to them. They have access to functionalities and pages related to data entry, form submissions, data control, visualisation, and reports. Data Entry Staff play an essential role in gathering accurate and comprehensive data at the grassroots level, ensuring that the RUSH platform captures information directly from the targeted areas. Their diligent data collection efforts contribute to the overall effectiveness and reliability of the sanitation and hygiene data within the platform. 5. **Institutional User:** Institutional Users have access to functionalities and pages such as profile management, visualisation, and reports. They can view and download data from all counties within the RUSH platform. Institutional Users do not possess administrative privileges but play a vital role in accessing and utilising the data for research, analysis, and decision-making purposes. Their ability to access data from multiple administrative levels ensures comprehensive insights and contributes to informed actions and interventions in the field of sanitation and hygiene. #### Administrative Levels The administrative levels within the RUSH platform are of utmost importance as they serve as a fundamental backbone for various components within the system. These administrative levels, provided by the Ministry of Health, play a crucial role in user management, data organisation, and the establishment of approval hierarchy rules. As such, this master list of administrative levels stands as a critical component that needs to be accurately provided by the Ministry of Health. The administrative levels serve as a key reference for assigning roles and access privileges to users. Users are associated with specific administrative levels based on their responsibilities and jurisdiction. The administrative levels determine the data organisation structure, allowing for effective data aggregation, review, and approval processes. The approval hierarchy rules are established based on these administrative levels, ensuring proper authorisation and validation of submitted data. Additionally this allows for effective data visualisation, filtering, and analysis based on administrative boundaries. The administrative levels consist of distinct administrative names, level names, and unique identifiers, allowing for easy identification and filtering of data points within the platform. 1. **National:** The National level represents the highest administrative level within the RUSH platform. It encompasses the entire country of Kenya and serves as the top-level jurisdiction for data management, coordination, and decision-making. 2. **County:** The County level represents the second administrative level within the RUSH platform. It corresponds to the various counties in Kenya and acts as a primary jurisdiction for data collection, management, and implementation of sanitation and hygiene initiatives. 3. **Sub-County:** The Sub-County level represents the third administrative level within the RUSH platform. It corresponds to the sub-county divisions within each county and serves as a localised jurisdiction for data collection, review, and approval processes. 4. **Ward:** The Ward level represents the fourth administrative level within the RUSH platform. It corresponds to the wards or smaller subdivisions within each sub-county. Wards act as the grassroots level of data collection, ensuring that data is collected at the most localised and community-specific level. Here's an explanation of the models and their relationships: 1. **Levels Model:** - The Levels model represents the administrative levels within the RUSH platform. - Each instance of the Levels model corresponds to a specific administrative level, such as national, county, sub-county, or ward. - The model includes fields such as **name** and **level**. - The **name** field stores the name or label for the administrative level, as the explained administrative level above. - The level field stores the numerical representation of the administrative level, with lower values indicating higher levels of administration. 2. **Administration Model:** - The Administration model represents administrative entities within the RUSH platform. - Each instance of the Administration model corresponds to a specific administrative entity, such as a county or sub-county. - The model includes fields such as **parent, code, level, name,** and **path**. - The **parent** field establishes a foreign key relationship with the Administration model itself, representing the parent administrative entity. - The **code** field stores a unique identifier or code for the administrative entity that comes from shapefile. - The **level** field establishes a foreign key relationship with the Levels model, indicating the administrative level associated with the entity. - The **name** field stores the name or label for the administrative entity. - The **path** field stores the hierarchical path or location of the administrative entity within the administrative structure. Functionality: - The Levels model allows for the definition and categorisation of different administrative levels within the RUSH platform. - The Administration model represents specific administrative entities, such as counties or sub-counties, and their relationships with higher-level entities. - The parent field enables the establishment of hierarchical relationships between administrative entities, creating a structure that reflects the administrative hierarchy in the system. - The level field associates each administrative entity with a specific administrative level, providing a standardised way to categorise and organise entities based on their level. - The code field allows for unique identification or labeling of administrative entities, facilitating easy referencing and searchability. - The name field stores the name or label of each administrative entity, providing a human-readable identifier for easy identification. - The path field stores the hierarchical path or location of an administrative entity within the administrative structure, aiding in navigation and hierarchical querying. #### Forms Forms play a vital role in the RUSH platform, serving as a fundamental component for collecting data related to sanitation and hygiene practices. They are designed to capture specific information necessary for monitoring and evaluating sanitation initiatives at various administrative levels. Importance of Forms:
1. **Data Collection:** Forms are designed to capture relevant data regarding sanitation and hygiene practices. They ensure that standardised information is collected consistently across different administrative levels. 2. **Information Management:** Forms enable the organised storage and retrieval of data related to sanitation and hygiene practices. The collected data can be accessed, analised, and visualised for informed decision-making and policy formulation. 3. **Monitoring and Evaluation:** By collecting data through forms, the RUSH platform facilitates ongoing monitoring and evaluation of sanitation initiatives. This helps measure progress, identify challenges, and make data-driven decisions to improve sanitation and hygiene practices. 4. **Data Consistency and Standardisation:** With questionnaire definitions and question attributes, forms ensure consistency and standardisation in data collection. This promotes reliable analysis and comparison of data across different regions and time periods. 5. **Approval Workflow:** Forms incorporate approval rules and assignments, allowing designated administrators to review and approve data submitted through the platform. This ensures data quality and compliance with established standards. 6. **User Assignments:** The platform assigns specific forms to individual users, enabling targeted data collection responsibilities. This streamlines the data collection process and ensures accountability. 7. **Integration with Other Components:** Forms are integrated with other platform components such as question groups, question attributes, and options. This enhances the flexibility and customisation of data collection based on specific requirements.
Questions and Question Groups within Forms Questions and question groups are essential components that contribute to the structured organisation and systematic data collection within forms. These components are interconnected and play a significant role in capturing information related to sanitation and hygiene practices. 1. **Forms Model** - The Forms represents individual forms within the RUSH platform. - Each form has a unique `name`, `version`, `uuid`, and `type` ("County" or "National"). - The model establishes relationships with other models to facilitate data approval, question grouping, and user assignments. - Forms serve as the container for questions and question groups, defining the overall structure and context for data collection. - Each form is associated with specific questions and question groups that collectively capture data for a particular purpose, such as county-level or national-level sanitation assessments. 2. **Question Groups Model** - The Question Group represents a grouping mechanism for related questions within a form. - Question groups are an organisational unit within a form that groups together questions with a common theme or topic. - Each question group is associated with a specific form and has a unique name. - The order of question groups determines the sequence or presentation of these groups within the form. 3. **Questions Model** - The Questions model represents individual questions within a form. - Questions are associated with a specific form and question group, defining their position and relationship within the form's structure. - Each question captures specific data points related to sanitation and hygiene practices. - Questions can have various types (e.g., **administration (cascade), text, number, option, multiple option, geo, date**) and properties (e.g., **required, rule, dependency, and api for cascade type of question**). - The properties of questions are defined within the context of the question group and form they belong to.

Cascade type of question has different api call properties for each users depends on the access of the administrative of so users can only fill the form within their administrative area

#### Form Data the Form Data and Answers models work together to capture, store, and associate form data and the corresponding answers within the RUSH platform. 1. **Form Data Model** - When a user fills out a form in the RUSH platform, the entered data is captured and stored as form data. - The Form Data model represents a specific data entry for a form within the platform. - Each instance of the Form Data model corresponds to a unique submission of a form by a user. - The Form Data model includes information such as the **form name, version, administration level, geographical data**, and **timestamps** for creation and updates. - By storing form data, the RUSH platform maintains a record of each user's submission and enables the tracking of changes and updates over time. - The form data is associated with the relevant form through a foreign key relationship, allowing easy retrieval and analysis of the submitted information. 2. **Answers Model** - Within each form data entry, the user provides answers to the questions included in the form. - The Answers model represents individual answers for specific questions within a form data entry. - Each answer in the Answers model is associated with a particular question and the corresponding form data entry. - The model includes fields such as the **answer value, name, options** (if applicable), and **timestamps** for creation and updates. - By storing answers as separate instances, the RUSH platform retains the granularity of data, allowing for detailed analysis of each answer within the form data. - The answers are linked to the form data and questions through foreign key relationships, facilitating easy retrieval and analysis of specific answers within a given form data entry. Functionality: - When a user submits a form, the entered data is processed and saved as a new instance of the Form Data model, representing a unique data entry for that form. - The associated answers for each question in the form are stored as instances of the Answers model, linked to the corresponding form data entry and question. - The form data and answers are stored in the database, providing a comprehensive record of the submitted information. - This stored data can be accessed, retrieved, and analised for various purposes, such as monitoring and evaluating sanitation and hygiene practices, generating reports, and informing decision-making processes. - The relationship between form data and answers allows for flexible querying and analysis, enabling the platform to generate insights and visualise trends based on the collected data. ### Class Overview
Class Name Class Notes
OrganisationOrganisation(id, name)
OrganisationAttributeOrganisationAttribute(id, organisation, type)
SystemUserSystemUser(id, password, last\_login, is\_superuser, email, date\_joined, first\_name, last\_name, phone\_number, designation, trained, updated, deleted\_at, organisation)
LevelsLevels(id, name, level)
AdministrationAdministration(id, parent, code, level, name, path)
AccessAccess(id, user, administration, role)
FormsForms(id, name, version, uuid, type)
FormApprovalRuleFormApprovalRule(id, form, administration)
FormApprovalAssignmentFormApprovalAssignment(id, form, administration, user, updated)
QuestionGroupQuestionGroup(id, form, name, order)
QuestionsQuestions(id, form, question\_group, order, text, name, type, meta, required, rule, dependency, api, extra)
QuestionOptionsQuestionOptions(id, question, order, code, name, other)
UserFormsUserForms(id, user, form)
QuestionAttributeQuestionAttribute(id, name, question, attribute, options)
ViewJMPCriteriaViewJMPCriteria(id, form, name, criteria, level, score)
FormDataFormData(id, name, form, administration, geo, created\_by, updated\_by, created, updated)
PendingDataBatchPendingDataBatch(id, form, administration, user, name, uuid, file, approved, created, updated)
PendingDataBatchCommentsPendingDataBatchComments(id, batch, user, comment, created)
PendingFormDataPendingFormData(id, name, form, data, administration, geo, batch, created\_by, updated\_by, created, updated)
PendingDataApprovalPendingDataApproval(id, batch, user, level, status)
PendingAnswersPendingAnswers(id, pending\_data, question, name, value, options, created\_by, created, updated)
PendingAnswerHistoryPendingAnswerHistory(id, pending\_data, question, name, value, options, created\_by, created, updated)
AnswersAnswers(id, data, question, name, value, options, created\_by, created, updated)
AnswerHistoryAnswerHistory(id, data, question, name, value, options, created\_by, created, updated)
ViewPendingDataApprovalViewPendingDataApproval(id, status, user, level, batch, pending\_level)
ViewDataOptionsViewDataOptions(id, data, administration, form, options)
ViewOptionsViewOptions(id, data, administration, question, answer, form, options)
ViewJMPDataViewJMPData(id, data, path, form, name, level, matches, score)
ViewJMPCountViewJMPCount(id, path, form, name, level, total)
JobsJobs(id, task\_id, type, status, attempt, result, info, user, created, available)
DataCategoryDataCategory(id, name, data, form, options)
TaskTask(id, name, func, hook, args, kwargs, result, group, started, stopped, success, attempt\_count)
SuccessSuccess(id, name, func, hook, args, kwargs, result, group, started, stopped, success, attempt\_count)
FailureFailure(id, name, func, hook, args, kwargs, result, group, started, stopped, success, attempt\_count)
ScheduleSchedule(id, name, func, hook, args, kwargs, schedule\_type, minutes, repeats, next\_run, cron, task, cluster)
OrmQOrmQ(id, key, payload, lock)
### Database Overview #### Main Tables **access**
postablecolumnnulldtypelendefault
1accessidNObigint access\_id\_seq
2accessroleNOint
3accessadministration\_idNObigint
4accessuser\_idNObigint
**administrator**
postablecolumnnulldtypelendefault
1administratoridNObigint administrator\_id\_seq
2administratorcodeYEScharacter varying255
3administratornameNOtext
4administratorlevel\_idNObigint
5administratorparent\_idYESbigint
6administratorpathYEStext
**answer**
postablecolumnnulldtypelendefault
1answeridNObigint answer\_id\_seq
2answernameYEStext
3answervalueYESdouble
4answeroptionsYESjsonb
5answercreatedNOtz timestamp
6answerupdatedYEStz timestamp
7answercreated\_by\_idNObigint
8answerdata\_idNObigint
9answerquestion\_idNObigint
**answer\_history**
postablecolumnnulldtypelendefault
1answer\_historyidNObigint answer\_history\_id\_seq
2answer\_historynameYEStext
3answer\_historyvalueYESdouble
4answer\_historyoptionsYESjsonb
5answer\_historycreatedNOtz timestamp
6answer\_historyupdatedYEStz timestamp
7answer\_historycreated\_by\_idNObigint
8answer\_historydata\_idNObigint
9answer\_historyquestion\_idNObigint
**batch**
postablecolumnnulldtypelendefault
1batchidNObigint batch\_id\_seq
2batchnameNOtext
3batchuuidYESuuid
4batchfileYEScharacter varying200
5batchcreatedNOtz timestamp
6batchupdatedYEStz timestamp
7batchadministration\_idNObigint
8batchform\_idNObigint
9batchuser\_idNObigint
10batchapprovedNObool
**batch\_comment**
postablecolumnnulldtypelendefault
1batch\_commentidNObigint batch\_comment\_id\_seq
2batch\_commentcommentNOtext
3batch\_commentcreatedNOtz timestamp
4batch\_commentbatch\_idNObigint
5batch\_commentuser\_idNObigint
**data**
postablecolumnnulldtypelendefault
1dataidNObigint data\_id\_seq
2datanameNOtext
3datageoYESjsonb
4datacreatedNOtz timestamp
5dataupdatedYEStz timestamp
6dataadministration\_idNObigint
7datacreated\_by\_idNObigint
8dataform\_idNObigint
9dataupdated\_by\_idYESbigint
**form**
postablecolumnnulldtypelendefault
1formidNObigint form\_id\_seq
2formnameNOtext
3formversionNOint
4formuuidNOuuid
5formtypeYESint
**form\_approval\_assignment**
postablecolumnnulldtypelendefault
1form\_approval\_assignmentidNObigint form\_approval\_assignment\_id\_seq
2form\_approval\_assignmentupdatedYEStz timestamp
3form\_approval\_assignmentadministration\_idNObigint
4form\_approval\_assignmentform\_idNObigint
5form\_approval\_assignmentuser\_idNObigint
**form\_approval\_rule**
postablecolumnnulldtypelendefault
1form\_approval\_ruleidNObigint form\_approval\_rule\_id\_seq
2form\_approval\_ruleadministration\_idNObigint
3form\_approval\_ruleform\_idNObigint
**jobs**
postablecolumnnulldtypelendefault
1jobsidNObigint jobs\_id\_seq
2jobstypeNOint
3jobsstatusNOint
4jobsattemptNOint
5jobsresultYEStext
6jobsinfoYESjsonb
7jobscreatedNOtz timestamp
8jobsavailableYEStz timestamp
9jobsuser\_idNObigint
10jobstask\_idYEScharacter varying50
**levels**
postablecolumnnulldtypelendefault
1levelsidNObigint levels\_id\_seq
2levelsnameNOcharacter varying50
3levelslevelNOint
**option**
postablecolumnnulldtypelendefault
1optionidNObigint option\_id\_seq
2optionorderYESbigint
3optioncodeYEScharacter varying255
4optionnameNOtext
5optionotherNObool
6optionquestion\_idNObigint
**organisation**
postablecolumnnulldtypelendefault
1organisationidNObigint organisation\_id\_seq
2organisationnameNOcharacter varying255
**organisation\_attribute**
postablecolumnnulldtypelendefault
1organisation\_attributeidNObigint organisation\_attribute\_id\_seq
2organisation\_attributetypeNOint
3organisation\_attributeorganisation\_idNObigint
**pending\_answer**
postablecolumnnulldtypelendefault
1pending\_answeridNObigint pending\_answer\_id\_seq
2pending\_answernameYEStext
3pending\_answervalueYESdouble
4pending\_answeroptionsYESjsonb
5pending\_answercreatedNOtz timestamp
6pending\_answerupdatedYEStz timestamp
7pending\_answercreated\_by\_idNObigint
8pending\_answerpending\_data\_idNObigint
9pending\_answerquestion\_idNObigint
**pending\_answer\_history**
postablecolumnnulldtypelendefault
1pending\_answer\_historyidNObigint pending\_answer\_history\_id\_seq
2pending\_answer\_historynameYEStext
3pending\_answer\_historyvalueYESdouble
4pending\_answer\_historyoptionsYESjsonb
5pending\_answer\_historycreatedNOtz timestamp
6pending\_answer\_historyupdatedYEStz timestamp
7pending\_answer\_historycreated\_by\_idNObigint
8pending\_answer\_historypending\_data\_idNObigint
9pending\_answer\_historyquestion\_idNObigint
**pending\_data**
postablecolumnnulldtypelendefault
1pending\_dataidNObigint pending\_data\_id\_seq
2pending\_datanameNOtext
3pending\_datageoYESjsonb
5pending\_datacreatedNOtz timestamp
6pending\_dataadministration\_idNObigint
7pending\_datacreated\_by\_idNObigint
8pending\_datadata\_idYESbigint
9pending\_dataform\_idNObigint
11pending\_databatch\_idYESbigint
12pending\_dataupdatedYEStz timestamp
13pending\_dataupdated\_by\_idYESbigint
**pending\_data\_approval**
postablecolumnnulldtypelendefault
1pending\_data\_approvalidNObigint pending\_data\_approval\_id\_seq
2pending\_data\_approvalstatusNOint
4pending\_data\_approvaluser\_idNObigint
5pending\_data\_approvallevel\_idNObigint
6pending\_data\_approvalbatch\_idNObigint
**question**
postablecolumnnulldtypelendefault
1questionidNObigint question\_id\_seq
2questionorderYESbigint
3questiontextNOtext
4questionnameNOcharacter varying255
5questiontypeNOint
6questionmetaNObool
7questionrequiredNObool
8questionruleYESjsonb
9questiondependencyYESjsonb
10questionform\_idNObigint
11questionquestion\_group\_idNObigint
12questionapiYESjsonb
13questionextraYESjsonb
**question\_attribute**
postablecolumnnulldtypelendefault
1question\_attributeidNObigint question\_attribute\_id\_seq
2question\_attributenameYEStext
3question\_attributeattributeNOint
4question\_attributeoptionsYESjsonb
5question\_attributequestion\_idNObigint
**question\_group**
postablecolumnnulldtypelendefault
1question\_groupidNObigint question\_group\_id\_seq
2question\_groupnameNOtext
3question\_groupform\_idNObigint
4question\_grouporderYESbigint
**system\_user**
postablecolumnnulldtypelendefault
1system\_useridNObigint system\_user\_id\_seq
2system\_userpasswordNOcharacter varying128
3system\_userlast\_loginYEStz timestamp
4system\_useris\_superuserNObool
5system\_useremailNOcharacter varying254
6system\_userdate\_joinedNOtz timestamp
7system\_userfirst\_nameNOcharacter varying50
8system\_userlast\_nameNOcharacter varying50
9system\_userdesignationYEScharacter varying50
10system\_userphone\_numberYEScharacter varying15
11system\_userupdatedYEStz timestamp
12system\_userdeleted\_atYEStz timestamp
13system\_userorganisation\_idYESbigint
14system\_usertrainedNObool
**user\_form**
postablecolumnnulldtypelendefault
1user\_formidNObigint user\_form\_id\_seq
2user\_formform\_idNObigint
3user\_formuser\_idNObigint
#### Materialized Views ### Relationship Diagrams [![rtmis-main.png](https://wiki.cloud.akvo.org/uploads/images/gallery/2023-05/scaled-1680-/m50UssYwap5KHyMx-rtmis-main.png)](https://wiki.cloud.akvo.org/uploads/images/gallery/2023-05/m50UssYwap5KHyMx-rtmis-main.png) To generate the relationship diagram for the RUSH platform, the dbdocs.io tool is utilized. The process involves using the **django-dbml** library to generate a dbml (database markup language) file that represents the database schema and entity relationships based on the Django models. This dbml file is then pushed to a designated location, accessible during the CI/CD pipeline. The dbdocs.io command-line tool is utilized to build the documentation using the dbml file. The process typically includes specifying the location of the dbml file and providing a project name, which may be customized based on the CI/CD environment or branch. Once the documentation is built, the resulting relationship diagram can be accessed via the generated dbdocs.io link, which provides a visual representation of the database schema and the relationships between entities within the RUSH platform. ```bash # Generate DBML # https://github.com/akvo/rtmis/blob/main/backend/run-qc.sh#L22 python manage.py dbml > db.dbml # Push DBDocs # https://github.com/akvo/rtmis/blob/main/ci/build.sh#L116-L122 update_dbdocs() { if [[ "${CI_BRANCH}" == "main" || "${CI_BRANCH}" == "develop" ]]; then npm install -g dbdocs # dbdocs build doc/dbml/schema.dbml --project rtmis dbdocs build backend/db.dbml --project "rtmis-$CI_BRANCH" fi } ```

To view the comprehensive relationship diagram for the RUSH platform, please refer to the following link: **[RUSH Platform Relationship Diagram](https://dbdocs.io/deden/rtmis-main).**

### Sequence Diagrams ### Data Flow Diagrams [![rtmis-data-flow.png](https://wiki.cloud.akvo.org/uploads/images/gallery/2023-05/scaled-1680-/GH9RroBcG7yRcIdI-rtmis-data-flow.png)](https://wiki.cloud.akvo.org/uploads/images/gallery/2023-05/GH9RroBcG7yRcIdI-rtmis-data-flow.png) ## User Interface Design The RUSH platform incorporates a range of user interfaces designed to enhance usability, streamline workflows, and enable efficient data management and analysis. These interfaces serve as the gateway for users to interact with the platform's various features and functionalities. From the login page that grants access to authenticated users, to the dashboard providing an informative overview of key data and notifications, each interface has a specific purpose and contributes to the seamless operation of the platform. - **Login Page:** The login page allows users to authenticate themselves and access the platform using their credentials. - **Dashboard:** The dashboard serves as the main interface after login, providing an overview of key information, notifications, and access to different modules and functionalities. - **Data Entry Forms:** User-friendly forms are designed for data collection, enabling users to input sanitation and hygiene data accurately and efficiently. - **Form Management Interface:** Administrators can create, edit, and manage forms, including defining question groups, adding questions, setting validation rules, and configuring approval workflows. - **Data Review and Approval Interface:** This interface allows authorised users to review, edit, approve, or reject data entries based on their administrative levels and approval roles. - **Visualisations Interface:** Each form will have a dedicated visualisation page where users can view interactive charts, graphs, tables, and maps representing the collected data for that specific form. - **User Management Interface:** Administrators can manage user accounts, roles, and access permissions within the RUSH platform. - **Approval Hierarchy Interface:** This interface provides a visual representation of the approval hierarchy, showcasing the different levels and roles involved in the data approval process. - **Data Import/Export Interface:** This interface facilitates the import and export Excel files, which can be filtered by geographical administrative area and advanced filters (filter by specific input of the submission). - **Settings and Configuration Interface:** Administrators can access and modify platform settings, including email notifications, system preferences, and integration configurations. - **Notifications and Alerts Interface:** Users can receive important notifications, alerts, and reminders through the platform, ensuring timely communication and action. - **User Profile Interface:** Users can view their personal information, including profile details and list of assigned forms. - **Help and Support Interface:** This interface provides users with access to documentation, FAQs, tutorials, and support resources to assist them in using the platform effectively. - **Data Search and Filtering Interface:** Users can search and filter data based on specific criteria, allowing them to retrieve relevant information quickly. - **Error and Exception Handling Interface:** When errors occur, an interface can display informative error messages and provide guidance on how to resolve or report the issue. These user interfaces collectively offer a comprehensive and intuitive user experience, facilitating efficient data entry, analysis, visualization, approval workflows, and decision-making within the RUSH platform.

For a detailed visual representation of the user interfaces within the RUSH platform, please refer to the design interface available at the following link: **[RUSH Platform Design Interface](https://xd.adobe.com/view/26c48557-3a9c-40c6-a370-f4af7991c47a-7397/).**

This interface showcases the overall layout, design elements, and interactions that users can expect when navigating through the platform. It provides a valuable reference for understanding the visual aesthetics, information architecture, and user flow incorporated into the RUSH platform's user interfaces. By exploring the design interface, stakeholders can gain a clearer understanding of the platform's look and feel, facilitating better collaboration and alignment throughout the development process. ## Error Handling ### Error Handling Rules The platform incorporates robust error handling strategies to address various types of errors that may occur during operation. Here are the key considerations for error handling in the RUSH platform: 1. **Error Logging and Monitoring:** The platform logs errors and exceptions that occur during runtime. These logs capture relevant details such as the error type, timestamp, user context, and relevant system information. Error logs enable developers and administrators to identify and troubleshoot issues efficiently, helping to improve system reliability and performance. 2. **User-Friendly Error Messages:** When errors occur, the platform provides user-friendly error messages that communicate the issue clearly and concisely. Clear error messages help users understand the problem and take appropriate actions or seek assistance. The messages may include relevant details about the error, potential solutions, and contact information for support if necessary. 3. **Graceful Degradation and Recovery:** The platform is designed to handle errors gracefully, minimising disruptions and providing fallback mechanisms where possible. For example, if a specific functionality or service becomes temporarily unavailable, the platform can display a fallback message or provide alternative options to ensure users can continue their work or access relevant information. 4. **Error Validation and Input Sanitisation:** The platform applies comprehensive input validation and sanitisation techniques to prevent and handle errors caused by invalid or malicious user input. This includes validating user-submitted data, sanitising inputs to prevent code injection or script attacks, and ensuring that data conforms to expected formats and ranges. Proper input validation reduces the risk of errors and security vulnerabilities. 5. **Exception Handling and Error Recovery:** The platform utilises exception handling mechanisms to catch and handle errors gracefully. Exceptions are caught, logged, and processed to prevent system crashes or unexpected behavior. The platform incorporates appropriate error recovery strategies, such as rolling back transactions or reverting to previous states, to maintain data integrity and prevent data loss or corruption. 6. **Error Reporting and Support Channels:** The platform provides channels for users to report errors and seek support. These channels can include contact forms, dedicated support email addresses, or a help-desk system. By offering reliable channels for error reporting and support, users can report issues promptly and receive assistance in resolving them effectively. 7. **Continuous Improvement:** The platform regularly assesses error patterns and user feedback to identify recurring issues and areas for improvement. By analising error trends, the development team can prioritise bug fixes, optimise system components, and enhance the overall stability and reliability of the platform. ### List Errors The following section provides an overview of potential errors that may occur within the RUSH platform. While data validation plays a significant role in minimizing errors during data entry and form submissions, certain issues can still arise in other aspects of the platform's functionality. These errors encompass various areas, including authentication, authorization, file uploads, data synchronization, network connectivity, server timeouts, data import/export, data corruption, missing data, report generation, visualization, server overload, email notifications, and third-party integrations. By being aware of these potential errors, the development team can proactively address and implement proper error handling mechanisms to ensure smooth operations, enhance user experience, and maintain data integrity throughout the platform. 1. **Database Connection Error:** Failure to establish a connection with the database server, resulting in the inability to retrieve or store data. 2. **Authentication Error:** Users may encounter authentication errors when attempting to log in, indicating invalid credentials or authentication failures. 3. **Authorisation Error:** Users may encounter authorisation errors when accessing certain features or performing actions for which they do not have sufficient privileges. 4. **File Upload Error:** When uploading files, errors may occur due to file format compatibility, size limitations, or network connectivity issues. 5. **Data Synchronisation Error:** In a multi-user environment, conflicts may arise when multiple users attempt to update the same data simultaneously, leading to synchronisation errors. 6. **Network Connectivity Error:** Users may experience network connectivity issues, preventing them from accessing the platform or transmitting data. 7. **Server Timeout Error:** When processing resource-intensive tasks, such as generating complex reports or visualizations, server timeouts may occur if the process exceeds the maximum allowed execution time. 8. **Data Import/Export Error:** Errors may occur during the import or export of data, resulting in data loss, formatting issues, or mismatches between source and destination formats. 9. **Data Corruption Error:** In rare cases, data corruption may occur, leading to inconsistencies or incorrect values in the database. 10. **Missing Data Error:** Users may encounter missing data issues when attempting to retrieve or access specific records or fields that have not been properly captured or stored. 11. **Report Generation Error:** Errors may occur during the generation of reports, resulting in incomplete or inaccurate data representation or formatting issues. 12. **Visualization Error:** Issues with data visualization components, such as charts or graphs, may lead to incorrect data representation or inconsistencies in visual outputs. 13. **Server Overload Error:** During periods of high user activity or resource-intensive tasks, the server may become overloaded, causing slowdowns or system instability. 14. **Email Notification Error:** Failure to send email notifications, such as approval requests or password reset emails, may occur due to issues with the email service or configuration. 15. **Third-Party Integration Error:** Errors may arise when integrating with external services or APIs, resulting in data transfer issues or functionality limitations. These errors represent potential issues that may arise in the RUSH platform, excluding errors already addressed by data validation measures. It's crucial to implement proper error handling and logging mechanisms to promptly identify, track, and resolve these errors, ensuring the smooth functioning of the platform. ## Security Considerations The RUSH platform incorporates multiple security measures to safeguard data, protect user privacy, and ensure secure operations across its Docker containers and cloud-based infrastructure. Here are the key security considerations in the platform: 1. **Container Security (Docker):** The Docker containers, including the Back-end and Worker containers, are designed with security in mind. The containers are configured to follow best practices such as using official base images, regularly updating dependencies, and employing secure container runtime configurations. These measures reduce the risk of vulnerabilities and unauthorised access within the containerised environment. 2. **Access Control and Authentication:** The platform implements robust access control mechanisms to ensure that only authorised users can access the system and its functionalities. User authentication, such as through the use of JWT (JSON Web Token), is employed to verify user identities and grant appropriate access based on roles and permissions. This helps prevent unauthorised access to sensitive data and functionalities. 3. **Network Security (NGINX):** The Front-end container, powered by NGINX, helps enforce security measures at the network level. NGINX can be configured to handle SSL/TLS encryption, protecting data in transit between users and the platform. It can also serve as a reverse proxy, effectively managing incoming traffic and providing an additional layer of security to prevent potential attacks. 4. **Secure Database Storage (Cloud-SQL):** The RUSH platform utilises Cloud-SQL for secure database storage. Cloud-SQL offers built-in security features, including encryption at rest and transit, role-based access control, and regular security updates. These measures help protect the integrity and confidentiality of the platform's data stored in the Cloud-SQL database. 5. **Secure File Storage (Cloud Storage Bucket):** The platform leverages Cloud Storage Bucket for secure file storage. Cloud Storage provides robust access controls, including fine-grained permissions, encryption, and auditing capabilities. This ensures that data files, such as uploaded documents, are securely stored and protected from unauthorised access. **The endpoints of file should only served by the back-end** so it also applies authentication. 6. **Security Monitoring and Auditing:** The platform implements security monitoring and auditing tools to detect and respond to potential incidents. System logs and activity records are regularly reviewed to identify any suspicious activities or breaches. Additionally, periodic security audits are conducted to assess and address potential vulnerabilities proactively. 7. **User Education and Awareness:** The platform emphasise user education and awareness regarding security best practices. Users are encouraged to follow strong password policies: **Lowercase, Numbers, Special Character, Uppercase Character, No White Space, and Minimum 8 Characters**. By promoting user security awareness, the platform strengthens overall security posture. ## Performance Considerations The RUSH platform has several performance considerations, particularly in relation to visualisation, excel data download, data upload, and validation. While these functionalities are crucial for effective data management and analysis, they can pose potential performance challenges due to the volume and complexity of the data involved. The platform takes these considerations into account to optimise performance and ensure a smooth user experience. Here are the key performance considerations: 1. **Visualisation:** Visualisations are powerful tools for data analysis and communication. However, generating complex visualisations from large datasets can be computationally intensive and may lead to performance issues. The RUSH platform employs optimisation techniques, such as efficient data retrieval, caching, and rendering algorithms, to enhance the speed and responsiveness of visualisations. It strives to strike a balance between visual richness and performance to provide users with meaningful insights without sacrificing usability. 2. **Excel Data Download:** The ability to download data in Excel format is essential for users to perform in-depth analysis and reporting. However, large datasets or complex queries can result in long download times and increased server load. To mitigate this, the RUSH platform optimises the data retrieval and export process, employing techniques such as data compression and efficient file generation. It aims to minimise download times and ensure a seamless user experience when exporting data to Excel. 3. **Data Upload and Validation:** Data upload and validation involve processing and verifying large volumes of data. This process can be time-consuming, particularly when dealing with extensive datasets or complex validation rules. The RUSH platform optimises data upload and validation processes through efficient algorithms and parallel processing techniques. It strives to expedite the data entry process while maintaining data integrity and accuracy. --- To ensure optimal performance, the RUSH platform continuously monitors system performance, identifies bottlenecks, and implements performance optimisations as needed. This may involve infrastructure scaling, database optimisations, query optimisations, and caching strategies. Regular maintenance and updates are conducted to keep the platform running smoothly and efficiently. It is worth noting that the platform's performance can also be influenced by factors such as network connectivity, hardware capabilities, and user behavior. To mitigate these factors, the RUSH platform provides guidelines and best practices for users to optimise their own data handling processes and network connectivity. ## Deployment Strategy The RUSH platform follows a deployment strategy that leverages the capabilities of the Google Cloud Platform (GCP) to ensure efficient and reliable deployment of the application. The deployment strategy includes the use of Google Kubernetes Engine (GKE) to manage containers, the storage of container images in the Container Registry with git hash suffixes, the utilisation of ingress and load balancers for routing traffic, Cloud DNS for domain management, and IAM key management services for secure access to CloudSQL using gcloud proxy. Here's an explanation of each component of the deployment strategy: 1. **Google Kubernetes Engine (GKE):** - GKE is utilised as the container orchestration platform for deploying and managing the RUSH platform's containers. - The application is deployed in two clusters: the test cluster and the production cluster. - The test cluster receives updates from the main branch, allowing for continuous integration and testing of new features and code changes. - The production cluster receives tagged releases, ensuring stability and reliability for the live environment. 2. **Container Registry:** - Container images of the RUSH platform are stored in the Google Container Registry. - Each container image is suffixed with a git hash, providing a unique identifier for version control and traceability. - This approach allows for efficient image management, rollbacks, and reproducible deployments. 3. **Ingress, Load Balancers, and Cloud DNS:** - Ingress and load balancers are utilised to route and distribute traffic to the RUSH platform's services within the GKE clusters. - Ingress acts as the entry point, directing requests to the appropriate services based on defined rules. - Load balancers ensure high availability and scalability by distributing traffic across multiple instances of the platform. - Cloud DNS is used for domain management, mapping domain names to the respective IP addresses of the deployed services. 4. **CloudSQL and IAM Key Management Services:** - The RUSH platform accesses CloudSQL, the managed relational database service on GCP, for data storage and retrieval. - IAM key management services are utilised to securely connect to CloudSQL using the gcloud proxy. - This approach ensures secure and controlled access to the database, limiting exposure of sensitive information. [![rtmis-deployment.png](https://wiki.cloud.akvo.org/uploads/images/gallery/2023-05/scaled-1680-/SNGroaBTwYeWYDll-rtmis-deployment.png)](https://wiki.cloud.akvo.org/uploads/images/gallery/2023-05/SNGroaBTwYeWYDll-rtmis-deployment.png) By utilising GCP services such as GKE, Container Registry, ingress, load balancers, Cloud DNS, CloudSQL, and IAM key management services, the RUSH platform benefits from a robust and scalable deployment strategy. It enables efficient management of containers, version control of images, routing and distribution of traffic, secure access to the database, and reliable domain management. This deployment strategy ensures a stable and performant environment for running the RUSH platform, facilitating seamless user access and interaction.

To view the example deployment script for the RUSH platform, please refer to the following link: **[RUSH Platform CI/CD](https://github.com/akvo/rtmis/tree/main/ci)**.

## Testing Strategy #### Testing Framework and Tools The RUSH platform employs a comprehensive testing strategy to ensure the reliability, functionality, and quality of both its back-end and front-end components. The testing strategy encompasses different levels of testing, including back-end testing with Django Test, front-end testing with Jest, and container network testing with HTTP (bash). Here is an overview of the testing strategy for the RUSH platform: **Back-end Testing with Django Test** - The back-end testing of the RUSH platform is conducted using Django Test, a testing framework provided by Django. - Django Test enables the creation of test cases and test suites to evaluate the functionality and behavior of the back-end components. - Back-end testing focuses on unit tests, integration tests, and API tests to validate individual modules, their interactions, and the API endpoints. - Test cases cover various scenarios, including positive and negative input cases, edge cases, and boundary conditions to ensure robustness and accuracy. **Front-end Testing with Jest** - The front-end testing of the RUSH platform is performed using Jest, a JavaScript testing framework widely used for testing React applications. - Jest facilitates the creation of unit tests, integration tests, and component tests to assess the behavior and functionality of the front-end components. - Front-end testing focuses on validating the UI components, user interactions, and the correctness of the application's logic and state management. - Test cases cover various scenarios, including rendering components, user actions, and expected outcomes to ensure the desired user experience and functionality. **Container Network Testing with HTTP (bash) WILL BE REPLACED BY SELENIUM-HQ:** - The RUSH platform conducts container network testing using HTTP (bash) to assess the communication and network connectivity between different containers within the Docker environment. - Container network testing ensures that the back-end, worker, and front-end containers can communicate effectively and exchange data seamlessly. - Test scenarios involve sending HTTP requests and verifying the responses, ensuring the expected data flow and connectivity between containers. The testing strategy for the RUSH platform aims to achieve thorough coverage across the back-end, front-end, and container network aspects. It focuses on validating the functionality, data flow, interactions, and network connectivity within the platform. Test cases are designed to cover a wide range of scenarios, including normal operation, edge cases, and potential error conditions. #### Hardware Capability Evaluation In addition to the testing strategies mentioned earlier, the RUSH platform recognise the importance of stress testing to evaluate the hardware capability and performance under heavy workloads. This specifically applies to resource-intensive tasks such as data validation and data seeding from the Excel bulk data upload feature. Stress testing is conducted to simulate high-demand scenarios and identify potential bottlenecks or performance issues. Here's an explanation of the stress testing approach: **Stress Testing**
- Stress testing involves subjecting the RUSH platform to simulated high-volume and high-concurrency scenarios to evaluate its performance and robustness under heavy workloads. - During stress testing, the platform is tested with large datasets or concurrent user loads that closely represent real-world usage scenarios. - The focus is on measuring the response time, throughput, and resource utilisation to identify any performance degradation, scalability issues, or resource limitations.
**Data Validation Stress Test**
- A stress test specifically targeting the data validation process is conducted to assess how the platform performs when validating large volumes of data from the Excel bulk data upload feature. - The stress test involves simulating multiple concurrent data uploads, each containing a significant amount of data that requires validation. - The test measures the time taken to process and validate the data, ensuring that the platform maintains acceptable performance levels and does not become overwhelmed by the workload.
**Data Seeding Stress Test**
- A stress test focusing on the data seeding process is conducted to evaluate the platform's capability to handle heavy data seeding operations resulting from the Excel bulk data upload feature. - The stress test involves simulating a high number of concurrent data seeding requests, each involving a large dataset to be inserted into the database. - The test measures the time taken to seed the data, ensuring that the platform can handle the load without compromising performance or causing data integrity issues.
The stress testing process aims to identify any performance bottlenecks, resource limitations, or scalability issues that may arise when the platform is subjected to heavy workloads. By conducting stress tests, the development team can gather valuable insights and make necessary optimisations to ensure that the platform can handle the expected load and perform optimally under stressful conditions.

The stress testing phase is important to validate the hardware capability and scalability of the RUSH platform, particularly during resource-intensive tasks like data validation and data seeding from the Excel bulk data upload feature.

## Assumptions and Constraints The development and operation of the RUSH platform are subject to certain assumptions and constraints that influence its design and functionality. These assumptions and constraints are important to consider as they provide context and boundaries for the platform's implementation. Here are the key assumptions and constraints of the RUSH platform: Technical Infrastructure: The RUSH platform assumes access to a reliable technical infrastructure, including servers, networking components, and cloud-based services. It requires sufficient computational resources, storage capacity, and network connectivity to handle the expected user load and data processing requirements. 1. **Data Availability and Quality**: The platform assumes the availability and quality of data from various sources, including county and national levels. It relies on the assumption that relevant data is collected, validated, and provided by the respective stakeholders. The accuracy, completeness, and timeliness of the data are crucial for effective analysis and decision-making within the platform. 2. **Compliance with Regulatory Requirements**: The RUSH platform operates under the assumption that it complies with applicable laws, regulations, and data privacy requirements. It is assumed that necessary consent, data usage, and privacy policies are in place to protect user data and comply with legal obligations. 3. **User Adoption and Engagement**: The platform assumes user adoption and engagement, as its success relies on active participation and utilisation by relevant stakeholders. It assumes that users, including data entry staff, data approvers, administrators, and institutional users, will actively use the platform, contribute accurate data, and engage in data analysis and decision-making processes. 4. **System Scalability and Performance**: The RUSH platform assumes that it can scale and perform adequately to handle increasing user demand and growing data volumes over time. It assumes that the necessary infrastructure and optimisations can be implemented to maintain system performance, responsiveness, and reliability as the user base and data size expand. 5. **Collaboration and Data Sharing**: The platform assumes a collaborative environment and willingness among stakeholders to share data and insights. It assumes that relevant agencies, organisations, and institutions are willing to collaborate, contribute data, and use the platform's functionalities for informed decision-making and improved sanitation and hygiene practices. 6. **Resource Constraints**: The development and maintenance of the RUSH platform operate within resource constraints, such as budgetary limitations, time constraints, and availability of skilled personnel. These constraints may impact the scope, timeline, and features of the platform's implementation and ongoing operations. ## Dependencies #### Software Dependencies The RUSH platform incorporates various dependencies and frameworks to enable its functionality and deliver a seamless user experience. The following dependencies are essential components used in the development of the platform: 1. **Django:** The RUSH platform utilises Django, a high-level Python web framework, to build the back-end infrastructure. Django provides a solid foundation for handling data management, authentication, and implementing business logic. 2. **Pandas:** The platform relies on Pandas, a powerful data manipulation and analysis library in Python, to handle data processing tasks efficiently. Pandas enables tasks such as data filtering, transformation, and aggregation, enhancing the platform's data management capabilities. 3. **React:** The front-end of the RUSH platform is developed using React, a popular JavaScript library for building user interfaces. React enables the creation of dynamic and interactive UI components, ensuring a responsive and engaging user experience. 4. **Ant Design (antd)**: The platform utilises Ant Design, a comprehensive UI library based on React, to design and implement a consistent and visually appealing user interface. Ant Design provides a rich set of customisable and reusable UI components, streamlining the development process. 5. **Echarts:** Echarts, a powerful charting library, is integrated into the RUSH platform to generate various data visualisations. With Echarts, the platform can display charts, graphs, and other visual representations of data, enabling users to gain insights and make informed decisions. 6. **D3:** The RUSH platform incorporates D3.js, a JavaScript library for data visualisation. D3.js provides a powerful set of tools for creating interactive and customisable data visualisations, including charts, graphs, and other visual representations. By leveraging D3.js, the platform can deliver dynamic and engaging data visualisations to users. 7. **Leaflet:** The platform incorporates Leaflet, a JavaScript library for interactive maps, to handle geo-spatial data visualisation. Leaflet enables the integration of maps, markers, and other geo-spatial features, enhancing the platform's ability to represent and analise location-based information. 8. **Node-sass:** Node-sass is a Node.js library that enables the compilation of Sass (Syntactically Awesome Style Sheets) files into CSS. The RUSH platform uses node-sass to process and compile Sass files, allowing for a more efficient and maintainable approach to styling the user interface. In addition to the previously mentioned dependencies, the RUSH platform relies on the following essential dependencies and libraries to support its functionality and development process: 1. **Django Rest Framework (DRF):** The RUSH platform utilises Django Rest Framework, a powerful and flexible toolkit for building Web APIs. DRF simplifies the development of APIs within the platform, providing features such as request/response handling, authentication, serialisation, and validation. It enables seamless integration of RESTful API endpoints, allowing for efficient communication between the frontend and backend components. 2. **PyJWT:** PyJWT is a Python library that enables the implementation of JSON Web Tokens (JWT) for secure user authentication and authorisation. The RUSH platform utilises PyJWT to generate, validate, and manage JWT tokens. JWT tokens play a crucial role in ensuring secure user sessions, granting authorised access to specific functionalities and data within the platform. 3. **Sphinx:** Sphinx is a documentation generation tool widely used in Python projects. The RUSH platform incorporates Sphinx to generate comprehensive and user-friendly documentation. Sphinx facilitates the creation of structured documentation, including API references, code examples, and user guides. It streamlines the documentation process, making it easier for developers and users to understand and utilise the platform's features and functionalities. By leveraging these additional dependencies, including Django Rest Framework, PyJWT, and Sphinx, the RUSH platform gains essential support for building robust APIs, implementing secure authentication mechanisms, and generating comprehensive documentation. --- These dependencies contribute to the platform's overall functionality, security, and user-friendliness, ensuring a well-rounded and effective solution for managing sanitation and hygiene practices in Kenya. #### Master Lists The RUSH platform incorporates several master lists that play a vital role in its functioning and data management. These master lists include the administrative levels, questionnaire definitions, and the shape-file representing accurate administrative boundaries. The administrative levels master list defines the hierarchical structure of Kenya's administrative divisions, facilitating data organisation, user roles, and reporting. ##### Shape-file and Country Administrative Description An essential master list in the RUSH platform is the shape-file that accurately represents the administrative levels of Kenya. This shape-file serves as a crucial reference for various components within the system, including user management, data management, and visualisation. The importance of the shape-file as a master list lies in its ability to provide precise and standardised administrative boundaries, enabling effective data identification, filtering, and visualisation. Here's an explanation of the significance of the shape-file in the RUSH platform: 1. **Accurate Administrative Boundaries:** - The shape-file provides accurate and up-to-date administrative boundaries of Kenya, including the national, county, sub-county, and ward levels. - These boundaries define the jurisdictional divisions within the country and serve as a fundamental reference for assigning roles, managing data, and generating reports within the platform. - The accuracy of administrative boundaries ensures that data and administrative processes align with the established administrative hierarchy in Kenya. 2. **Data Identification and Filtering:** - The shape-file enables efficient data identification and filtering based on administrative boundaries. - By associating data points with the corresponding administrative levels, the platform can retrieve and present data specific to a particular county, sub-county, or ward. - This functionality allows users to view, analise, and report on data at different administrative levels, facilitating targeted decision-making and resource allocation. 3. **Visualisation and Geographic Context:** - The shape-file serves as the basis for visualising data on maps within the RUSH platform. - By overlaying data on the accurate administrative boundaries provided by the shapefile, users can visualise the distribution of sanitation and hygiene indicators across different regions of Kenya. - This geo-spatial visualisation enhances understanding, supports data-driven decision-making, and aids in identifying geographic patterns and disparities. 4. **Data Consistency and Standardisation:** - The shape-file, being a standardised and authoritative source, ensures consistency and uniformity in defining administrative boundaries across the platform. - It provides a reliable reference that aligns with the official administrative divisions recognised by the Ministry of Health and other relevant authorities. - The use of a consistent and standardised master list facilitates data aggregation, analysis, and reporting, ensuring reliable and comparable insights. The shape-file sourced from the Ministry of Health should provide accurate administrative boundaries, supports data identification and filtering, enables geo-spatial visualisation, and ensures data consistency and standardisation. By utilising the shape-file as the master list, the platform can effectively manage administrative processes, present data in a meaningful geographic context, and contribute to evidence-based decision-making for improved sanitation and hygiene practices throughout Kenya.

The shape-file sourced from the Ministry of Health acts as a crucial master list within the RUSH platform.

##### Questionnaire Definitions and Form Management In addition to the administrative levels, the RUSH platform relies on another important master-list that defines the questionnaires used within the system. The questionnaire definition plays a crucial role in capturing the necessary data points and structuring the information collection process. Managing and maintaining the questionnaire forms are essential before seeding them into the system. This section outlines the importance of questionnaire definitions and the process of form management in the RUSH platform. 1. **Questionnaire Definitions:** - Questionnaire definitions define the structure, content, and data points to be collected during data entry. - These definitions specify the questions, response options, and any associated validations or skip patterns. - Questionnaire definitions determine the type and format of data that can be entered for each question. - These definitions ensure consistency and standardisation in data collection across the platform. 2. **Form Management:** - Form management involves the creation, customisation, and maintenance of the questionnaire forms. - Before seeding the forms into the system, it is crucial to ensure their accuracy, completeness, and adherence to data collection standards. - Form management includes activities such as form design, validation rules setup, skip logic configuration, and user interface customisation. - It is important to conduct thorough testing and quality assurance to ensure that the forms function correctly and capture the required data accurately. 3. **Form Fixes and Updates:** - As part of the form management process, it is essential to address any issues or errors identified during testing or from user feedback. - Form fixes and updates may involve resolving bugs, improving user interface elements, modifying question wording, or adjusting validation rules. - It is crucial to carefully test and validate the fixed forms to ensure that the changes are successfully implemented and do not introduce new issues.

It is important to note that form management is an iterative process that may involve continuous improvements and updates as new requirements, feedback, or changes in data collection standards arise.

#### 3rd-Party Services The RUSH platform relies on certain third-party services to enhance its functionality and provide essential features. These services include **[Mailjet](https://www.mailjet.com/)** for email communication and optionally Cloud Bucket as a storage service. Here's an explanation of their significance: 1. **Mailjet**: - Mailjet is utilised for seamless email communication within the RUSH platform. - It provides features such as email delivery, tracking, and management, ensuring reliable and efficient communication between system users. - Mailjet enables the platform to send notifications, reports, and other email-based communications to users, enhancing user engagement and system responsiveness. 2. **Cloud Bucket** (Optional): - The RUSH platform offers the option to utilise Cloud Bucket, a cloud-based storage service, for storing data such as uploaded or downloaded Excel files. - Cloud Bucket provides a secure and scalable storage solution, allowing for efficient management of large data files. - By utilising Cloud Bucket, the platform offloads the burden of storing and managing data files from the host server, resulting in improved performance and scalability. - Storing data files in Cloud Bucket also enhances data availability, durability, and accessibility, ensuring seamless access to files across the platform.

The use of Cloud Bucket as a storage service is optional, and alternative storage solutions can be considered based on specific requirements and constraints of the RUSH platform.

## Risks and Mitigation Strategies The development and operation of the RUSH platform come with inherent risks that can impact its effectiveness, security, and usability. Identifying and addressing these risks through appropriate mitigation strategies is essential to ensure the smooth functioning and success of the platform. Here are some key risks associated with the RUSH platform and their corresponding mitigation strategies: #### Data Security and Privacy Risks Risk: Unauthorised access, data breaches, or misuse of sensitive information. Mitigation: Implement robust security measures, such as encryption, access controls, and regular security updates. Conduct thorough security audits, provide user education on data security best practices, and ensure compliance with data protection regulations. #### Technical Risks **Risk:** System failures, infrastructure disruptions, or performance bottlenecks. **Mitigation:** Employ redundant and scalable infrastructure to minimise single points of failure. Regularly monitor system performance, conduct load testing, and implement disaster recovery plans. Update software and hardware components to address vulnerabilities and ensure optimal performance. #### Data Quality Risks **Risk:** Inaccurate, incomplete, or unreliable data affecting decision-making processes. **Mitigation:** Implement data validation mechanisms, enforce data entry standards, and provide user training on data collection best practices. Conduct regular data quality checks and provide feedback loops to data entry staff for improvement. Collaborate with data providers to improve data accuracy and completeness. #### User Adoption and Engagement Risks **Risk:** Low user adoption, resistance to change, or lack of engagement with the platform. **Mitigation:** Conduct user needs assessments, involve stakeholders in the platform's design and development process, and provide comprehensive user training and support. Highlight the benefits and value of the platform to promote user adoption and engagement. Continuously gather user feedback and iterate on the platform based on user needs and preferences. #### Stakeholder Collaboration Risks **Risk:** Limited collaboration and data sharing among stakeholders. **Mitigation:** Foster strong partnerships with relevant agencies, organisations, and institutions. Promote a culture of collaboration, sharing best practices, and jointly addressing common challenges. Establish clear data sharing agreements and protocols to encourage stakeholder participation and data contribution. #### Resource Risks **Risk:** Insufficient resources (human, or technical) for platform development and maintenance. **Mitigation:** Develop realistic resource plans and secure adequate funding for the platform's implementation and ongoing operation. Optimise resource allocation, prioritise critical features and functionalities, and leverage partnerships to share resources and expertise. ---

Regular risk assessments, monitoring, and proactive risk management practices should be integrated into the platform's lifecycle to identify emerging risks and implement appropriate mitigation strategies.

## Implementation Plan The implementation plan for the RUSH platform involves a structured approach to ensure successful development and deployment. The plan includes tasks, timelines, and resource requirements, taking into account the available team members. Here's an outline of the implementation plan: #### Task Breakdown 1. Analise requirements and finalise specifications. 2. Design the system architecture and database schema. 3. Develop the back-end functionality, including data management, API integration, and authentication. 4. Implement the front-end components, including user interface design, data visualisation, and user interactions. 5. Integrate and test the front-end and back-end components for seamless functionality. 6. Implement security measures, including JWT authentication and secure data handling. 7. Conduct thorough testing, including unit tests, integration tests, and user acceptance testing. 8. Refine and optimise performance for data processing and visualisation. 9. Prepare documentation, including user guides, API documentation, and system architecture documentation. 10. Plan and execute the deployment strategy on the Google Cloud Platform. #### Timelines 1. Analise requirements and finalise specifications: 1 week 2. System architecture and database schema design: 1 week 3. Back-end development: x weeks 4. Front-end development: x weeks 5. Integration and testing: x weeks 6. Security implementation: x weeks 7. Thorough testing and optimisation: x weeks 8. Documentation preparation: 1 week 9. Deployment on the Google Cloud Platform: 1 week #### Resource Requirements 1. **2 Back-end Developers**: Responsible for back-end development, API integration, and database management. 2. **2 Front-end Engineers**: Responsible for front-end development, user interface design, and data visualisation. 3. **1 Project Supervisor**: Oversees the project, provides guidance, and ensures adherence to requirements, timelines and Pull Request reviews. 4. **1 Project Manager**: Manages the project's overall progress, coordinates resources, and communicates with stakeholders. 5. **1 Dev-ops Engineer**: Handles deployment, infrastructure setup, and configuration on the Google Cloud Platform. The team members work collaboratively to ensure timely completion of tasks, quality assurance, and adherence to project milestones. Regular communication, coordination, and agile project management practices contribute to effective resource utilisation and smooth implementation.

It is important to note that the timelines provided are estimates and can be adjusted based on the complexity of the project, team dynamics, and any unforeseen challenges that may arise during implementation.

#### Communication and Task Management To facilitate efficient communication and task management within the team, the RUSH platform utilises **Slack** and **Asana**. These tools play crucial roles in enabling effective collaboration, communication, and task tracking. #### Document Management For document management, the RUSH platform utilises **Google Drive**. Team members can use Google Drive to store and manage various project documents, including design specifications, meeting minutes, reports, and other relevant files. #### Report Hierarchy The RUSH project follows a hierarchical reporting structure to ensure efficient communication and progress tracking. The hierarchy is designed to provide clear lines of reporting and facilitate effective decision-making. Here's an overview of the report hierarchy:
1. **Team Members** - Back-end Developers, Front-end Engineers, and Dev-ops Person directly report their progress, challenges, and updates to the Project Supervisor and Project Manager. - They communicate their completed tasks, pending work, and any obstacles they encounter during their development and deployment activities with Asana. 2. **Project Supervisor** - The Project Supervisor oversees the technical aspects of the project. - They provide guidance, support, and technical expertise to the team members. - The Project Supervisor break down all the tasks in Asana and assign to team members with due date. - The Project Supervisor works closely with the Project Manager to ensure alignment with project goals and timelines. 3. **Project Manager** - The Project Manager is responsible for the overall management and coordination of the RUSH project. - They track the progress of the development, monitor task completion, and manage resources and timelines. - The Project Manager communicates project updates, risks, and milestones to stakeholders and ensures effective collaboration among team members.
Regular meetings, such as stand-ups and sprint reviews, are conducted to discuss progress, address challenges, and align efforts across the team. This reporting hierarchy ensures effective communication, progress tracking, and efficient decision-making throughout the development and deployment phases of the RUSH platform. ## Documentation References The RUSH platform utilises various documentation references to provide comprehensive and accessible documentation for users and developers. These references include: 1. **Swagger:** - Swagger is used to generate interactive API documentation for the RUSH platform's Restful APIs. - By utilising the Open-API Specification, Swagger automatically generates detailed API documentation, including endpoint descriptions, request examples, and response details. - The Swagger documentation serves as a valuable resource for API consumers, facilitating seamless integration and understanding of the available endpoints and their functionality. 2. **GitHub Wiki:** - The RUSH platform leverages GitHub Wiki as a documentation reference for storing and presenting project-related information. - The GitHub Wiki provides a collaborative space for developers to create and maintain documentation directly within the project's repository. - It allows for the organisation of documentation pages, versioning, and easy navigation, ensuring that the latest project information is readily available to team members and contributors. 3. **DBDocs.io:** - DBDocs is utilised to generate comprehensive documentation for the RUSH platform's database schema and structure. - DBDocs automatically extracts information from the database and generates clear and well-structured documentation. - The DBDocs documentation serves as a valuable reference for understanding the database design, relationships, and entity attributes. 4. **ReadTheDocs:** - ReadTheDocs is employed to host and present user and developer documentation for the RUSH platform. - ReadTheDocs allows for the creation of user-friendly and searchable documentation, making it easy for users to find the information they need. - It provides a centralised location for storing and organising documentation, ensuring that both technical and non-technical users can access the necessary resources. These documentation references, including Swagger, GitHub Wiki, DBDocs.io, and ReadTheDocs, play integral roles in providing comprehensive, organised, and accessible documentation for the RUSH platform. By utilising these resources, the platform ensures that users, developers, and API consumers have the necessary information to effectively utilise and contribute to the platform. ## Conclusion The development of the RUSH platform involves a comprehensive low-level design (LLD) that encompasses various aspects, including its purpose, functional overview, user roles, administrative levels, dependencies, security considerations, testing strategies, and deployment plan. Through meticulous planning and consideration of these factors, the RUSH platform aims to address sanitation and hygiene challenges in rural and urban areas of Kenya effectively. The platform's purpose is to provide real-time monitoring, information aggregation, and data analysis to support decision-making and improve sanitation and hygiene practices. With its capabilities such as data visualisation, questionnaire management, and user role administration, the RUSH platform empowers stakeholders at different administrative levels to make informed decisions and take appropriate actions. The LLD also highlights the importance of master lists, including administrative levels and questionnaire definitions, which serve as crucial references for data management, user roles, and system operations. Additionally, the security considerations, testing strategies, and dependency management outlined in the LLD ensure robustness, performance, and reliability of the platform. The deployment strategy leverages Google Cloud Platform, utilising containerisation with GKE, storing container images in the Container Registry, and employing services like CloudSQL, Cloud Storage Bucket, Ingress, Load Balancers, and Cloud DNS. The implementation plan provides a timeline, task breakdown, and resource requirements, allowing for efficient coordination and progress tracking. Furthermore, the RUSH platform embraces effective communication and task management through the use of Slack and Asana, enabling seamless collaboration and efficient project execution. The documentation references, including Swagger, GitHub Wiki, DBDocs, and ReadTheDocs, facilitate comprehensive documentation and knowledge sharing among the team. In conclusion, the RUSH platform's LLD serves as a foundational guide for its development, emphasise the importance of functionality, data management, security, testing, deployment, communication, and documentation. By adhering to this comprehensive design, the RUSH platform aims to make significant contributions to improving sanitation and hygiene practices, ultimately leading to better health outcomes in rural and urban areas of Kenya. # 2023 New Features ## UI Branding ### Migrating Panels to Sidebar Menu #### **[![canvas.png](https://wiki.cloud.akvo.org/uploads/images/gallery/2023-12/scaled-1680-/WnO1xV6fjWpYONG8-canvas.png)](https://wiki.cloud.akvo.org/uploads/images/gallery/2023-12/WnO1xV6fjWpYONG8-canvas.png)** **Figure 1: New Control Center with Sidebar** #### Previous Implementation Overview The previous implementation of the user interface in the application primarily revolved around a panel-based design complemented by a tabbed navigation system. This approach was characterized by distinct sections within the main panel, where each section or page had its own set of tabs for detailed navigation. Here's a closer look at the key features of this previous implementation: 1. **Panel-Based Layout:** - The interface was structured around main panels, each representing a major functional area of the application. - These panels served as the primary means of navigation and content organization, providing users with a clear view of the available options and functionalities. 2. **Tabbed Navigation:** - Within each panel, a tabbed interface was used to further categorize and compartmentalize information and features. - The **[UserTab](https://github.com/akvo/rtmis/blob/main/frontend/src/components/tabs/UserTab.js)** component, for instance, was a pivotal element in this design, allowing for the segregation of different user-related functionalities like Manage Data, User Management or Approval Panel. 3. **Role-Based Access:** The navigation elements, both panels and tabs, were dynamically rendered based on **[the user’s role and permissions](https://github.com/akvo/rtmis/blob/00d842e32488d0d6bacfe4c2bfe6e24ce63d4588/frontend/src/lib/config.js#L39-L132)**. This ensured that users accessed only the features and information pertinent to their roles. 4. **Content Organization:** The content within each panel was organized logically, with tabs providing a secondary level of content segregation. This allowed users to navigate large amounts of information more efficiently. 5. **User Interaction:** Interaction with the interface was primarily through clicking on various panels and tabs. The UI elements were designed to be responsive to user actions, providing immediate access to the content. 6. **Aesthetic and Functional Consistency:** The previous design maintained a consistent aesthetic and functional approach across different panels and tabs, ensuring a cohesive user experience. 7. **Responsive Design:** While the design was primarily desktop-focused, it included responsive elements to ensure usability across various screen sizes. 8. **State Management and URL Routing:** The application managed the state of active panels and tabs, with URL routing reflecting the current navigation path. This was crucial for bookmarking and sharing links. [![canvas.png](https://wiki.cloud.akvo.org/uploads/images/gallery/2023-12/scaled-1680-/WFId8cvRsfRgpy0g-canvas.png)](https://wiki.cloud.akvo.org/uploads/images/gallery/2023-12/WFId8cvRsfRgpy0g-canvas.png) **Figure 2: Previous Control Center** #### Key Considerations The redesign of an application's user interface to incorporate a sidebar-based layout with expandable content requires a strategic and thoughtful approach. This transition aims to enhance the desktop user experience by offering a more intuitive and organized navigation system. These considerations will guide the development process, ensuring that the final product efficiently and effectively meets user needs. Below is a list of these key considerations: 1\. **Navigation Hierarchy and Structure:** - **Clear Hierarchy:** Design a straightforward and logical hierarchy within the sidebar. Ensure users can easily understand the relationship between main categories and their expandable sub-categories. - **Expandable Sections:** Implement expandable sections for main categories to reveal sub-categories, using visual cues for differentiation. 2\. **User Role and Access Control:** - **Dynamic Sidebar Content:** Adjust the sidebar content dynamically based on the user's role and permissions, ensuring appropriate access control. - **Relevant Access:** Ensure users only see and access sidebar items pertinent to their roles. 3\. **State Management and URL Routing:** - **State Synchronization:** Manage the state of the expanded/collapsed sections and the active selection in sync with the application's routing. - **URL Structure:** Design URLs to reflect the nested nature of the sidebar, facilitating intuitive navigation and bookmarking. 4\. **User Experience and Interaction:** - **Active Section Indicators:** Employ visual indicators to denote which section is active or expandable. - **Simplicity:** Avoid making the sidebar too complex or crowded, even on desktop. 5\. **Content Organization and Layout:** - **Logical Grouping:** Group related items in the sidebar in a way that makes sense to the user, facilitating easier navigation. - **Responsive Main Content Area:** Ensure the main content area adapts well to changes in the sidebar, especially when sections are expanded or collapsed. 6\. **Performance Considerations:** - **Optimized Performance:** Even without lazy loading, ensure that the performance is optimized, particularly if the sidebar includes dynamic or data-intensive elements. - **Efficient Pagination:** Since the pages use pagination, ensure it's implemented efficiently to handle data loading without performance lags. 7\. **Testing and Validation:** - **Browser Testing:** Test the sidebar across different browsers to ensure consistency and functionality. - **User Feedback:** Collect user feedback focused on the desktop experience to refine the navigation model.

Example **Ant-design** implementation of sidebar component: [https://ant.design/~demos/components-layout-demo-side](https://ant.design/~demos/components-layout-demo-side)

#### User Access Overview ```javascript const config = { ... roles: [ { id: 1, name: "Super Admin", filter_form: false, page_access: [ ... "visualisation", "questionnaires", "approvals", "approvers", "form", "reports", "settings", ... ], administration_level: [1], description: "Overall national administrator of the RUSH. Assigns roles to all county admins", control_center_order: [ "manage-user", "manage-data", "manage-master-data", "manage-mobile", "approvals", ], }, ... ], checkAccess: (roles, page) => { return roles?.page_access?.includes(page); }, ... } ``` Source: [https://github.com/akvo/rtmis/blob/main/frontend/src/lib/config.js](https://github.com/akvo/rtmis/blob/main/frontend/src/lib/config.js) 1. **Roles Array:** - The `roles` array within `config` defines different user roles in the system. Each role is an object with specific properties. - Example Role Object: - `id`: A unique identifier for the role (e.g., `1` for Super Admin). - `name`: The name of the role (e.g., "Super Admin"). - `filter_form`: A boolean indicating whether the role has specific form filters (e.g., `false` for Super Admin). - `page_access`: An array listing the pages or features the role has access to (e.g., "visualisation", "questionnaires", etc. for Super Admin). - `administration_level`: An array indicating the level(s) of administration the role pertains to (e.g., `[1]` for national level administration for Super Admin). - `description`: A brief description of the role (e.g., "Overall national administrator of the RUSH. Assigns roles to all county admins" for Super Admin). - `control_center_order`: An array defining the order of items or features in the control center specific to the role. 2. **Check Access Function:** - `checkAccess` is a function defined within `config` to determine if a given role has access to a specific page or feature. - It takes two parameters: `roles` (the role object) and `page` (the page or feature to check access for). - The function returns `true` if the `page_access` array of the role includes the specified `page`, indicating that the role has access to that page. - Example Usage of checkAccess: - ```bash λ ag config.checkAccess pages/profile/components/ProfileTour.jsx 19: ...(config.checkAccess(authUser?.role_detail, "form") 28: ...(config.checkAccess(authUser?.role_detail, "approvals") pages/settings/Settings.jsx 29: config.checkAccess(authUser?.role_detail, p.access) pages/control-center/components/ControlCenterTour.jsx 14: ...(config.checkAccess(authUser?.role_detail, "data") 29: config.checkAccess(authUser?.role_detail, "form") 38: ...(config.checkAccess(authUser?.role_detail, "user") 48: config.checkAccess(authUser?.role_detail, "form") 57: ...(config.checkAccess(authUser?.role_detail, "approvals") components/layout/Header.jsx 74: {config.checkAccess(user?.role_detail, "control-center") && ( ``` ##### Usage and Implications - **Role-Based Access Control (RBAC):** This configuration is a clear example of RBAC, where access to different parts of the application is controlled based on the user's role. - **Dynamic Access:** The system can dynamically render UI elements and allow actions based on the user's role, enhancing security and user experience. - **Scalability and Maintenance:** By defining roles and access rights in a centralized configuration, the system becomes easier to manage and scale. Adding a new role or modifying access rights becomes a matter of updating the `config` object. - **Functionality:** The `checkAccess` function simplifies the process of verifying access rights, making the code more readable and maintainable. ## Master Data Management
**Figure 3: Administration and Entities Hierarchy** ### User Interactions #### Add / Edit Administration Attribute - **Step 1:** Click the "Add Attribute" button. - **Step 2:** Fill in the attribute name and select the type (e.g., "Value","Option", "Multiple Option", "Aggregate"). - **Step 3:** If the attribute type is "Option,Multiple Option or Aggregate" click the "+" button to add more options. - **Step 4:** Click "Submit" to save. - **Step 5:** Success alert message appears and return to Administration Attribute list API: [administration-endpoints](https://wiki.cloud.akvo.org/books/rtmis/page/2023-new-features#bkmrk-administration-endpo "RTMIS") #### Add / Edit Administration - **Step 1:** Click "Add New Administration" or select an administrative area to edit. - **Step 2:** Select Level Name. The options will be in between National to Lowest Level, so National and Lowest Level will be hidden. - **Step 3:** Select the parent administration using a cascading drop-down. - **Step 4:** Fill in administration details (name, parent, and code). - **Step 5:** Fill in attributes and their values. - For Value type: Input Number - For Option and Multiple Option type: Drop-down option - For Aggregate: It will shows table with 2 columns, the columns are: **name, value** - **Name:** the dissagregation name - **Value:** Input Number - **Step 6:** Click "Submit" to save. - **Step 7:** A success message appears confirming the administration has been added or updated. - **Step 8:** Return to administration list. [API: ](https://wiki.cloud.akvo.org/books/rtmis/page/2023-new-features#bkmrk-administration-crud)[administration-endpoints](https://wiki.cloud.akvo.org/books/rtmis/page/2023-new-features#bkmrk-administration-endpo "RTMIS")

The option names for the Level are situated between the National and Lowest levels. The inclusion of the National Level is not feasible, as it would result in the appearance of more than two countries, rendering the selection of a parent level logically null. While the addition of the Lowest Level is achievable, it is necessary to inhibit the display of the last cascade option to ensure that any newly added administration does not have an undefined level.

#### Add / Edit Entity - **Step 1:** Click on the "Add Entity" or "Edit Entity" button from the Entity List Page to start the process. - **Step 2:** Fill in the entity details such as the name of the entity (e.g., "Health Facility", "School"). - **Step 3:** Click the "Submit" button to save the new or updated entity information. - **Step 4:** A success message appears confirming the entity has been added or updated. - **Step 5:** Return to Entity List API: [entity-endpoints](https://wiki.cloud.akvo.org/books/rtmis/page/2023-new-features#bkmrk-entity-endpoints) #### Add / Edit Entity Data - **Step 1:** Click on the "Add Entity Data" or "Edit Entity Data" button to begin from the Entity Data List. - **Step 2:** Choose the entity from a drop-down list for which you want to add or edit data. - **Step 3:** Fill in the specific data for the selected entity, such as services offered, number of staff, etc. - **Step 4:** Select the Administration ID from the cascade drop down. This ID links the entity data to a specific administrative unit. - **Step 5:** Click the "Submit" button to save the new or updated entity data. - **Step 6:** A success message appears confirming the entity data has been added or updated. - **Step 7:** Return to Entity Data List API: [entity-data-endpoints](https://wiki.cloud.akvo.org/books/rtmis/page/2023-new-features#bkmrk-entity-endpoints) ### Administration / Entity Attribute Types #### Option & Multiple Option Values **Use Case** We have a dataset that contains categorical information about the types of land use for various regions. This data will be utilized to classify and analyze land use patterns at the county level. **Feature** To achieve this, we will need to define option values for an attribute. In this scenario, the workflow is as follows: **Define Attribute**
- Attribute Name: Land Use Type - Attribute Code: `Land_Use_Type` - Type: Categorical (Option Values) - Administration Level: County
**Define Option Values**
- Option Name: Residential - Option Code: Residential - Option Name: Commercial - Option Code: Commercial - Option Name: Agricultural - Option Code: Agricultural
**Upload Data for Counties**
CountyAttribute CodeValue
County ALand\_Use\_TypeResidential
County BLand\_Use\_TypeCommercial
County CLand\_Use\_TypeAgricultural
In this case, we define the "Option Values" for the "Land Use Type" attribute, allowing us to categorize land use patterns at the county level. The actual data for individual counties is then uploaded using the defined options. #### Single Numeric Values **Use Case** We possess household counts from the 2019 census that correspond to the RTMIS administrative list at the sub-county level. This data can be employed to compute the household coverage per county, which is calculated as (# of households in that sub-county in RTMIS / # from the census). **Feature** To achieve this, we need to store the population value for individual sub-counties as part of their attributes. In this scenario, the workflow is as follows: **Define Attribute** - Attribute Name: Census HH Count - Attribute Code: `Census_HH_Count` - Type: Single Numeric Value - Administration Level: Sub-County **Upload Data for Individual Sub-Counties**
Sub-CountyAttribute CodeValue
CHANGAMWECensus\_HH\_Count46,614
JOMVUCensus\_HH\_Count53,472
In this case, the values for the county level will be automatically aggregated. #### Disaggregated Numeric Values **Use Case** We aim to import data from the CLTS platform or the census regarding the count of different types of toilets, and we have a match at the sub-county level. This data will serve as baseline values for visualization. **Feature** For this use case, we need to store disaggregated values for an attribute. To do so, we will: **Define the Attribute** - Attribute Name: Census HH Toilet Count - Attribute Code: `Census_HH_Toilet_Count` - Type: Disaggregated Numeric Values - Disaggregation: “Improved”, “Unimproved” - Administration Level: Sub-County **Upload Data for Individual Sub-Counties**
Sub-CountyAttribute CodeDisaggregationValue
CHANGAMWECensus\_HH\_Toilet\_CountImproved305,927
CHANGAMWECensus\_HH\_Toilet\_CountUnimproved70,367
### Database Overview #### Entities Table
postablecolumnnulldtypelendefault
1Entitiesid Integer
2Entitiesname Text
#### Entity Data Table
postablecolumnnulldtypelendefault
1Entity Dataid Integer
2Entity Dataentity\_id Integer
3 Entity Data code Yes Text
4Entity Dataname Text
5Entity Dataadministration\_id Integer
#### Entity Attributes
postablecolumnnulldtypelendefault
1Entity Attributesid Integer
2Entity Attributesentity\_id Integer
3Entity Attributesname Text
#### Entity Attributes Options
postablecolumnnulldtypelendefault
1Entity Attributes Optionsid Integer
2Entity Attributes Optionsentity\_attribute\_id Integer
3Entity Attributes Optionsname Text
#### Entity Values
postablecolumnnulldtypelendefault
1Entity Valuesid Integer
2Entity Valuesentity\_data\_id Integer
3Entity Valuesentity\_attribute\_id Integer
4Entity Valuesvalue Text
#### Administration Table
postablecolumnnulldtypelendefault
1administratoridNObigint administrator\_id\_seq
2administratorcodeYEScharacter varying255
3administratornameNOtext
4administratorlevel\_idNObigint
5administratorparent\_idYESbigint
6administratorpathYEStext
#### Administration Attributes
postablecolumnnulldtypelendefault
1Administration Attributesid Integer
2Administration Attributeslevel\_id Integer
3 Administration Attribute code Text Unique (Auto-Generated)
4Administration AttributesType Enum (Number, Option, Aggregate)
5Administration Attributesname Text
#### Administration Attributes Options
postablecolumnnulldtypelendefault
1Administration Attributes Optionsid Integer
2Administration Attributes Optionsadministration\_attributes\_id Integer
3Administration Attributes Optionsname Text
#### Administration Values
postablecolumnnulldtypelendefault
1Administration Valuesid Integer
2Administration Valuesadministration\_id Integer
3Administration Valuesadministration\_attributes\_idInteger
4Administration Valuesvalue Integer
5 Administrative Values option Text
Rules: - Attribute Type: **Numeric** - value: NOT NULL - option: NULL - Attribute Type: **Option** - value: NULL - option: NOT NULL - Attribute Type: **Aggregate** - value: NOT NULL - option: NOT NULL Validation for Option Type - If parent has a value for a particular administration\_attributes\_id, then invalidate the children input. - If children have a value for a particular administration\_attributes\_id, then override the children value. ### Materialized View for Aggregation #### Visualization Query
idtypenameattributeoptionvalue
1administrationBantulWater Points TypeDugwell1
2entityBantul SchoolType of schoolHighschool1
### API Endpoints #### Administration Endpoints ##### Administration Create / Update (POST & PUT) ```json { "parent_id": 1, "name": "Village A", "code": "VA", "attributes": [{ "attribute":1, "value": 200, },{ "attribute":2, "value": "Rural", },{ "attribute":3, "value": ["School","Health Facilities"], },{ "attribute":4, "value": {"Improved": 100,"Unimproved": 200}, } ] } ``` ##### Administration Detail (GET) ```json { "id": 2, "name": "Tiati", "code": "BT", "parent": { "id": 1, "name": "Baringo", "code": "B" }, "level": { "id": 1, "name": "Sub-county" }, "childrens": [{ "id": 2, "name": "Tiati", "code": "BT" }], "attributes": [{ "attribute":1, "type": "value", "value": 200, },{ "attribute":2, "type": "option", "value": "Rural", },{ "attribute":3, "type": "multiple_option", "value": ["School","Health Facilities"], },{ "attribute":4, "type": "aggregate", "value": {"Improved": 100,"Unimproved": 200}, } ] } ``` ##### Administration List (GET) Query Parameters (for filtering data): - parent (only show data that has same parent id, so the parent itself should not be included) - search (search keyword: by name or code) - level - Rules: - Always filter parent\_id = null (Kenya) by default ```json { "current": "self.page.number", "total": "self.page.paginator.count", "total_page": "self.page.paginator.num_pages", "data":[ { "id": 2, "name": "Tiati", "code": "BT", "parent": { "id": 1, "name": "Baringo", }, "level": { "id": 1, "name": "Sub-county" } } ]} ``` ##### Administration Attributes CRUD (POST & PUT) ```json { "name": "Population", "type": "value", "options": [] } ``` ##### Administration Attributes (GET) ```json [{ "id": 1, "name": "Population", "type": "value", "options": [] },{ "id": 2, "name": "Wheter Urban or Rural", "type": "option", "options": ["Rural","Urban"] },{ "id": 3, "name": "HCF and School Availability", "type": "multiple_option", "options": ["School","Health Care Facilities"] },{ "id": 4, "name": "JMP Status", "type": "aggregate", "options": ["Improved","Unimproved"] }] ``` #### Entity Endpoints ##### Entity Create / Update (POST / PUT) ```json { "name": "Schools", } ``` ##### Entity List (GET) ```json { "current": "self.page.number", "total": "self.page.paginator.count", "total_page": "self.page.paginator.num_pages", "data":[ { "id": 1, "name": "Health Facilities", }, { "id": 2, "name": "Schools", } ]} ``` #### Entity Data Endpoints ##### Entity Data Create / Update (POST / PUT) ```json { "name": "Mutarakwa School", "code": "101", "administration": 1, "entity": 1 } ``` ##### Entity Data List (GET) ```json { "current": "self.page.number", "total": "self.page.paginator.count", "total_page": "self.page.paginator.num_pages", "data":[ { "id": 1, "name": "Lamu Huran Clinic", "code": "101", "administration": { "id": 111, "name": "Bura", "full_name": "Kenya - Tana River - Bura - Bura - Bura", "code": null }, "entity": { "id": 1, "name": "Health Care Facilities" } }, ]} ``` ### Bulk Upload As an administrator of the system, the ability to efficiently manage and update administrative data is crucial. To facilitate this, a feature is needed that allows for the bulk uploading of administrative data through a CSV file. This CSV file format is generated based on administration level table and administrative attribute table. When downloading a template, system administrators are given the ability to choose what attributes they want to include in the template. The CSV template, will contain columns representing all administrative levels (such as National, County, Sub-County, Ward, and Village) along with their respective IDs. Additionally, it will include columns for selected attributes associated with each administrative unit, as defined in the administration attribute table. #### Acceptance Criteria ##### CSV File Format and Structure - The system should accept CSV files for bulk upload. - The CSV file must include columns for different administrative levels (e.g., National, County, Sub-County, Ward, Village). - The CSV tile must include only selected attributes. - Each administrative level column in the CSV file must be filled to ensure proper hierarchical placement. - Columns for administrative codes and attributes are included but are optional to fill. ##### Optional Codes and Attributes - While the administrative codes and attribute columns are provided in the CSV template, filling them is optional. - The system should be able to process the CSV file and update the administration data correctly, even if some or all of the code and attribute columns are left blank. ##### Data Validation and Integrity - The system should validate the CSV file to ensure that all required administrative level columns are filled. - The system should handle empty optional fields (codes and attributes) gracefully without causing errors. - Any discrepancies or format errors in the CSV file should be reported back to the user for correction via email. - The system should process the CSV file efficiently, updating existing records and adding new ones as necessary. - The process should be optimized to handle large datasets without significant performance issues. ##### User Feedback and Error Handling - The user should receive clear feedback on the progress of the upload, including confirmation via email once the upload is complete. - The system should provide detailed error messages or guidance in case of upload failures or data inconsistencies. #### Example CSV Template for Administration Data
CountySub-CountyWardVillagePopulationWhether\_Urban\_or\_RuralHCF\_and\_School\_AvailabilityJMP\_Status\_ImprovedJMP\_Status\_Unimproved
KituiMwingi NorthKyusoIkinda200RuralSchool;Health Care Facilities100200
KituiMwingi NorthKyusoGai Central150UrbanHealth Care Facilities120180
- **County, Sub-County, Ward, Village**: Names of the administrative units at each level. - **Population**: Corresponds to the "Population" attribute. - **Whether\_Urban\_or\_Rural**: Corresponds to the "Whether Urban or Rural" attribute. - **HCF\_and\_School\_Availability**: Corresponds to the "HCF and School Availability" attribute. Multiple options are separated by semicolons. - **JMP\_Status\_Improved, JMP\_Status\_Unimproved**: Correspond to the "JMP Status" aggregate attribute, split into separate columns for each option. **Notes:** - The template is designed to reflect the structure of the administrative hierarchy from County to Village. - The columns for administrative levels are included, and each level is represented in its own column. - Attributes are represented according to their types and names as provided. - The CSV format allows for flexibility in filling out the data, with some attribute fields being optional. #### Bulk Upload Process Example process: ```python from api.v1.v1_jobs.constants import JobTypes, JobStatus from api.v1.v1_jobs.models import Jobs from api.v1.v1_users.models import SystemUser job = Jobs.objects.create(type=JobTypes.validate_administration, status=JobStatus.on_progress, user=request.user, info={ 'file': filename, }) task_id = async_task('api.v1.v1_jobs.jobs.validate_administration', job.id, hook='api.v1.v1_jobs.job.seed_administration') ``` 1. **Initiating the Bulk Upload Task**: - When a bulk upload is initiated, the `async_task` function is called. - The function is provided with the task name `'api.v1.v1_jobs.job.validate_administration_data'`, which likely refers to a function responsible for validating the uploaded administration data. 2. **Passing Job ID to the Task**: - Along with the task name, the job ID (`job.id`) is passed to the `async_task` function. - This job ID is used to associate the asynchronous task with the specific job record in the `Jobs` table. 3. **Task Execution and Hook**: - The `async_task` function also receives a `hook` parameter, in this case, `'api.v1.v1_jobs.job.seed_administration_data'`. - This hook is likely another function that is called after the validation task completes. It's responsible for seeding the validated administration data into the database. 4. **Task ID Generation**: - The `async_task` function generates a unique task ID for the job. This task ID is used to track the progress and status of the task. - The task ID is likely stored in the `Jobs` table, associated with the corresponding job record. 5. **Monitoring and Tracking**: - With the task ID, administrators can monitor and track the status of the bulk upload process. - The `Jobs` table provides a comprehensive view of each job, including its current status, result, and any relevant information. 6. **Error Handling and Notifications**: - If the validation or seeding task encounters any errors, these are captured and recorded in the `Jobs` table. - The system can be configured to notify administrators of any issues, allowing for prompt response and resolution. 7. **Completion and Feedback**: - Once the bulk upload task is completed (both validation and seeding), its final status is updated in the `Jobs` table. - Administrators can then review the outcome of the job and take any necessary actions based on the results. ### Database Seeder #### Administration Seeder In the updated approach for seeding initial administration data, the shift from using **TopoJSON** to **Excel** file format is being implemented. While TopoJSON has been the format of choice, particularly for its geospatial data capabilities which are essential for visualization purposes, the move to Excel is driven by the need for a more flexible and user-friendly data input method. However, this transition introduces potential challenges in maintaining consistency between the Excel-based administration data and the TopoJSON used for visualization. The inherent differences in data structure and handling between these two formats could lead to discrepancies, impacting the overall data integrity and coherence in the system. This change necessitates a careful consideration of strategies to ensure that the data remains consistent and reliable across both formats. ##### Key Considerations - **Data Format and Consistency**: The shift to Excel might introduce inconsistencies with the TopoJSON format, especially in terms of data structure and geospatial properties. - **Data Validation**: Robust validation is essential to mitigate errors common in Excel files. - **Import Complexity**: Managing complex Excel structures requires additional parsing mechanisms. - **Scalability and Performance**: Excel's performance with large datasets and memory usage should be monitored. - **Security and Integrity**: Increased risk of data tampering in Excel files, and challenges in version control. - **Automation and Workflow Integration**: Adapting automation processes to accommodate Excel's format variations. - **User-Provided Data**: Dependence on external data updates necessitates clear handling policies. ##### Excel File Structure for Seeder **File Naming Convention** - Each Excel file represents a county. - File names follow the format: `-.xlsx` - Example: `101-Nairobi.xlsx`, `102-Mombasa.xlsx` **File Content Structure** Each file contains details of sub-counties and wards within the respective county.
Sub-County\_IDSub-CountyWard\_IDWard
201Westlands301XYZ
201Westlands302ABC
............
##### Seeder Adaptation - **Hard-coded National Level**: The national level, Kenya, should be hard-coded in the seeder. - **Dynamic County Processing**: The seeder dynamically processes each county file, creating or updating records for sub-counties and wards. - **File Processing Logic**: The seeder reads the file name to determine the county and iterates through each row to seed data for sub-counties and wards. #### Administration Attribute Seeder ##### Assumptions - Administration IDs are available and consistent. - The attributes are stored in an Excel file, with a structure that includes administration IDs and their corresponding attributes. ##### Example Excel File Structure
Admin\_IDAttribute1Attribute2...
1Value1Value2...
2Value1Value2...
............
##### Seeder Script ```python import pandas as pd from your_app.models import Administration, AdministrationAttribute class AdministrationAttributeSeeder: def __init__(self, file_path): self.file_path = file_path def run(self): # Load data from Excel file df = pd.read_excel(self.file_path) # Iterate through each row in the DataFrame for index, row in df.iterrows(): admin_id = row['Admin_ID'] # Retrieve the corresponding Administration object administration = Administration.objects.get(id=admin_id) # Create or update AdministrationAttribute for attr in row.index[1:]: # Skipping the first column (Admin_ID) attribute_value = row[attr] AdministrationAttribute.objects.update_or_create( administration=administration, attribute_name=attr, defaults={'attribute_value': attribute_value} ) print("Administration attributes seeding completed.") # Usage seeder = AdministrationAttributeSeeder('path_to_your_excel_file.xlsx') seeder.run() ``` **Note:** 1. **File Path**: Replace `'path_to_your_excel_file.xlsx'` with the actual path to the Excel file containing the administration attributes, the excel files will be safely stored in backend/source. 2. **Model Structure**: This script assumes the existence of `Administration` and `AdministrationAttribute` models. Adjust the script according to your actual model names and structures. 3. `update_or_create`: This method is used to either update an existing attribute or create a new one if it doesn't exist. 4. **Error Handling**: Add appropriate error handling to manage cases where the administration ID is not found or the file cannot be read. ### Task Scheduler The system needs to perform scheduled tasks periodically such as backups, report generation, and so on. Cron expression is a familiar format used to configure scheduled tasks to run periodically. Using the Cron expression in the Task Scheduler is the prefered approach. Django Q has a feature to [run scheduled tasks](https://django-q.readthedocs.io/en/latest/schedules.html) and can be used to implement the Task Scheduler. With [Croniter](https://github.com/kiorky/croniter) package it can support cron expression. #### Configuration Use django settings to configure the Task Scheduler. Example: ```python SCHEDULED_TASKS = { "task name" : { "func": "function_to_run", "cron": "* * * * *", "kwargs": { "hook": "post_function_to_run" } }, } ``` The task attributes (`func`, `cron`. ...) is a dictionary object representation of the [Django Q schedule parameters.](https://django-q.readthedocs.io/en/latest/schedules.html#reference) #### Configuration update synchronization The Task Scheduler configuration must support adding new tasks, deleting tasks, and changing task parameters. The command to synchronize configuration updates needs to be implemented. This command will be run on Django startup to apply configuration changes. ```python from django_q.models import Schedule def sync_scheduled_tasks(): schedules = get_setting_schedules() existing_schedules = list(Schedule.objects.all()) actions = calculate_schedule_changes(schedules, existing_schedules) apply_sync_actions(actions) class SyncActions: to_add: List[Schedule] to_modify: List[Schedule] to_delete: List[Schedule] def get_setting_schedules() -> List[Schedule]: """ Converts the schedules configuration in the app settings to django-q schedule objects """ ... def calculate_schedule_changes( schedules: List[Schedule], existing_schedules: List[Schedule] ) -> SyncActions: """ Calculates the operations that have to be taken in order to sync the schedules in the settings with the existing schedules in the db """ ... def apply_sync_actions(actions: SyncActions): """ Applies the operations required to sync the schedules in the settings with the schedules in the DB """ ... ``` #### List of scheduled tasks - SQLite file generator ### Entity Type of Question #### How to Achieve Entity Type of Question To achieve an entity type of question, we need to ensure that the question type is supported in both web forms and mobile applications. We should consider the question format, ensuring alignment with [akvo-react-form](https://github.com/akvo/akvo-react-form#supported-field-type), and verify that the attributes can be stored in the database. For this case, we will use a type cascade with an additional attribute for further classification. #### Handling Existing Cascade Type of Question As mentioned earlier, we will use an extra attribute to manage existing cascade-type questions, if the cascade type does not have extra attributes and not providing an API endpoint, then the entity cascade will not work. ##### Provide API attribute for Entity Cascade Implementing an API attribute for Entity Cascade is a significant enhancement aimed at improving the functionality of web forms. This feature involves adding an API attribute at the question level within a questionnaire and defining it as an object. The primary purpose of this object is to store the API URL, which is crucial for enabling the Entity Cascade functionality. This should be done as follows: ```json { "api": { "endpoint": "" } } ``` The format for the response can be found at the following URL: [https://raw.githubusercontent.com/akvo/akvo-react-form/main/example/public/api/entities/1/13](https://raw.githubusercontent.com/akvo/akvo-react-form/main/example/public/api/entities/1/13) ##### Extra attribute for Entity Cascade
**Attribute** **Value**
type "entity" This aims to identify on the backend that we will use entity table to filter entity data and send SQLite files to the mobile app
nameUse existing entity names and fill them **exactly as they are in the database** to prevent data from not being found https://wiki.cloud.akvo.org/link/65#bkmrk-entities-table
parentId Set the **question source ID** to trigger a list of entities to appear based on the answer to the question. If the questionnaire is filled out via a Webform, the entities will appear from the API response. The entities will appear from the SQL query results if the questionnaire is filled out via a Mobile app.
##### Example ```json { "id": 67, "label": "School cascade", "name": "school_cascade", "type": "cascade", "required": false, "order": 7, "api": { "endpoint": "https://akvo.github.io/akvo-react-form/api/entities/1/" }, "extra": { "type": "entity", "name": "School", "parentId": 5 } }, ``` ##### BACKEND changes We need to modify the form details response by changing this file to retrieve the SQLite file based on the extra type attribute [https://github.com/akvo/rtmis/blob/main/backend/api/v1/v1\_forms/serializers.py#L322-L331](https://github.com/akvo/rtmis/blob/main/backend/api/v1/v1_forms/serializers.py#L322-L331) ```python for cascade_question in cascade_questions: if cascade_question.type == QuestionTypes.administration: source.append("/sqlite/administrator.sqlite") if ( cascade_question.extra and cascade_question.extra.get('type') == 'entity' ): source.append("/sqlite/entity_data.sqlite") else: source.append("/sqlite/organisation.sqlite") return source ``` [https://github.com/akvo/rtmis/blob/main/backend/api/v1/v1\_forms/serializers.py#L198-L216](https://github.com/akvo/rtmis/blob/main/backend/api/v1/v1_forms/serializers.py#L198-L216) ```python def get_source(self, instance: Questions): user = self.context.get('user') assignment = self.context.get('mobile_assignment') if instance.type == QuestionTypes.cascade: if instance.extra: cascade_type = instance.extra.get("type") cascade_name = instance.extra.get("name") if cascade_type == "entity": # Get entity type by name entity_type = Entity.objects.filter(name=cascade_name).first() entity_id = entity_type.id if entity_type else None return { "file": "entity_data.sqlite", "cascade_type": entity_id, "cascade_parent": "administrator.sqlite" } # ... the rest of the code ``` The backend response will be ```json { ... "source": { "file": "entity_data.sqlite", "cascade_type": 1, "cascade_parent": "administrator.sqlite" } } ``` #### Mobile Handler for Entity Type of Question Once the mobile application can read the entity SQLite file, we can execute a filtering query based on the selected administration. ##### Test cases - It should be able to load `entity\_data.sqlite`. - It should be able to be filtered by cascade\_type and the selected administration ID. - It should display the answer from the currentValues. - It should not be shown when the administration has not been selected. ##### Store selected administration We need to store the selected administration to quickly retrieve the parent of the entity cascade. Once the administration is selected, the related entity list should be made available. To achieve this, we can add a new global state called ``administration`` and set its value using the onChange event in the TypeCascade component. - Add administration in global state forms - [https://github.com/akvo/rtmis/blob/main/app/src/store/forms.js#L13](https://github.com/akvo/rtmis/blob/main/app/src/store/forms.js#L13) - ```javascript ... prefilled: false, administration: null, } ``` - Set value `administration` in onChange event - [https://github.com/akvo/rtmis/blob/main/app/src/form/fields/TypeCascade.js#L66-L67](https://github.com/akvo/rtmis/blob/main/app/src/form/fields/TypeCascade.js#L66-L67) - ``` FormState.update((s) => { ... s.administration = source?.file === 'administrator.sqlite' ? finalValues : s.administration; }); ``` ##### Modify initial cascade Change how the dropdown data is initialized by checking the`cascadeParent` from the source value. If '`cascadeParent`' exists, use it as a parameter to retrieve the selected administration as the parent ID. Otherwise, obtain the parent from the 'parent\_id' value. To filter entity types, we can utilize the '`cascadeType`' property to display a list of relevant entities with previously defined extra attributes. The implementation will look as follows: [https://github.com/akvo/rtmis/blob/main/app/src/form/fields/TypeCascade.js#L115-L134](https://github.com/akvo/rtmis/blob/main/app/src/form/fields/TypeCascade.js#L115-L134) ```javascript const parentIDs = cascadeParent === 'administrator.sqlite' ? prevAdmAnswer || [] : parentId || [0]; const filterDs = dataSource ?.filter((ds) => { if (cascadeParent) { return parentIDs.includes(ds?.parent); } return ( parentIDs.includes(ds?.parent) || parentIDs.includes(ds?.id) || value?.includes(ds?.id) || value?.includes(ds?.parent) ); }) ?.filter((ds) => { if (cascadeType && ds?.entity) { return ds.entity === cascadeType; } return ds; }); ``` ## Grade Determination Process ### Grade Claim The Sub-County or Ward PHO opens a Grade Determination process by claiming that a community has reached a G level. A team is assembled to collect data in all households and at the community level. The collected data is associated with the Grade Determination process, i.e. it is not stored alongside the routine data. Specific questions could be added to the Community form to reinforce the accountability of PHOs in claiming a grade. Ex: - Confirm that the grade claim criteria are achieved. - Confirm that all households have been visited. The collected data does not need to go through the data approval workflow the routine data is subject to. Based on the collected data, the Sub-County or Ward the PHO can decide to submit the claim for approval to the Sub-County PHO or to cancel it. The platform computes and displays the % completion of the data collection activity associated with the Grade Determination process (the number of households of a community - denominator - is collected in the community form). A % completion below 100% does not prevent the Sub-County or Ward the PHO from submitting the claim for approval. **Features** - User is able to create a Grade Determination Process - User is able to collect data that goes to a different bucket - User is able to see browse data associated with the Grade Determination Process ### Claim Certification Claim certification is done by doing another round of data collection on a sampled number of households per candidate communities. The collected data does not need to go through the data approval workflow the routine data is subject to. The collected data goes to a different bucket than the routine data. The data collection is performed by staff of a different Sub-County a community belongs to. The data collection is done in batches: a team will plan and perform the data collection for multiple communities. The County PHO is in charge of creating the batches and to assign them to the Sub-County PHO that will later put together a team of data collectors. Candidate Communities are expected to be assigned to a batch within two months of being approved for the certification process. Specific sampling rules apply: - 50%-100% of at-risk households should be sampled, with a minimum sample of 20 new/at-risk households (or 100% of at-risk households where fewer than 20) - 30%-100% of other households should be sampled, with a minimum sample of 30 other households (or 100% of other households where fewer than 30) Based on the data collected, the County PHO can decide to: - Certify a community - The community is then flagged for the requested grad. This ends the Grade Determination Process. - Fail the certification - The Grade Determination Process ends. The users are able to see the outcomes for which the targeted level was not reached in order to provide feedback to the community. **Features** - The user is able to confirm the certification - The user is able to to create batches of Candidate Communities and assign them to a Sub-County user - The Sub-County user is able to assign the Candidate Communities to specific enumerators. - User is able to collect data that goes to a different bucket ##### # Mobile Application ## Introduction The Mobile Application for Real-Time Management Information System (RTMIS) plays a pivotal role in facilitating remote data collection, primarily designed to support offline data submission for enumerators. Enumerators, who are an integral part of the data collection process, are assigned the responsibility of collecting critical information beyond the scope of Data Collectors. This mobile application serves as an indispensable tool, equipping enumerators with the means to efficiently gather data, even in areas with limited or no connectivity. The Mobile Application for Real-Time Management Information System (RTMIS) is built upon a module derived from the National Management Information System (NMIS) Mobile Application ([https://github.com/akvo/nmis-mobile](https://github.com/akvo/nmis-mobile)). The NMIS Mobile App serves as a generic data collection tool designed to accommodate the needs of multiple services and organizations. Within this context, the RTMIS Mobile Application takes center stage as a specialized module tailored to support the unique requirements of real-time data collection for management information. Specifically crafted to cater to the demands of the RTMIS, this mobile application empowers enumerators and data collectors with a targeted set of features and functionalities. ## Requirements ### Initial Setup 1. **Setup New Expo Application:** - Create a new Expo application as a foundation for the RTMIS Mobile App. - Configure the Expo environment with the necessary dependencies. 2. **Integration from nmis-mobile Repository:** - Copy the entire [**app**](https://github.com/akvo/nmis-mobile/tree/main/app) folder from the **nmis-mobile** repository to the RTMIS repository. - Ensure that the integration includes all relevant code, assets, and configurations. - Make the necessary modifications to the module to align it with the specific requirements and functionalities of the RTMIS back-end. 3. **Docker Compose Setup for Development:** - Implement Docker Compose setup to enable seamless development of the Mobile App within the RTMIS project. - Integrate the Mobile App into the RTMIS development environment to ensure compatibility and ease of testing. 4. **Authentication Method Enhancement:** - Implement changes to introduce a new and improved authentication method for the RTMIS Mobile App. - Ensure that the new authentication method aligns with the security requirements and standards of the RTMIS project. - Update relevant documentation and user instructions to reflect the changes. 5. **CI/CD Setup for Mobile App Deployment:** - Establish a robust CI/CD pipeline for the RTMIS Mobile App, enabling automated deployment to the Expo platform. - Configure the pipeline to trigger builds and deployments based on code changes and updates to the Mobile App repository. - Ensure that the CI/CD setup includes proper testing and validation procedures before deploying to Expo 6. **Integration of Django Mobile Module:** - Incorporate the Django mobile module from the **National Wash MIS** repository folder: **[v1\_mobile](https://github.com/akvo/national-wash-mis/tree/main/backend/api/v1/v1_mobile)** into the RTMIS back-end. ## Overview To support the integration of the mobile application, several critical updates are required for both the RTMIS platform's back-end and front-end components. These modifications encompass a range of functionalities designed to seamlessly accommodate the needs of the mobile application. Key updates will include, but are not limited to: #### 1. Back-end 1. **Authentication and Authorization API for Mobile Users:** - Integrate automated pass-code generation functionality to generate unique 6-digit alpha-numeric pass-codes for multiple mobile data collector assignment. - Establish an API mechanism to authenticate and authorize mobile users based on a pass-code. This ensures secure access to the RTMIS platform while simplifying user management for mobile data collectors. 2. **Form List and Cascade Retrieval API:** - Develop Cascade SQLite generator for both Entities and Administration. - Implement an API that enables the mobile application to retrieve forms and cascades from the RTMIS platform. This functionality is vital for data collection activities performed by enumerators and data collectors in the field. 3. **Data Monitoring API:** - Modify data/batch submission-related models and API to support monitoring submission. - Modify approval workflow-related models and API to support monitoring submission. 4. **Data Synchronisation API:** - Make the necessary modifications to the v1\_mobile module to align it with the specific requirements and functionalities of the RTMIS back-end: - Preload existing data-points. - Modify Mobile Form submission-related models and API to support monitoring submission. 5. **Data Entry Staff Data Editing and Approval Workflow:** - Develop functionality for Data Entry Staff to add Mobile Assignments. The Data Entry Staff user can have multiple mobile assignments, which will require village ID and form ID. When a mobile assignment is created, it will generate a pass-code that will be used by Enumerators to collect data in the field via the Mobile App. - Develop functionality for Data Entry Staff to edit data submitted via the mobile application. 6. **Form Updates:** - Develop New Question Type: Data-point Question - New Question Parameters: Display Only #### 2. Front-end 1. **Dedicated "Mobile Data Collectors" Section:** - Create a dedicated section within the RTMIS front-end, labeled "Mobile Data Collectors," where Data Entry Staff can easily access and manage mobile data collector assignments. 2. **"Add Mobile Data Collector" Feature:** - Implement a user-friendly feature within the "Mobile Data Collectors" section that allows Data Entry Staff to initiate the process of adding mobile data collectors. 3. **Assignment Details Form:** - Develop a user-friendly form that Data Entry Staff can use to input assignment details: - the name of the assignment - Level (for scoping the administration selection) - Multiple Administration village selection - and form(s) selection. - Once the Data Entry Staff presses "create," the back-end will process it and return a 6-digit Alphanumeric code that will be used for mobile authentication. 4. **Communication of Pass-codes:** - Provide a mechanism within the front-end that allows Data Entry Staff to easily communicate the generated pass-codes to the respective mobile data collectors. 5. **User Guidance (RTD Updates):** - Include user guidance elements and feedback mechanisms in the front-end to assist Data Entry Staff throughout the process, ensuring that they understand the workflow and status of each assignment. #### 3. Mobile App 1. **Mobile App User Schema:** - Modify Authentication Method 2. **Mobile Database Modification** - Modify the [Database Schema](https://wiki.cloud.akvo.org/books/mobile-app-for-national-management-information-system/page/low-level-design#bkmrk-database-schema) to support Monitoring and Cascade Sync Updates - Read more: [**Mobile Database Modification**](https://wiki.cloud.akvo.org/books/rtmis/page/mobile-application#bkmrk-mobile-database) 3. **Mobile UI Modification** - Develop a screen where user can see and sync the list of existing data-points - Develop a screen where user can choose to add new data-point or edit existing data-point - [![NMIS-sync.png](https://wiki.cloud.akvo.org/uploads/images/gallery/2023-11/scaled-1680-/LZlIJSGaIs5x6WJv-nmis-sync.png)](https://wiki.cloud.akvo.org/uploads/images/gallery/2023-11/LZlIJSGaIs5x6WJv-nmis-sync.png) - Read more: [**Mobile UI Modification**](https://wiki.cloud.akvo.org/books/rtmis/page/mobile-application#bkmrk-additional-changes-o) ## Back-end ### Back-end Database Migrations #### Mobile Assignment Schema ##### 1. Mobile Group (PENDING) - Table name: **mobile\_assignment\_group** - Model name: **MobileAssignmentGroup** - Path to Model: **api.v1.v1\_mobile.models** - Migrations: **New Table**
poscolumnnulldtypelendefault
1idNoInteger-(Auto-increment)
3nameNoText6-
4 created\_by
##### 2. Mobile Assignment Table - Table name: **mobile\_assignment** - Model name: **MobileAssignment** - Path to Model: **api.v1.v1\_mobile.models** - Migrations: **Alter Table**, add **name**
poscolumnnulldtypelendefault
1idNoInteger-(Auto-increment)
2 nameNoText255-
3 passcodeNoText6(Auto-generated)
4 token No Text 255 JWT String
5 created\_by No Integer - (Primary Key)
**Explanation:** The `MobileAssignment` table stores information about mobile data collector assignments. The `id` column serves as the primary key and a unique identifier for each assignment. The `name` column holds the assignment's name or description, while the `passcode` column stores a unique pass-code for mobile data collector access. ##### 3. Mobile Assignment Form Administration Table (Junction): - Table name: **mobile\_assignment\_form\_administration** - Model name: **MobileAssignmentFormAdministration** - Path to Model: **api.v1.v1\_mobile.models** - Migrations: **New Table**
poscolumnnulldtypelendefault
1idNoInteger-(Auto-increment)
2assignment\_idNoInteger--
3form\_idNoInteger--
4administration\_idNoInteger--
**Explanation:** This table serves as a junction table that establishes the many-to-many relationship between mobile assignments (`MobileAssignment`), forms (`form_id`), and administrative level (`administration_id`). The `id` column remains as the primary key, and the other columns associate the rows with the respective assignment, form, and administrator. #### Current Schema Updates ##### 1. Data-point Table - Table name: **data** - Model name: **FormData** & **PendingFormData** - Path to Mode; **api.v1.v1\_data.models** - Migrations: **Alter Tabl**e, add **uuid**
postablecolumnnulldtypelendefault
1dataidNObigint data\_id\_seq
2dataform\_idNObigint
3 data administration\_id NO bigint
4datanameNOtext
5datageoYESjsonb
6datacreatedNOdatetime
7dataupdatedYESdatetime
8datacreated\_by\_idNObigint
9dataupdated\_by\_idYESbigint
10 data uuid NO uuid uuid.uuid4
##### 1. Question Table - Table name: **question** - Model name: **Questions** - Path to Model: **api.v1.v1\_forms.models** - Migrations: **Alter Table,** add **fn, tooltip, display\_only, meta\_uuid,** and **monitoring**
postablecolumnnulldtypelendefault
1questionidNObigint question\_id\_seq
2questionorderYESbigint
3questiontextNOtext
4questionnameNOcharacter varying255
5questiontypeNOint
6questionmetaNObool
7questionrequiredNObool
8questionruleYESjsonb
9questiondependencyYESjsonb
10questionform\_idNObigint
11questionquestion\_group\_idNObigint
12questionapiYESjsonb
13questionextraYESjsonb
14 question tooltip YES jsonb
15 question fn YES jsonb
16 question display\_only YES bool
17 question meta\_uuid YES bool
18 question disabled YES jsonb
18 question hidden YES jsonb
##### 2. Option Table - Table name: **option** - Model name: **QuestionOptions** - Path to Model: **api.v1.v1\_forms.models** - Migrations: **Alter Table,** add **color**
postablecolumnnulldtypelendefault
1optionidNObigint option\_id\_seq
2optionorderYESbigint
3optioncodeYEScharacter varying255
4optionnameNOtext
5optionotherNObool
6optionquestion\_idNObigint
7 option color YES text
### API Endpoints #### New Endpoints ##### 1. Create Mobile Assignment - Endpoint: **api/v1/mobile-assignment/<id>** - Method: **POST / PUT** - Authentication: **Bearer Token** - Payload: ```json { "name": "Kelewo Community Center Health Survey", "administrations": [321,398], "forms": [1,2,4], } ``` - Success Response (for POST request): ```json { "id": 1, "passcode":"4dadjyla", } ``` - Explanation: - **id:** id of the assignment - **name**: represents the name of assignment (can be person name, community or organization). - **administrations**: list of **administration\_ids** from **administration** table. - **forms**: list of forms for the mobile assignment - **passcode**: generated from **CustomPasscode** in **utils.custom\_helper** via **MobileAssignmentManager** ##### 2. Get List of Mobile Assignment - Endpoint: **api/v1/mobile-assignment** - Method: **GET** - Authentication: **Bearer Token** - Payload: **None** - Success Response: ```json { "current":1, "total":11, "total_page":2, "data": [{ "id":1, "name": "Kelewo Community", "passcode": "3a45562", "forms": [{ "id":1, "name": "Health Facilities" },{ "id":2, "name": "CLTS", },{ "id":3, "name": "Wash In Schools" }], "administrations": [{ "id":765, "name": "Kelewo" }] }] } ``` #### Token Modifications In the updated RTMIS Mobile application, a significant change is being introduced to enhance security and access control. This change involves modifying the token generation process for Mobile Data Collector Assignments. Here's a detailed description of this update: ##### 1. Context and Need for Change - **Previous System**: In the earlier version of the NMIS app, tokens were generated using **RefreshToken** from **rest\_framework\_simplejwt.tokens**. This approach was suitable when the Mobile App users were Data Entry Users themselves. Previous token: - ```python class MobileAssignmentManager(models.Manager): def create_assignment(self, user, name, passcode=None): token = RefreshToken.for_user(user) if not passcode: passcode = generate_random_string(8) mobile_assignment = self.create( user=user, name=name, token=token.access_token, passcode=CustomPasscode().encode(passcode), ) return mobile_assignment ``` - **New Requirement**: With the introduction of Mobile Data Collector Assignments, there's a need to restrict token access to prevent unauthorized use of other endpoints. ##### 2. Custom Token Generation for Enhanced Security - **Custom Token Implementation**: The token generation process will be customized to create tokens that are specifically restricted in their access capabilities. - **Restricted Access**: The custom token will only grant access to endpoints with the prefix **api/v1/mobile/device/\***. This ensures that Mobile Data Collectors can access only the necessary data and functionalities relevant to their assignments. - **Security Benefit**: This approach significantly enhances the security of the system by ensuring that each token can only interact with a limited set of endpoints, thereby reducing the risk of unauthorized access to sensitive data or functionalities. ##### 3. Example Custom Token Generation ```python import jwt from rtmis.settings import SECRET_KEY def generate_assignment_jwt(assignment_id, allowed_forms_ids, administration_ids, secret_key): # Custom claim for Mobile Assignment custom_claim = { "assignment_id": assignment_id, "allowed_endpoints": "api/v1/mobile/device/*", "forms": allowed_forms_ids, "administrations": administration_ids } # Payload of the JWT without an expiration time payload = { "assignment": custom_claim } # Generate JWT token token = jwt.encode(payload, SECRET_KEY, algorithm="HS256") return token # Example usage secret_key = "your_secret_key" # Secure, unguessable string assignment_id = "assignment_123" # Unique identifier for the mobile assignment allowed_forms_ids = [101, 102, 103] # Example list of allowed form IDs administration_ids = [201, 202] # Example list of allowed administration IDs token = generate_assignment_jwt(assignment_id, allowed_forms_ids, administration_ids, secret_key) ``` ##### 4. Token Payload ```json { "user_id": "", "assignment_id": "", "allowed_endpoints": "api/v1/mobile/device/*", "administration_ids": ["administration_id"], "allowed_forms_ids": ["form_id"], "exp": 1701468103, "iat": 1701424903, "jti": "923cfad9ff244e6897bfef2260dde4ee", ...other_stuff } ``` ##### 5. Example Custom Authentication ```python from rest_framework.authentication import BaseAuthentication from rest_framework import exceptions import jwt class MobileAppAuthentication(BaseAuthentication): def authenticate(self, request): # Retrieve the token from the request token = request.META.get('HTTP_AUTHORIZATION') if not token: return None # Authentication did not succeed try: # Decode the token decoded_data = jwt.decode(token, 'your_secret_key', algorithms=["HS256"]) # Check if the token has the required claims assignment_info = decoded_data.get('assignment') if not assignment_info: raise exceptions.AuthenticationFailed('Invalid token') # Add more checks here if needed (e.g., allowed_forms_ids, administration_ids) # You can return a custom user or any identifier here return (assignment_info, None) # Authentication successful except jwt.ExpiredSignatureError: raise exceptions.AuthenticationFailed('Token expired') except jwt.DecodeError: raise exceptions.AuthenticationFailed('Token is invalid') except jwt.InvalidTokenError: raise exceptions.AuthenticationFailed('Invalid token') ``` ##### 6. Token Implementation Considerations - **Token Scope**: The scope of the token is strictly limited to the specified API endpoints, ensuring that Mobile Data Collectors cannot access other parts of the system. - **Compatibility**: The new token generation method should be compatible with the existing system's infrastructure and authentication mechanisms. - **User Experience**: The change in token generation should be seamless to the users, with no negative impact on the user experience for legitimate access. #### Endpoint Modifications ##### 1. Get List of Assigned Forms Unlike **[nmis-mobile,](https://github.com/akvo/nmis-mobile)** In the RTMIS Mobile application, the option to add users manually from the device will not be available (removed from the latest nmis-mobile). Consequently, when logging in, the response will now include information about the **assignmentName**. The remaining data will adhere to the existing structure of the [previous Authentication API](https://wiki.cloud.akvo.org/books/mobile-app-for-national-management-information-system/page/low-level-design#bkmrk-get-the-list-of-assi). - Endpoint: **api/v1/device/auth** - Method: **GET** - Authentication: **None** - Request Body: ```json {"code": ""} ``` - New Response: ```json { "name": "Kelewo Community", "syncToken": "Bearer eyjtoken", "formsUrl": [ { "id": 519630048, "url": "/forms/519630048", "version": "1.0.0" }, { "id": 533560002, "url": "/forms/533560002", "version": "1.0.0" }, { "id": 563350033, "url": "/forms/563350033", "version": "1.0.0" }, { "id": 567490004, "url": "/forms/567490004", "version": "1.0.0" }, { "id": 603050002, "url": "/forms/603050002", "version": "1.0.0" } ], "certifications": [] } ``` ##### 2. Get Individual Form - Endpoint: **api/v1/device/form/<form\_id>** - Method: **GET** - Authentication: **None** - Authorization: **Bearer Token** The Individual Form will be the same as the [previous response endpoint](https://wiki.cloud.akvo.org/books/mobile-app-for-national-management-information-system/page/low-level-design#bkmrk-example-json-form%3A), with the only change being in the schema of the cascade-type question as defined in the [**Mobile Cascade Modification**](https://wiki.cloud.akvo.org/books/rtmis/page/mobile-application#bkmrk-mobile-cascade-modif) section. In the previous cascade-type question, the `parent_id` was an integer, acting as the initial level cascade filter, so the first level of the cascade showed the children of the `parent_id`. Now, we support multiple `parent_id`s, so the first level of the cascade represents the `parent_id`s themselves. Initial Result: ```json "source": { "file": "cascade-296940912-v2.sqlite", "parent_id": 273 }, ``` Final Result: ```json "source": { "file": "cascade-296940912-v2.sqlite", "parent_id": [273,234] }, ``` ### Form Updates #### New Question Type ##### Data-point Question This new question type is similar to an option-type question, but instead of custom options created by the user, the options will be populated from the "data-point-name" field in the data table (refer to: [https://wiki.cloud.akvo.org/books/rtmis/page/low-level-design#bkmrk-database-overviews)](https://wiki.cloud.akvo.org/books/rtmis/page/low-level-design#bkmrk-database-overviews)). **Requirements:** - New API for Web-form which retrieve list of data-point based on the user token to filter the data-point list - SQLite generation for the data-point list, the SQLite generation cycle will triggered when data is approved. - File format for the SQLite: "/sqlite/<**form\_id**>-<**administration\_id**>-data.sqlite" **Parameters:** - Name: **type** - Type: **Enum** - Enum Name: **data\_point** #### New Question Parameter ##### Display Only The "Display Only" parameter is a helper that can be used to display a question for which the answer should not be sent to the server. The "Display Only" parameter is used to assist users in running data calculations, dependency population, or auto-answering for other questions. **Example use case:** - Q1: Do you want to update or create new data? - When the answer is "yes," Q2 and Q3 appear. - When the answer is "no," Q2 and Q3 do not appear. **Requirements:** - The "Display Only" question parameter shall be defined as a feature in the survey/questionnaire creation tool. - The primary purpose of the "Display Only" parameter is to allow the inclusion of questions in a survey for informational or display purposes only. - The survey tool shall include appropriate error handling mechanisms to prevent "Display Only" questions from being treated as regular questions during data processing. - This will not become a part of a bulk template, and data download **Parameters:** - Name: **displayOnly** - Type: **Boolean** **Database Migration: [Question](https://wiki.cloud.akvo.org/books/rtmis/page/mobile-application#bkmrk-q%2C-r)** ##### String Function The latest version of the questionnaire introduces a new type of question, released in[ akvo-react-form v2.2.6](https://github.com/akvo/akvo-react-form/releases/tag/v2.2.6), known as **autofield**. This question type necessitates a new parameter, with **fn** as the object name. To accommodate this, modifications to the database are required to store this new parameter effectively. **Example use case:** ```json { "id": 1701810579091, "name": "Outcome result - Functional toilet with privacy", "order": 4, "type": "autofield", "required": false, "meta": false, "fn": { "fnColor": { "G1": "#38A15A", "G0": "#DB3B3B" }, "fnString": "function() {(#1699422286091.includes(\"G1\") && #1699423357200.includes(\"G1\") && #1699423571454.includes(\"G1\")) ? \"G1\" : \"G0\";}", "multiline": false } } ``` - **Context:** The questionnaire includes three questions related to toilet facilities in a household, each with options categorized as "G0", "G0+", and "G1". The autofield question aims to provide an overall outcome based on responses to these questions. - **Questions:** - **Household Toilet Observed** (Question ID: 1699422286091) - Options: "G0 No toilet" and "G1 Toilet observed" - Determines if a toilet facility is visible in the household. - **Functional Toilet** (Question ID: 1699423357200) - Options: "G0 Non-functional toilet", "G0+ Partly functional toilet", and "G1 Fully functional toilet" - Assesses the functionality of the toilet facility. - **Toilet Privacy** (Question ID: 1699423571454) - Options: "G0 No toilet privacy", "G0+ Inadequate toilet privacy", and "G1 Good toilet privacy" - Evaluates the privacy aspect of the toilet facility. - **Autofield Question:** - **ID**: 1701810579091 - **Type**: "autofield" - **Function (fnString)**: Evaluates the responses to the above questions and determines the overall outcome. The function checks if all three questions have a "G1" response. If so, the result is "G1"; otherwise, it defaults to "G0". - **Use Case Scenario:** - A household is being surveyed for toilet facilities. - The enumerator observes that there is a toilet (G1 for Question 1699422286091), it is fully functional (G1 for Question 1699423357200), and it provides good privacy (G1 for Question 1699423571454). - The autofield function evaluates these responses and, since all are "G1", the overall outcome is "G1". - The autofield question then displays this result, using the color associated with "G1" (#38A15A - a shade of green) as defined in `fnColor`. - **Outcome:** The autofield question effectively summarizes the overall status of the household's toilet facilities based on specific criteria, providing a quick and visually intuitive result. This helps in making informed decisions or assessments based on the survey data. **Requirements:** - **fnColor**: Maps result values to specific color codes in hex format. Each color must correspond to a potential result of the `fnString` function. - **fnString**: A JavaScript function that evaluates conditions based on responses to other questions (identified by their question\_id, referenced with a hashtag #) and returns a result. - **multiline**: A boolean value indicating whether the result should be displayed in a single line (false) or multiple lines (true). - **Integration with Questionnaire Logic**: The `fn` parameter must integrate with the overall questionnaire logic, dynamically evaluating and displaying results based on responses. - **User Interface Display**: The result and its associated color, as defined in `fnColor`, should be clearly displayed in the questionnaire interface. - **Validation and Error Handling**: Ensure `fnString` is a valid function and `fnColor` contains valid color codes. The system should handle errors effectively if the function fails or returns an undefined color code. **Parameters:** - Name: **fn** - Type: **Object** **Database Migration:** [Question](https://wiki.cloud.akvo.org/books/rtmis/page/mobile-application#bkmrk-q%2C-r) ##### Meta UUID The "Meta UUID" parameter is a useful utility that generates a universally unique identifier (UUID) for each data point, allowing you to easily track and distinguish individual records within your dataset. This unique identifier can be used as a parent datapoint when performing data monitoring, grade claims, and certification **Example use case:** ```json { "id": 1702914803732, "order": 4, "name": "hh_code", "label": "Household Code", "type": "text", "required": true, "meta": false, "meta_uuid": true } ``` **Requirements:** - The "Meta UUID" question parameter shall be defined as a feature in the survey/questionnaire creation tool. - The "Meta UUID" UUID allows for efficient lookup, linking, and querying of specific datapoints, ensuring that identical data records can be uniquely identified and managed. **Parameters:** - Name: **meta\_uuid** - Type: **Boolean** **Database Migration: [Question](https://wiki.cloud.akvo.org/books/rtmis/page/mobile-application#bkmrk-q%2C-r)** ##### Hidden **Example use case:** ```json { "id": 1716283800, "order": 34, "name": "community_outcomes_achieved", "label": "Have all of the community outcomes for this grade been achieved?", "type": "option", "required": true, "meta": false, "options": [ { "order": 1, "label": "Yes", "value": "yes", "color": "green" }, { "order": 2, "label": "No", "value": "no", "color": "red" } ], "hidden": { "submission_type": ["registration", "monitoring", "certification"] } } ``` **Parameters:** - Name: **hidden** - Type: **Object** **Database Migration: [Question](https://wiki.cloud.akvo.org/books/rtmis/page/mobile-application#bkmrk-q%2C-r)** ##### Disabled **Example use case:** ```json { "id": 1699354849382, "order": 2, "name": "hh_location", "label": "What is the location of the household?", "short_label": null, "type": "administration", "required": true, "meta": false, "fn": null, "disabled": { "submission_type": ["monitoring", "verification", "certification"] } } ``` **Parameters:** - Name: **disabled** - Type: **Object** **Database Migration: [Question](https://wiki.cloud.akvo.org/books/rtmis/page/mobile-application#bkmrk-q%2C-r)** ##### Default value **Example use case:** ```json { "id": 1699354220734, "order": 1, "name": "reg_or_update", "label": "New household registration or Monitoring update?", "type": "option", "required": true, "meta": false, "options": [ { "order": 1, "label": "New", "value": "new" }, { "order": 2, "label": "Update", "value": "update" } ], "default_value": { "submission_type": { "monitoring": "update", "registration": "new", } }, "dependency": null, "fn": null } ``` **Parameters:** - Name: **default\_value** - Type: **Object** **Database Migration: [Question](https://wiki.cloud.akvo.org/books/rtmis/page/mobile-application#bkmrk-q%2C-r)** ##### Pre-filled **Example use case:** ``` { "id": 1699417958748, "order": 1, "name": "resp_position", "label": "Household respondent position in household", "type": "option", "required": true, "meta": false, "options": [ { "order": 1, "label": "Household head", "value": "hh_head" }, { "order": 2, "label": "Spouse of household head", "value": "spouse_of_hh_head" }, { "order": 3, "label": "Parent of household head", "value": "parent_of_hh_head" } ], "pre": { "reg_or_update": { "new": ["hh_head"] } } } ``` **Parameters:** - Name: **pre** - Type: **Object** **Database Migration: [Question](https://wiki.cloud.akvo.org/books/rtmis/page/mobile-application#bkmrk-q%2C-r)** #### New Option Parameter ##### Option Color Additionally, new functionalities have been introduced to enhance the visual appeal of options in **option** and **multiple\_option** types of questions by incorporating color. To support this feature, a new column named **color** needs to be migrated into the **option** table. Database Migration: [Option](https://wiki.cloud.akvo.org/books/rtmis/page/mobile-application#bkmrk-2.-option-table) ## Front-end ### User Stories ##### 1. Adding an Assignment **Step 1**: Access the "Mobile Data Collectors" Section - **Action**: Navigate to the dedicated "Mobile Data Collectors" section within the RTMIS front-end. - **Purpose**: This section is specifically designed for managing mobile data collector assignments. **Step 2:** Initiate Adding a Mobile Data Collector - **Action**: Use the "Add Mobile Data Collector" feature available in this section. - **Purpose**: This feature allows the Data Entry Staff to start the process of creating a new assignment for mobile data collectors. **Step 3:** Fill in the Assignment Details Form - **Action**: Complete the user-friendly form provided for assignment details. - **Details to Include**: - **Name of the Assignment**: Provide a descriptive name or title for the assignment. - **Level:** Choose level for Mobile Assignment (not for sending to back-end) - **Administration Selection**: Choose the relevant administrative area for the assignment (one or multiple). - **Form(s) Selection**: Select the specific form(s) that the mobile data collector will use for data collection. **Step 4:** Create the Assignment - **Action**: After filling in all the necessary details, click the "create" button. - **Backend Processing**: On clicking "create," the RTMIS backend processes the provided information. **Step 5:** Receive the Assignment Pass-code - **Outcome**: Once the backend processing is complete, a unique 6-digit alphanumeric code is generated. - **Purpose**: This pass-code is used for mobile authentication by the enumerators or data collectors in the field. - **Note:** When Data Entry Staff add a new assignment for Mobile Data Collectors in the RTMIS system, it's important to note the following: - **Informing the Enumerator**: The Data Entry Staff who adds Mobile Data Collectors should personally inform the Enumerator about the assignment. This communication is typically done during a training session or a designated briefing. - **Pass-code Availability**: The unique 6-digit alphanumeric pass-code generated for each assignment will also be displayed in the Mobile User list within the RTMIS system. - **Responsibility of Communication**: It is the responsibility of the Data Entry Staff to ensure that Enumerators are aware of and understand the pass-code and its usage. ##### 2. Submitting a Pending Batch of Data **Step 1:** Data Collection by Mobile Data Collector/Enumerator - **Action**: As a Mobile Data Collector/Enumerator, I collect data in the field using the RTMIS mobile application. - **Outcome**: After data collection, I submit the data. The data is uploaded and appears as a pending submission. **Step 2:** Pending Submission Review by Data Entry User - **Action**: As a Data Entry User, I review the pending submissions that have come in from various Mobile Data Collectors/Enumerators. - **Visibility**: The submissions are clearly marked as pending and are queued for batch processing. **Step 3:** Batch Creation for Submission - **Action**: I create a batch of the pending data for submission. - **Details**: While creating the batch, I ensure that the name of the submitter (Mobile Data Collector/Enumerator) is recorded for each data entry. This is a new feature in the updated RTMIS system. **Step 4:** Data Submission - **Action**: I submit the batch of data for processing. - **New Feature**: Unlike the previous system, the RTMIS now records the name of the actual submitter (Mobile Data Collector/Enumerator) rather than the Data Entry User. **Step 5:** Data Approval Process (Unchanged): - **Note**: The rest of the data approval process remains unchanged. The submitted data undergoes the usual verification and approval workflow as per the existing RTMIS protocols. ## Mobile ### User Stories ##### 1. User Authentication **1.a. When there's no user in the users database:** - Open App - Login with the user pass-code - Store token (response from server) to **users** table and state - Fill the information about the user in **users** database from the server response. Unlike the previous version, in this version, the logged in user CANNOT fill the user information themselves. - Form list opened **1.b. When user is available in the users database:** - Open App - User selection page opened: on the bottom of the page, there should be a button for adding new user - User click add new user - Login with the user pass-code - Store token (response from server) to **users** table and state - Fill the information about the user in **users** database from the server response. Unlike the previous version, in this version, the logged in user CANNOT fill the user information themselves. - Form list opened ##### 2. Download Data-points (for monitoring) - Open App - User selection page opened - Select the user from user list - Press download data - Server will give the list of data-points which can be downloaded - ```json [{ "id": 1, "updated_at": 1701070914356 },{ "id": 2, "updated_at": 1701070914356 }] ``` - Mobile download the data-points 1 by 1 (queue) and store it to **datapoints** database - Before download, check if the **datapointId** is exist in the **datapoints** database - And compare: - If **updated\_at** > **createdAt** (in **datapoints** table): Replace the datapoint - If **updated\_at** < **createdAt** (in **datapoints** table): Don't download - User will get notified when: - server send error response - download is finished ### Mobile Database Modifications #### 1. Form Database Table name: **forms**
**Column Name** **Type** **Example**
id INTEGER (PRIMARY KEY) 1
userId INTEGER 1
formId INTEGER 453743523
version VARCHAR(255) "1.0.1"
latest TINYINT 1
name VARCHAR(255)'Household'
json TEXTSee: Example JSON Form
createdAt DATETIME `new Date().toISOString()`
Changes: - Add **userId** column to (from **users** database), so every form has owner. #### 2. User Database Table name: **users**
**Column Name** **Type** **Example**
id INTEGER (PRIMARY KEY) 1
activeTINYINT1 (default: 0)
name INTEGER 1
password TEXT[crypto](https://docs.expo.dev/versions/latest/sdk/crypto/)
token TEXT token
certifications TEXT jsonb (administration)
lastSyncedAtDATETIME `new Date().toISOString()`
Changes: - Add **token** column to store (token from authentication response) - Add **certifications** column table to store the certification assignments for users to complete the [Grade Certification form](https://wiki.cloud.akvo.org/link/68#bkmrk-grade-claim-support). - Add **lastSycedAt** column table to store the timestamp of the user's last sync. #### 3. Form Submission / Datapoints Database Table name: **datapoints**
**Column Name** **Type** **Example**
id INTEGER (PRIMARY KEY) 1
form INTEGER 1 (represent **id** in **forms** table, NOT formId)
user INTEGER1 (represent **id** in **users** table)
submitter TEXT 'John'
nameVARCHAR(255)'John - St. Maria School - 0816735922'
submitted TINYINT1
duration REAL 45.5 (in Minutes)
createdAt DATETIME `new Date().toISOString()`
submittedAt DATETIME`new Date().toISOString()`
syncedAt DATETIME `new Date().toISOString()`
json TEXT`'{"question_id": "value"}'`
submission\_type INTEGER 1 (represents the [enum value](https://github.com/akvo/rtmis/blob/main/app/src/lib/constants.js#L13-L18) of the submission type i.e. **registration**)
uuid VARCHAR(191) `Crypto.randomUUID()`
Changes: - **user** should be NULLABLE when form submission data is synced from RTMIS database sync - Add **submitter** column - Add **submission\_type** column - Add **uuid** column ### Mobile Cascade Modification The updated Mobile App Development introduces a significant change in handling cascade drop-down options, particularly in how multiple **parent\_ids** are managed. This change affects the way options are displayed and selected in the cascade type of questions. Here's a detailed explanation of the new functionality: ##### Updated Functionality **Previous Functionality** - **Single parent\_id**: Initially, the cascade drop-down supported only a single parent\_id. - **Children Display**: The parent\_id would query the SQLite database to display its children levels as options in the cascade drop-down. Example: ```json "source": { "file": "cascade-296940912-v2.sqlite", "parent_id": 273 }, ``` **Updated Functionality with Multiple Parent Ids** - **Array of parent\_ids**: The new system supports an array of parent\_ids, allowing for more complex cascade structures. - **First Cascade Level**: The **parent\_id** array itself becomes the first level of the cascade to select from. Example: ```json "source": { "file": "cascade-296940912-v2.sqlite", "parent_id": [273] }, ``` ##### Handling Different Scenarios 1. **Single parent\_id in Array**: - If the parent\_id array contains only one **administration\_id**, the first cascade option should automatically display the children of this single `parent_id`. - **Example**: "parent\_id": `[273]` would directly show the children of `273` as the cascade options. 2. **Multiple parent\_ids in Array**: - If the parent\_id array contains multiple administration\_ids, the first cascade level will allow selection among these `parent_id`s. - **Example**: `"parent_id": [273, 123]` means the first cascade level will have options to select either `273` or `123`. 3. **Single `parent_id` Without Children**: - In a scenario where the `parent_id` array has one `administration_id` and this `administration` does not have any children, the app should automatically select this `parent_id` as the value by default. - **Example**: If `273` has no children, it becomes the default selected value ### Data Synchronization [![RTMIS - sycing - fix.png](https://wiki.cloud.akvo.org/uploads/images/gallery/2024-06/scaled-1680-/P0yKqjORDjZ3nwnw-rtmis-sycing-fix.png)](https://wiki.cloud.akvo.org/uploads/images/gallery/2024-06/P0yKqjORDjZ3nwnw-rtmis-sycing-fix.png) To ensure that the mobile app is up-to-date with the latest information from the server, users can synchronize data points with a simple process. This ensures that all forms, data points, and master data are current and accurate. #### Syncing Data Points Step-by-Step Process: 1. **Initiate Sync**: The mobile user can easily initiate the synchronization process by clicking the "Sync Datapoint" button on the Mobile app's Home screen. 2. **Request to Backend**: When the user clicks "Sync Datapoint", the app sends a request to the backend server to retrieve three main categories of data: - **Form Updates**: Retrieves the current form assignments for the mobile user, including any updates indicated by form versions. This ensures the user is aware of any changes made to the forms they use. - **Data-point List**: Obtains the latest routine data based on the mobile user’s form assignments. This includes all relevant and recent data points necessary for the user's tasks. - **Cascades**: Retrieves the latest master data, such as administration details, organization information, and entity lists. This data is critical for aligning the app with real-world conditions and reflecting any additions, updates, or removals. 3. **Completion of Sync Process**: Once the synchronization process is complete, the mobile user can access the updated data. They can then navigate to the desired form with all the latest information available. ##### Data-point List API Here is the following JSON response from data-point list API: ```json { "current": 1, "total": 7, "total_page": 1, "data": [ { "id": 11, "form_id": 1699353915355, "name": "DATA #1", "administration_id": 57443, "url": "https://rtmis.akvotest.org/b4b00592-b949-4424-b4ba-448a0d410ecf.json", "last_updated": "2024-05-30T04:31:58.539349Z" } ] } ```

The **url** field in the **data** array will contain a URL to the JSON file that the mobile app will download as a **data-point**. This JSON URL is a direct link to a static file and is not generated by the back-end API, allowing for high traffic downloads.

##### Data-point JSON After obtaining all the JSON URLs asynchronously, the mobile app will fetch the following JSON schema and store it in the mobile database: ```json { "id": 21, "datapoint_name": "Testing Data County", "submission_type": 1, "administration": 2, "uuid": "025b218b-d80a-454f-8d69-8eef812edc82", "geolocation": [ 6.2088, 106.8456 ], "answers": { "101": "Jane", "102": [ "Male" ], "103": 31208200175, "104": 2, "105": [ 6.2088, 106.8456 ], "106": [ "Parent", "Children" ], "109": 2.5 } } ``` By following this process, mobile users can maintain a high level of productivity and accuracy in their tasks, leveraging the most current data available from the server. ### Monitoring Support ![RTMIS - Monitoring support.png](https://wiki.cloud.akvo.org/uploads/images/gallery/2024-06/Z0ylMDklSZ87QXpI-rtmis-monitoring-support.png) 
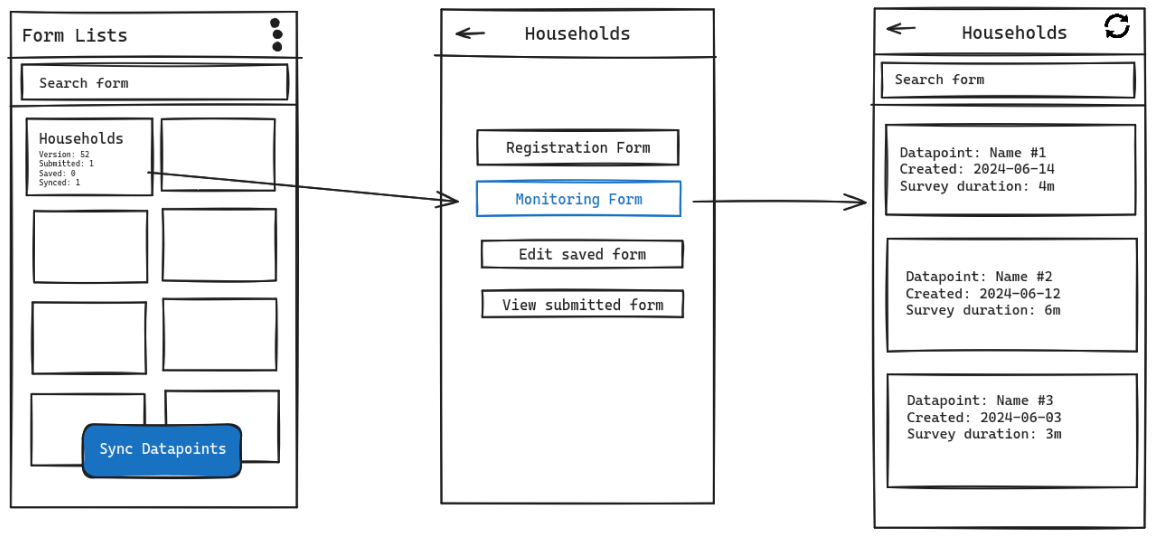
In this version of RTMIS mobile, we introduce monitoring support for data-points. This monitoring is similar to a normal submission but includes previous answers. The form's shape will depend on the **submission\_type** equal to 2 (enum value for monitoring) in the question-level object. Users will only answer questions that have a monitoring flag in the question. When synced to the server, it will be treated as the same data-point, except they will have the same meta [UUID](https://wiki.cloud.akvo.org/books/rtmis/page/mobile-application#bkmrk-1.-data-point-table) as their parent data-point. ##### Storing the Monitoring Data-point The following table represents the schema for storing monitoring data-points:
**Column Name** **Type** **Example**
id INTEGER (PRIMARY KEY) 1
formId INTEGER 1 (represent **id** in **forms** table, NOT formId)
nameVARCHAR(255)'Testing Data County'
administrationId TINYINT1
uuid VARCHAR(255) 025b218b-d80a-454f-8d69-8eef812edc82
syncedAt DATETIME `new Date().toISOString()`
json TEXT`'{"question_id": "value"}'`
### Grade Claim Support [![RTMIS - grade claim FIX.png](https://wiki.cloud.akvo.org/uploads/images/gallery/2024-06/RjmcNZZj6CBe4hUf-rtmis-grade-claim-fix.png)](https://wiki.cloud.akvo.org/uploads/images/gallery/2024-06/Z0ylMDklSZ87QXpI-rtmis-monitoring-support.png) The Grade Claim feature within the mobile app is designed to streamline the verification and certification of grades. Below is a detailed description of how this feature operates and its dependencies. #### Overview The Grade Claim feature has two submission types: 1. **Verification**: Utilized through the Grade Claim form. 2. **Certification**: Utilized through the Grade Certification form. [Example Form Configuration](https://github.com/akvo/rtmis/blob/main/backend/source/forms/1699354006503.prod.json#L10-L15) #### Feature Dependencies and Behavior - **Submission Type Dependency**: - The availability of the Grade Claim feature is dependent on the submission type definitions at the form level. - If `verification` or `certification` submission types are defined in the form, the corresponding button will appear on the mobile app's Manage Form screen. - **Approval Process**: - Neither the Grade Claim form nor the Grade Certification form requires an approval process, simplifying the workflow for users. - **Certification Assignment Requirement**: - The Grade Certification process requires a certification assignment, which is managed by sub-county users via the dashboard. - If a `certification` submission type exists but the mobile user does not have an assignment, the certification button will not be displayed in the app. - **UUID Requirement**: - The Grade Claim feature also requires a UUID to link the grade claim or certification to the parent data-point. This ensures accurate data tracking and association. #### How to Use the Grade Claim Feature 1. **Initiate Grade Claim**: - Navigate to the Manage Form screen in the mobile app. - If `verification` or `certification` submission types are available, the respective buttons will be visible. 2. **Complete the Form**: - Select the appropriate form (Grade Claim or Grade Certification) based on the submission type. - Fill out the necessary information and submit the form. 3. **No Approval Needed**: - Once submitted, the forms do not require an approval process, allowing for immediate processing. 4. **Certification Assignments**: - Ensure that certification assignments are managed via the dashboard by sub-county users to enable the certification feature on the mobile app. 5. **UUID Linking**: - Ensure that each submission is linked with the parent data-point using the provided UUID to maintain data integrity. By following this documentation, users can effectively utilize the Grade Claim feature, ensuring a smooth and efficient workflow for verifying and certifying grades. # Formatting the JSON File We detailed the process of formatting a JSON file to create a customized questionnaire form for the RTMIS system. The RTMIS system leverages the [Akvo Form Service](https://form-service.akvotest.org/forms) for generating initial JSON form structures. We explored the basic structure and components of the form JSON, as documented in the [Akvo React Form's README](https://github.com/akvo/akvo-react-form/blob/main/README.md). Additionally, we introduced specific customizations required for RTMIS, including the addition of **submission\_types** at the form level and **three new parameters** at the question level: default\_value, disabled, and hidden. These custom parameters are defined as objects based on the [submission\_type](https://github.com/akvo/rtmis/blob/main/backend/api/v1/v1_forms/constants.py#L37-L48), which is specified as an enumeration. We provided a detailed example of the JSON structure incorporating these customizations and outlined the manual steps needed to add these custom parameters after generating the initial JSON form. By following this process, users can effectively format their JSON files to meet the requirements of RTMIS customized questionnaire forms. ## Overview The RTMIS system uses a JSON file to build a questionnaire form. This JSON file can be generated using an internal library called **Akvo Form Service**. For more information and to access the editor, visit the following link: [https://form-service.akvotest.org/forms](https://form-service.akvotest.org/forms) In general, all components and formats in the form JSON are documented in the Akvo React Form's README file. You can find the documentation here: [https://github.com/akvo/akvo-react-form/blob/main/README.md](https://github.com/akvo/akvo-react-form/blob/main/README.md) However, for this project, we have added customizations at the form-level definition and at the question level. These customizations include the addition of `submission_types` at the form level, and three additional parameters at the question level: `default\_value`, `disabled`, and `hidden`. These parameters are defined as objects and depend on the `submission\_type`. The `submission\_type` itself is an enum value and is defined as a constant. You can view the definition here: [https://github.com/akvo/rtmis/blob/main/backend/api/v1/v1\_forms/constants.py#L37-L48](https://github.com/akvo/rtmis/blob/main/backend/api/v1/v1_forms/constants.py#L37-L48). All the customizations will be added manually after the JSON form is generated with the **Akvo Form Service**. ## Generate the JSON Form ### Create a New Form **Go to Akvo Form Service**: Open your browser and navigate to [https://form-service.akvotest.org/](https://form-service.akvotest.org/) **Access the Forms Menu**: Click on the "Forms" menu and Click the "New" button to create a new form. [![AFS - step 1.png](https://wiki.cloud.akvo.org/uploads/images/gallery/2024-06/scaled-1680-/V1WAswTvL7i46YSV-afs-step-1.png)](https://wiki.cloud.akvo.org/uploads/images/gallery/2024-06/V1WAswTvL7i46YSV-afs-step-1.png) **Update Title and Description**: Modify the default title and description as needed. [![AFS - step 2.png](https://wiki.cloud.akvo.org/uploads/images/gallery/2024-06/scaled-1680-/H2KcW1j7iUTluQpr-afs-step-2.png)](https://wiki.cloud.akvo.org/uploads/images/gallery/2024-06/H2KcW1j7iUTluQpr-afs-step-2.png) **Edit Default Group Question**: Click the gear icon on the right side to update the default group question. Once done, click the gear icon again to exit edit mode. [![AFS - step 3.png](https://wiki.cloud.akvo.org/uploads/images/gallery/2024-06/scaled-1680-/FxllAHdzdcTwyhEq-afs-step-3.png)](https://wiki.cloud.akvo.org/uploads/images/gallery/2024-06/FxllAHdzdcTwyhEq-afs-step-3.png) **Edit questions**: Click the pencil icon on the group question to edit or add questions. [![AFS - step 4.png](https://wiki.cloud.akvo.org/uploads/images/gallery/2024-06/scaled-1680-/veduA2bWEH5ruA9w-afs-step-4.png)](https://wiki.cloud.akvo.org/uploads/images/gallery/2024-06/veduA2bWEH5ruA9w-afs-step-4.png) **Edit questions:** For the default question, click the pencil icon and update the question type (e.g., option), fill in all necessary options, and click the pencil icon again to collapse the question. [![AFS - step 5.1.png](https://wiki.cloud.akvo.org/uploads/images/gallery/2024-06/scaled-1680-/pXSKkF1phAR2Xng4-afs-step-5-1.png)](https://wiki.cloud.akvo.org/uploads/images/gallery/2024-06/pXSKkF1phAR2Xng4-afs-step-5-1.png) **Add Questions**: To add a new question, click "Add New Question" at the bottom to insert a new question **after the current one**, or click "Add New Question" at the top to insert before. [![AFS - step 5.2.png](https://wiki.cloud.akvo.org/uploads/images/gallery/2024-06/scaled-1680-/OIAXCgnDTudl2C5w-afs-step-5-2.png)](https://wiki.cloud.akvo.org/uploads/images/gallery/2024-06/OIAXCgnDTudl2C5w-afs-step-5-2.png) **Preview and Save**: Go to the "Preview" tab to review and evaluate the form settings. If everything is correct, click the "Save" button to store the current version of the form. [![AFS - step 6 - finish.png](https://wiki.cloud.akvo.org/uploads/images/gallery/2024-06/scaled-1680-/G503SyJDuChERq4l-afs-step-6-finish.png)](https://wiki.cloud.akvo.org/uploads/images/gallery/2024-06/G503SyJDuChERq4l-afs-step-6-finish.png) ### Download Akvo Form Service to RTMIS - **Edit and Retrieve Form ID and Name** - On the form list, click the "Edit" button for the form you created (e.g., School Wash Form).[![AFS - Edit form.png](https://wiki.cloud.akvo.org/uploads/images/gallery/2024-06/scaled-1680-/KPEPwNpCOWrQBJbW-afs-edit-form.png)](https://wiki.cloud.akvo.org/uploads/images/gallery/2024-06/KPEPwNpCOWrQBJbW-afs-edit-form.png) - Go to the "**Preview**" tab. - Copy the ID from the last segment of the URL and the form name.[![AFS - Copy id and name.png](https://wiki.cloud.akvo.org/uploads/images/gallery/2024-06/scaled-1680-/9XjdifbHAJvv9bvJ-afs-copy-id-and-name.png)](https://wiki.cloud.akvo.org/uploads/images/gallery/2024-06/9XjdifbHAJvv9bvJ-afs-copy-id-and-name.png) - Paste the ID and name into the designated file. [backend/api/v1/v1\_forms/management/commands/download\_forms\_from\_afs.py#L8C1-L13C2](https://github.com/akvo/rtmis/blob/main/backend/api/v1/v1_forms/management/commands/download_forms_from_afs.py#L8C1-L13C2) ```python ... forms = [ { "id": 1701757876668, "name": "RTMIS School WASH Form", }, ] ... ``` - **Download the Form** - Run the command to download the form from Akvo Form Service into the RTMIS platform. ```bash ./dc-mobile.sh exec backend python manage.py download_forms_from_afs ``` - Once the download is complete, navigate to the directory `backend/source/forms/`. - Locate the form by its ID with the suffix `.prod` and `.json` file extension (e.g., `1701757876668.prod.json`). -
### Customization Details #### Form Level Customization At the form level, we introduce a new parameter: `submission\_types`. This parameter specifies the different types of submissions allowed for the form. The `submission\_types` parameter is defined as an enumeration, providing a set of predefined submission types that the form can handle.
id Submission Type Description
1 registration Utilized through the Registration form
2 monitoring Utilized through the Monitoring form
3 verification Utilized through the Grade Claim form
4 certification Utilized through the Grade Certification form
#### Question Level Customization At the question level, we introduce three new parameters: 1\. **default\_value**: Specifies the default value for the question. This value will be pre-filled when the form is loaded. 2\. **disabled**: A boolean parameter that indicates whether the question should be disabled (i.e., not editable) when the form is displayed. 3\. **hidden**: A boolean parameter that indicates whether the question should be hidden from view when the form is displayed. These parameters are defined as objects and their values depend on the `**submission\_type**`. #### Example JSON Structure Here is an example structure of the JSON file with the added customizations: ```json { "id": 123456, "form": "School WASH Form", "description": "School WASH", "defaultLanguage": "en", "languages": ["en"], "version": 1, "type": 1, "translations": null, "submission_types": [ "registration", "monitoring", "verification", "certification" ], "question_groups": [ { "id": 1699354006534, "order": 1, "name": "school_location_group_question", "label": "School: Location", "repeatable": false, "translations": null, "questions": [ { "id": 1699354006535, "order": 1, "name": "new_school_registration_monitoring_update", "label": "New school registration or monitoring update?", "short_label": null, "type": "option", "tooltip": { "text": "Entry of school data in RTMIS (first time) or update of monitoring data (existing school)" }, "required": true, "meta": false, "options": [ { "order": 1, "label": "New", "value": "new" }, { "order": 2, "label": "Update", "value": "update" }, { "order": 3, "label": "Verification", "value": "verification" }, { "order": 4, "label": "Certification", "value": "certification" } ], "default_value": { "submission_type": { "monitoring": "update", "registration": "new", "verification": "verification", "certification": "certification" } } }, { "id": 1699951210638, "order": 2, "name": "school_location", "label": "What is the location of the school?", "short_label": null, "type": "administration", "tooltip": { "text": "This question contains a list of possible school locations, starting with the government area or district, down to the community." }, "required": true, "meta": true, "disabled": { "submission_type": ["monitoring", "verification", "certification"] } }, { "id": 1716283778, "order": 33, "name": "schools_achieved_required_outcomes", "label": "Have 100% of school achieved the required outcomes for this grade?", "short_label": null, "type": "option", "required": true, "meta": false, "options": [ { "order": 1, "label": "Yes", "value": "yes", "color": "green" }, { "order": 2, "label": "No", "value": "no", "color": "red" } ], "hidden": { "submission_type": ["registration", "monitoring", "certification"] } } ] } ] } ``` By following these steps, you can successfully format the JSON file to work with RTMIS as a customized questionnaire form. # RTMIS Self-Host Installation Guide ## Installation Guide Below step is for self-host or on-prem installation process. Please follow [Developer-Guide](https://github.com/akvo/rtmis/blob/main/README.md) to setup the development environement. ### Infrastructure Diagram
## System Requirements #### Application Server - **CPU:** 2 GHz Dual Core Processor - **Memory:** 4 GiB - **Storage:** 25 GiB or more Disk Space - **Operating System:** Ubuntu Server 22.04 - x86\_64 (AMD/Intel) - **IP:** 1 public IP (plus 1 private IP if the database server in private IP) #### Database Server - **CPU:** 2 GHz Dual Core Processor - **Memory:** 4 GiB - **Storage:** 25 GiB or more Disk Space - **Operating System:** Ubuntu Server 22.04 - x86\_64 (AMD/Intel) - **IP:** 1 private or public IP ## Prerequisite - **Servers:** Application and database servers provisioned as specified above - **Domain:** Domain or Subdomain which pointed to the server's public IP - **Docker Engine:** 20.10 or above - **Git:** 2.39 or above - **3rd Party Service Providers:** - Mailjet: Mail delivery service - Sentry: Error tracking - Github Account: Code repository and CI/CD tool platform - Expo: Mobile application build service ## Preparation **Note:** The following guide is an example installation on **Ubuntu and Debian based systems**. You need the below depedencies installed both on **Application Server** and **Database Server**. #### Install Docker Engine 1. Install Docker engine: ``` sudo curl -L https://get.docker.com | sudo sh ``` 2. Manage Docker for a non-root user. ``` sudo usermod -aG docker $USER exit ``` 3. The above `exit` command will close your terminal session. Please log back in to the previous user before continuing to the next steps. #### Install Git Version Control The RTMIS uses git as version control. Therefore it is better to install git to make it easier to retrieve updates instead download the repository zip. ``` sudo apt install git ``` ## Install Database Server Execute the commands below on the server allocated for the **database** server. #### Clone the Repository ``` cd ~ mkdir src cd src git clone https://github.com/unicefkenya/rtmis.git . ``` #### Environment Variable Setup Install text editor to be able to edit `.env` file ``` sudo apt install nano ``` or ``` sudo apt install vim ``` Go to the repository directory, then edit the environment ``` cd deploy cp db.env.template db.env vim db.env ``` Example Environment: ``` POSTGRES_PASSWORD=<> # Ensure the values below match those in the app.env file in the application. DB_USER=<> DB_PASSWORD=<> DB_SCHEMA=<> ``` #### Run the Database Server ``` docker compose -f docker-compose.db.yml up -d ``` ## Install Application Server Execute the commands below on the server allocated for the **application** server. #### Clone the Repository ``` cd ~ mkdir src cd src git clone https://github.com/unicefkenya/rtmis.git . ``` #### Environment Variable Setup Install text editor to be able to edit `.env` file ``` sudo apt install nano ``` or ``` sudo apt install vim ``` Go to the repository directory, then edit the environment ``` cd deploy cp app.env.template app.env vim app.env ``` Example environment variables: ``` DB_HOST=<> DB_PASSWORD=<> DB_SCHEMA=<> DB_USER=<> POSTGRES_PASSWORD=<> DEBUG="False" DJANGO_SECRET=<> MAILJET_APIKEY=<> MAILJET_SECRET=<> WEBDOMAIN=<> APK_UPLOAD_SECRET=<> STORAGE_PATH="./storage" SENTRY_DSN="<>" TRAEFIK_CERTIFICATESRESOLVERS_MYRESOLVER_ACME_EMAIL=<> ``` #### Build the Documentation ``` CI_COMMIT=initial docker compose -f docker-compose.documentation-build.yml up ``` #### Build the Frontend ``` CI_COMMIT=initial docker compose -f docker-compose.frontend-build.yml up ``` #### Run the Application ``` docker compose -f docker-compose.app.yml up -d --build ``` #### Data Seeding for Initial Data Once the app is started, we need to populate the database with the initial data set. The required initial dataset are: 1. Seed administration 2. Seed super admin 3. Seed form 4. Seed organization ``` docker compose -f docker-compose.app.yml exec backend ./seeder.prod.sh ``` ## Cheatsheets #### Manual Update the Application Execute the command below on the application server to update the application with the latest codes and re-deploy to the application server: ``` $ cd deploy/ $ ./manual_update.sh ``` #### Restart the Application Execute the command below on the application server to restart the application container: ``` $ cd deploy/ $ ./restart_app.sh ``` #### Clear Nginx Cache Execute the command below on the application server: ``` $ docker compose -f docker-compose.app.yml exec -u root frontend sh -c "rm -rf /var/tmp/cache/*" ``` #### Remove Form Execute the command below on the application server. Login to container: ``` $ docker compose -f docker-compose.app.yml exec backend sh ``` After logged in, execute belo commands: ``` $ python manage.py shell > from api.v1.v1_forms.models import Forms > f = Forms.objects.filter(name="Short HH").first() > f.delete() ``` Exit from the container and execute below command: Execute the command below on the application server ``` $ docker compose -f docker-compose.app.yml exec -u root frontend sh -c "rm -rf /var/tmp/cache/*" ``` #### Execute the Cronjob Manually Execute the command below on the application server to triggering the cronjob manually. ``` $ docker compose -f docker-compose.app.yml exec backend-cron ./job.sh ``` #### Generate Django Secret ``` $ python3 -c 'import secrets; print(secrets.token_hex(60))' ``` # Sentry - Register Account and Setup Project 1. Visit Sentry's Website: Open your web browser and go to[ Sentry's official website](https://sentry.io/). On the homepage, look for the "Get Started" button. ![](https://lh7-rt.googleusercontent.com/docsz/AD_4nXcIq5JjCVGTDJ0OftwGubUy3olvWzDzHmNK-ACHCaOu5FdVOatyZNiraY18CvpBxQTpqkHjjS5L6Oyc06B8mNjs6SDVsjT7D0ogehrr3ys6VfCl_NRppP02IuSv3eOSMMgEIAwu81B0KJjE12wufDsB77FK?key=Q1Q09axT180AwOixXAtbHw) 2. You will be redirected to a sign-up page where you can either create a new account using your email and password or sign up using an external provider (e.g., GitHub, Google).![](https://lh7-rt.googleusercontent.com/docsz/AD_4nXfqVNtCvLfvReRu1tuxSu4LmhzdRQQF8JZVdQkrhL_VDaEWtQEwSlikUQcV6YUGM6S2SQ9wAPEwITWdRV3i_sJGXQ1k_Xt3iMLP5y6hMwv1p_X-kEzWef7X_KZSAYmV72mxLu9OsvawwQmEX0RjDPEWKvw?key=Q1Q09axT180AwOixXAtbHw) 3. Invite the team ![](https://lh7-rt.googleusercontent.com/docsz/AD_4nXfkwyeiGvEUDaBuPCf5nWCFamX1kV673HdwKM8TTXWc8LnbRi_p1ZSjHuz5Ani9_MiFsLcj-IpWuD9luelbuyEhNvG2THYKm65MTecsCzWq9Nb1RD2_26NSEahj1mjQU5sJGJZQ-pIlrLGWPOmi3g7tE9Q?key=Q1Q09axT180AwOixXAtbHw) Assign new team as Member. ![](https://lh7-rt.googleusercontent.com/docsz/AD_4nXdQlGYoIfDi8cbXv_U7IUWGSfhnetbrqJsGCjO8QawtmfUTqBt-1tDT8vl3u20K77_D4eTgqOJua567Mw4WVPT4Bgl0FWRhWF3gVRJN6Vl6TMOV6F4oxoLnn-wqX2CVINSzrjlnSps-D4Ezc4r13M9-j3I?key=Q1Q09axT180AwOixXAtbHw) ![](https://lh7-rt.googleusercontent.com/docsz/AD_4nXcwmdr-e5_-I5xEDv2HRkk6haMSM5bkkcZzDuwKelLs7m6ArIAfTPqwER1WsB4cQ8orB862bo4BT40GV_zhzXECnRZWsnUB5ma8IwaCuntx2D_yraUF59nt4RSdNZAebH2xM6DE6V6YMLKGOYs4RBq7Uskq?key=Q1Q09axT180AwOixXAtbHw) 4. Create a new project for backend A prominent “Create Project” button will appear on the right side of the screen. Click this button to begin the project creation process. ![](https://lh7-rt.googleusercontent.com/docsz/AD_4nXfMsZaTTZ14mVi2n-cidlZ-jSW2xAe8OEAQrLrnxD7JeZR3apN_YXQGUFomBV1kJ99dKApvh0w4jtWYgucCXN5rC4epfp7d8_IRDzOi1x_FhWC7ADAs_w_CeRtvDC3PqBRzWFcOwRUYPcLN5kC8qOd41qUK?key=Q1Q09axT180AwOixXAtbHw) You will be prompted to choose the technology stack your project will use. Options will include various programming languages and frameworks (like JavaScript, Python, Java, etc.). Select the appropriate one for your project.![](https://lh7-rt.googleusercontent.com/docsz/AD_4nXe5Ka_0VS8DVroloP4LsIVy62qo8uG_FdkNsHiUva-jT7dTEvJ_afhhmLfeAb1vNWisli_n5vVT5CIQSC3nUO08jQeycuZam4rKKMgOxtkHOP7pedRVSNXTmOlTpEyLICxRtfLPzxKqJfK0z6tUNkptkBsR?key=Q1Q09axT180AwOixXAtbHw)![](https://lh7-rt.googleusercontent.com/docsz/AD_4nXfP_1m4IIMII6x5JNum_QZ8PuOTnITuQPnvIT7xUgU4zAKvbaRlSNveUHp-QPkL8PQ57_mMCxqFpRMz-QpyavSY3OFm0pJBpqWg2f5gc88eBVx7yFTmnb2g95eQK4zZBO9ZvevfcDAIIJjI3E2WyT_8OY2A?key=Q1Q09axT180AwOixXAtbHw) After your project is created, Sentry will guide you through integrating the SDK into your application.![](https://lh7-rt.googleusercontent.com/docsz/AD_4nXflcAxIxxkgaYcApeK7gRfA3VJ52Lllf-gFB4-n94iOZBuo9VeRCZhyqmlrdKDIi9bjksUWY003I8A9Cl7vT1Quq25sGKio8dNyskm9XmW_uCCgoL6M0N70CB1GqfpS8DUbkkNCI0LVGJJiaKo7bzkdcjUP?key=Q1Q09axT180AwOixXAtbHw) 5. Create a project for Mobile app ![](https://lh7-rt.googleusercontent.com/docsz/AD_4nXePO6tq4SOxoXVmTs4REzOyROOqFtQz5aaDLJlPVVKoKb1AW-qnXAL4hMxvSo6YI6fLxMyL90bVw2NR8Yy8ifsLbHBERtj0QPpwrpc7YuEa5vZolI3nbfE3aNpB422B5lMNX-6ponwqh2lE3j6v1dyvHlek?key=Q1Q09axT180AwOixXAtbHw)![](https://lh7-rt.googleusercontent.com/docsz/AD_4nXdWOt9sZTkPAxDJetUius45xNv6JRBeeoWgQIMJ6fOHYxRYJqW7stlZJ5bMQkg6sQUaJBkx8UTrkm49ebNns0qfW8eTLysE88sKBRm9DzCyRl-6SJKygvPbdDFm-LlU2hZiU-Pm_YcGJ4pBmikVBowsNdE9?key=Q1Q09axT180AwOixXAtbHw) Keep the DNS value to be installed in the system. 6. Create Sentry auth token for mobile app data log In the settings page, look for “Auth Tokens” under the “Developer Settings” section in the left sidebar. Click on it to open the Auth Tokens page. ![](https://lh7-rt.googleusercontent.com/docsz/AD_4nXfbI5VMXX0mY6m77oO_0toIvc9IcFk_78OETR5oHnCqOGqN0Oax4AXHVgNGOSskl4XF3Cj9nZaJ9fTUhXDM2d7Q9hgCIoQhfPIL1FQwCvr7pfLxSoe4XA2Qab5qGtn1OoYvQkl36_2D_WarVPWLE6DcOUqb?key=Q1Q09axT180AwOixXAtbHw)![](https://lh7-rt.googleusercontent.com/docsz/AD_4nXfYcxNpy-jZeKxgB5VDJO93Bge2GOpegSW6o2_6IkiRtADEb3oHh6PTNGxLTBzO_d_-r3UbrTQ5E7K4ZLt-xDEvMHVAiEtzRI_6j5uqqEBKT09Pqup_0CMMxNJkN2VqmuESlh4IgVUmoHRgwGcNpxHq4Pgt?key=Q1Q09axT180AwOixXAtbHw) Once the token is created, make sure to copy it immediately, as you usually won’t be able to view it again for security reasons. Save it in a secure location. ![](https://lh7-rt.googleusercontent.com/docsz/AD_4nXd743RKsZUsePAvao2VKjipaFmGldJIbNcGjYSSY9ldS00Axc4pbXxoJ2X6JZsjcFkxSMxL2Cf-p0UkZ5fEjE_QseM3HQzjxJvtepwpxJlhS1PGrLYGiJI7OQFIpL32CYlWh1jpxAfe8tT-0fRuXDt4FAWT?key=Q1Q09axT180AwOixXAtbHw) # Expo.dev - Register Account and Setup Project 1. To begin using Expo, navigate to the Expo homepage. In the top right corner of the page, click on the "Sign Up" button. This will allow you to create a new account and gain access to Expo's ecosystem of tools for developing, reviewing, and deploying applications. If you already have an account, you can select the "Log In" option instead. ![](https://lh7-rt.googleusercontent.com/docsz/AD_4nXcaCY5-drM1hUaKHz44PpDhwjU8ImbTaJHxnOJDSKIMOatzMVmk1d5o-jRyBGGaZmJbo2b7tPeYzX9i5ZkT-UlyafoZE6BQW8iUSB9MiGJ9TJPK_hCIjXksEZlAYWBugO11UqdrqpoG0C1oTJqh0pSfYu-A?key=JFFlnz_LjLklOxaAM5v3WQ) 2\. Once you've clicked the "Sign Up" button, you'll be directed to the account creation page. Fill in the required fields. ![](https://lh7-rt.googleusercontent.com/docsz/AD_4nXeTa5L9Y35EHaw3x_1deHMx-X38uDFDXsSHoWnH8StJyeTyXtyhjrNyE-8lZXYOs9VowZtU8YROdFEBT8mu0bmj2UPJKH1jm0FLNitJP8mguLnk4581Y88Sg0k8KFQaRFznTSpSyyc_Q30IF3eR2-Q3Il9p?key=JFFlnz_LjLklOxaAM5v3WQ) 3. After successfully logging into your Expo account, you'll land on the Dashboard. To start your first project, click on the "Create a Project" button prominently displayed in this section. ![](https://lh7-rt.googleusercontent.com/docsz/AD_4nXe2w_ylvT0FVEm1g9YStysOtl-t9z-MTjvwcg_HgW7qNmSCiKQYCj6q5fMwApe0vaCPHm6kSXliqdDpzJe6NFuK0H5ZMFnG8vR6VKb-mm_GTbpAWNWN7rcaTGFrQUZfx6N06070aM1bYzn4MxE5YFRP5pY6?key=JFFlnz_LjLklOxaAM5v3WQ) 4\. After clicking "Create a Project," a dialog window will open prompting you to enter specific details for your new project: 1. 1. Display Name: Enter a human-readable name for your project (e.g., "Mobile App"). This is how the project will be displayed within the Expo platform. 2. Slug: Provide a unique, URL-friendly name for your project (e.g., "mobile-app"). This slug will be used in the project's URL, so it should be unique across your account. ![](https://lh7-rt.googleusercontent.com/docsz/AD_4nXdLxkDlfDNxk_IHSvaqOoV0ebSgNtFvK-hAgWYNnWD-FdJMHK2oE2B2KV_4Xv3T8yXJiEVuKINcRWJ852VsSFeAUPqk5b6eWNgmBlWyb2byIBicORvNptYQyi0zjbKwD3JGvWqs4sy812HcUUs1CPDddZI?key=JFFlnz_LjLklOxaAM5v3WQ) 5. To ensure proper access for managing your projects, navigate to the Access Tokens section in the sidebar of the dashboard. Here, you can create and manage robot users. Robot Users: Create a robot user for automated processes or third-party integrations, click on the "Add robot" button. ![](https://lh7-rt.googleusercontent.com/docsz/AD_4nXchYOc0Kl_PBxnYM23ICat2_KiURdQYmpFiNsGenfmPh2TgBmz7IrAkFoDQML9zRicZQXdhyMtSuIM8gH1rJGNmHLz_LjwlJehWCZTjNxiSHFxo7rjH7TJw6PDvm21fpGoyMw1Pdv56R7iET1KMr6VZxH8?key=JFFlnz_LjLklOxaAM5v3WQ) Set the role to "Developer" ![](https://lh7-rt.googleusercontent.com/docsz/AD_4nXdbYOQNqcQcyER7eAydIHFks6Hsasihdmy5yfU2b4KI0JFJkYsEzOk8j2_SZm-I8-mFNVoehV1CVbsUae2OUAteTGeQNH8FgumbnWKT4_kVBl2YNBFVTSx4dCMKTbFEgd5veGJr9z1O9XprnR8yyfnLgNEs?key=JFFlnz_LjLklOxaAM5v3WQ) Click "Generate new token " button ![](https://lh7-rt.googleusercontent.com/docsz/AD_4nXeGKF47dxhgGWb6j5li1Vv3Pl-dwmju2wV180_AEQOiLc6BOw90GMn1O_Z9Y-XwsiuvrPPSb-bFOpgLG-h8ck5SJoSpJTjm6qdaCdZRAF85F5YuY-KF8AU18Io6JZs-3iCYTO12QN9Vx-QVLqroMYI73Mkj?key=JFFlnz_LjLklOxaAM5v3WQ) After creating your access token, it's vital to secure it properly. In the Access Tokens section, you will see your newly generated token listed, along with a warning indicating that you should copy and store it in a safe place. [![image.png](https://wiki.cloud.akvo.org/uploads/images/gallery/2024-09/scaled-1680-/pVVgLZPBOGK20Vlq-image.png)](https://wiki.cloud.akvo.org/uploads/images/gallery/2024-09/pVVgLZPBOGK20Vlq-image.png)